
home
>
Blog
>
Photography
>
The lighting techniques that you must master and know
Lighting techniques …
What is the most important thing in a photograph? To get a good photo you need a good photographic eye, creativity and an essential element without which we would not achieve anything: light. That’s right, whether you have the most powerful camera on the market or a variety of photographic lenses, we would not achieve anything if we do not have the lights on.
In fact, the word photography is made up of two words that mean draw (spelling) with light (photo). So the fundamental essence of every photo is light and the way we arrange it or take advantage of it. That is why at the end of this note you will not only know the light sources or the types of blurring. If not, we will tell you about the various lighting schemes and the results you can obtain with them. Prepared?
In this post, you will learn about:
Natural and artificial light sources
Before delving into lighting techniques, we must know the types of light sources that exist in photography. Remember that we are not exclusive and it is up to your creativity to make combinations.
Natural lighting in photography
 The lighting par excellence comes from the oldest source of energy that we know: the Sun. This natural lighting can be very useful but at the same time it can be very treacherous. For obvious reasons you will not be able to control it but you can take advantage of it to take spectacular photographs.
Remember that you can use tools like filters and light bouncers to manipulate the direction of the light and the level of contrast. On summer and spring days don’t be afraid to lower the ISO and take advantage of fast speeds. On cloudier days you will have to sacrifice the noise level and the speed of exposure.
Do you want to learn to master the manual mode of your camera? Take this course now
Artificial lighting in photography

Artificial lighting is achieved from sources created by man. Some objects that emit artificial light are lamps, reflectors, flash, or other electrical source. The biggest advantage of artificial lighting is that we can control it to our liking and it allows us to explore our more artistic sides. It is very useful especially for closed spaces. Some brands of professional lights can be: Neewer, Kino Light, Arri, El Gato, among others.
You don’t have to limit yourself to just using one type of lighting, you can test the results of mixing both light sources. Remember that the limit is your imagination and your best ally will always be light.
Become a professional photographer with our courses, available 24/7
Types of light diffusion
You already know the light sources that you can use for your photos, but before moving on to the techniques, it is important that you know the different types of light diffusion:
Hard light
Hard light refers to lighting where shadows have sharp, defined edges. This light has almost no blur so it generates high contrast. It strikes directly from the source to the object or person to be photographed, forming
 What does the hard light transmit to you?
This type of lighting by generating more defined shadows can be very useful for making images with a dramatic tone. Hard light is also related to the mysterious, aggressiveness and duality. So it is perfect for highlighting facial expressions.
When is hard light used?
This type of lighting is often used for close-up portraits and for athletes, mostly. It is widely used in street photography, since by not being able to blur the sunlight so easily it always generates this type of light.
This type of light tends to exaggerate skin textures, as well as blemishes like wrinkles and acne. The shiny parts of the face can also overexploit. So in the case of portrait photos remember to use a little makeup to soften these details.
Soft light
Soft light, contrary to hard light, the edges between the light and the shadow are in a gradient. This transition is smoother, the boundaries are sometimes imperceptible and flatter. Light can be generated by an artificial source and in a low intensity way.
What does soft light transmit to you?
This type of lighting is less dramatic and usually generates a feeling of tranquility, calm, and even tenderness. You can manipulate the diffusion of light and play with the emotions in your photo. There is a wider range to experiment with.

Ready, now we can start with the first technique. Do you know them?
Download these Luts for Premiere Pro for free and speed up your colorization
Light schemes in photography
Front light
This type of lighting is when the light source is directly in front of the object. It is a very simple and linear scheme. However, having all the light from the front generates flat photographs.
A flat photograph is when everything within the shot receives light and the shadows are scarce, which is why they flatten the object. In an image with frontal light, the shadows are projected hard behind the object, out of our frame.
With this light scheme you will be able to directly illuminate the object without elements that remove it from the foreground. However, it is not the preferred when taking portraits. Since objects with front light no longer have the three-dimensional feel.

Side light
In this scheme, the main light source is positioned on one side of the object to be photographed (180 °). The side light gets to shine mainly on one side of the object, creating shadows on the other half. This light can be harsh or it can be blurred. Try it so that you get very “mysterious” results within your images.
These shadows so that they are not too harsh can be manipulated with a fill light, from the other side of the object. It does not have the same power as our main light but it fills in the dark spaces a bit to reduce the sense of drama. As well as in the following example of photographs with side light.

Start your first photography business with Melero Studio
Semi-lateral light
The semi-lateral light scheme is one where the main light source is positioned at 45º from the object. We no longer have an object divided between light and shadow. This receives light more partially and creates a background with shadows.
In photos with semi-side light, shadows favor the depth of the subject. With this type of lighting you manage to give a documentary effect to the images. Like the front light, we can use a fill light to lower the intensity of the shadow.

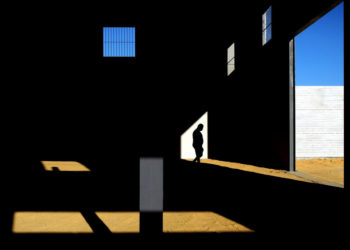
Backlighting
The backlit scheme is the reverse of the front light. Here we have the main light positioned just behind the object or person to generate a silhouette. The object becomes a shadow and the object’s colors are completely lost. It is very useful if you want to add suspense to your images.
In case you want to get this type of photograph with natural lighting, the perfect moment is at sunset. When we can position our model right in front of the sun.
Can you appease the shadows? Of course, here you can also use a secondary light to reduce the darkness of the shadows and experiment with the results.

Semi-backlight
In semi-backlit photos, the object is somewhere between backlight and side. The light source is positioned at 135 ° from the object, that is, it is placed in a corner of the object. Used to generate perspective and use shadows in close-ups.
This is the light scheme you can use for these types of photos, the fill is up to your creative eye.

Zenith light
We stopped experimenting with the radius of the object and now we are going to illuminate from above. In the Zenith Light scheme, the main light source must be placed above the object.
By using this overhead light effect, we only illuminate the top of objects. In the case of human models, the light falls on the head, illuminating the hair completely, partially the nose and shoulders. The rest is kept in harsh shadows, which can be blurred with a fill light.
This form of lighting builds suspense and helps a lot when taking choppy shots.

HOME PRODUCT PHOTO GUIDE
In this guide we will explain what product photography is and what elements you should consider to enrich the quality of your photos. For example: what to use as a background? Or where should the lighting be directed? Learn how to produce these types of photos at home!
Low light
In the case of low beam light, the light source is below the object or model, diagonally. This light must be placed at ground level. In this position, a large part of the body is illuminated and we have shadows on the face generated in the opposite way to which we are used to. That is why it is somewhat gloomy and is usually used for horror shots.
If we blur the shadows we can create shots that convey authority, since it makes our model increase in size and height.

Three-light scheme
The three-light scheme is one of the most used when taking pictures. In this we have three types of lights that help us to highlight the object, separate it from the background and eliminate very marked shadows.
How does the three-light scheme work? It’s very simple. We have a main light (key light), which falls on the object. The second light is the fill light, with this the shadows are removed from the environment of the object. The third is for the background (back light), and to be able to separate it from the object and add three-dimensionality to the shot. These last two lights have less intensity than the main light.

Time to paint with light
Now that you have all this knowledge in your hands, start planning the lighting for your next photo session. Remember that you can download the images and have them on hand to guide you when setting up the lighting for your set.
Spoken as a guide… We recommend you download our Photography eBook totally free that is waiting for you in our Resources section.
Discover more lighting techniques with our course “Photographic lighting techniques” with Matías Posti, an expert in the world of skateboarding, bmx, snowboarding and rollerblading images.
Sign up here


Discussion about this post