You’re stuck at home and you don’t know what to shoot. You have all the material you need, time, but nothing helps, you can’t find an idea. I revisited my archives to find a new idea for you, and this time it’s not a usual subject. Why don’t you take pictures of vegetables?
Taking pictures while staying at home: vegetables
You’re confined and you want to occupy your time by taking pictures. This is a great idea, and it can only help you make progress. I’ve already suggested that you do black and white or silhouette portraits. I have also invited you to photograph objects, here is a new and more atypical idea.
With a lot of luck you have a garden, a courtyard, a small plot of land outside your house.
With a little less luck, you only have a terrace or a balcony, but that will also be suitable for this exercise.
If you don’t have any of that, you can still follow, you just need to have a crisper in your fridge, preferably full (the crisper…).
Because we’re going to photograph the vegetables. Yes, we are.
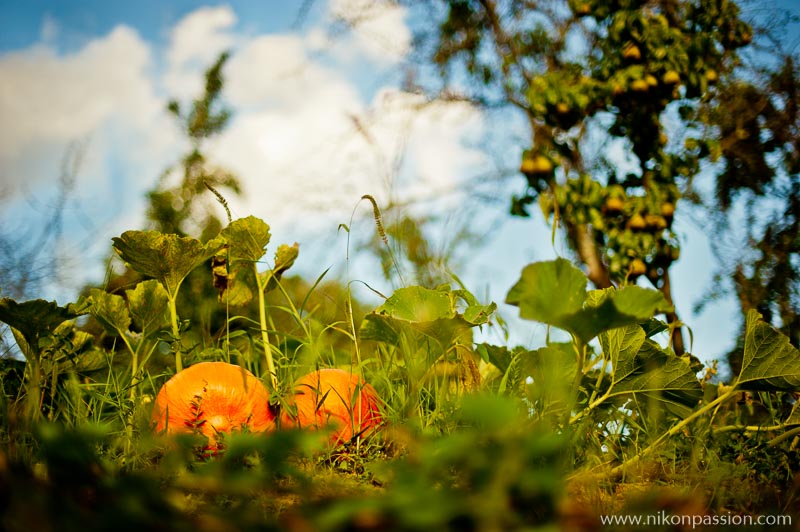
Nikon D700 + AF-S NIKKOR 50 mm f/1.4
1/4000th of a second. – f/1.4 – ISO 200
Preparation
Start by identifying a suitable location with a pleasant background. Avoid overly intrusive backgrounds, as they introduce unwanted elements into your photos and distract the eye.
Focus on the vegetable you are interested in, or have on hand.
Once you’ve spotted your victim, turn around as much as you can. Don’t just shoot from the front: get down, move left, right, go behind, come back, look for the right light, the right profile. You have time, take it.
Pay attention to the light, it will “make” the picture. Favour natural light, avoiding it to be too violent. This would accentuate the contrast by giving very light areas burnt out, and other very dark bites.
A grey sky is often preferable, especially if you can do without including this sky in the frame. Grey sky diffuses light, reduces contrasts, it’s much easier to manage than a blue sky in full sun at noon (read more).
Once you’ve decided on a frame, take a series of pictures by playing with the aperture. You will then be able to change the depth of field (read more), blur the background more or less.
For the photo that illustrates this subject, I chose the largest possible aperture on my AF-S NIKKOR 50 mm f/1.4 lens.
Depending on the focal length and the distance to the subject you will get a more or less sharp area, hence the importance of testing.
If you can, use your camera’s tilt screen to level yourself on the ground, or use a tripod to wedge your camera body into position. Be careful what you do if you’re on a balcony or terrace, don’t inadvertently go over the railing!
The shooting
When I took this picture, I wanted to highlight the orange colour of the two pumpkins in their green environment. The two colours go well together, the barely visible sky brings its discreet blue touch.
I couldn’t get too close, and I didn’t want to either. I wanted to plunge my two pumpkins into their environment with a bit of greenery in the foreground. But without it being too sharp, at the risk of looking away.
I focused on the vegetables, opening my diaphragm wide open, which allowed me to create a foreground and background blur.
If your decor does not lend itself to such an image because it is not pleasant, bend down, orient your case upwards, very slightly, so as to mask the decor and favour the sky. Don’t overdo it, or you risk seeing the perspectives tilt dangerously.
Treatment
I had a little fun with the aftercare. The initial image, raw, was neutral, the main colors didn’t stand out enough for my taste and the scenery was too present.
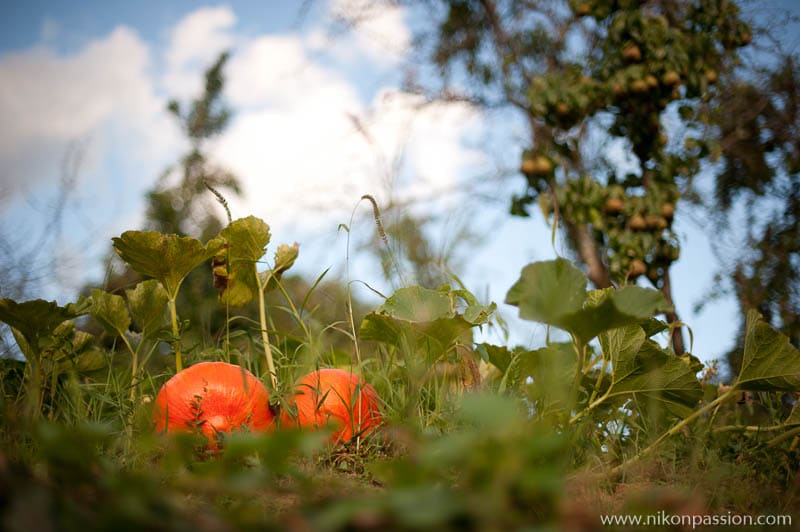
the photo before post-processing
I started by decreasing the exposure by 1/3 of Ev to recover density, before adjusting the white and black dots to fix my highlights and lowlights.
To highlight my subject, I adjusted the density on several areas of the image, using Lightroom’s brush tool. I could have done it in a more global way, but the point of post-processing is to experiment. Applying small touches of density + and density – here and there pleased me a lot.
To finish, I added vignetting, this defect that one always tries to correct (which one should not systematically do), clarity, a little vibrancy to push the green and orange and I adjusted the color temperature to have a warmer rendering.
I like the final image better. It’s personal, but I find it more interesting than the raw body JPG I could have made with the Nikon D700’s saturated (“bright”) Picture Control.
Taking pictures of vegetables: in conclusion
You don’t have to look very far for what you’ve got on hand, if that’s the case. A small piece of garden is enough, a flowerpot on a terrace too. Adapt yourself, whatever the subject, in the end, it’s the approach that counts.
By experimenting with this type of shooting, you will learn how to approach a subject that you may not be familiar with. You may not be attracted to it. You will learn how to present it from its best angle, how to look for the best light, the best post-processing. So many useful notions for all the other subjects!
Do you have some nice vegetable pictures to share after reading this topic? Take part in the dedicated photo challenge!


Discussion about this post