The automation of your camera allows you to adjust the exposure so that your photos are well exposed. He must be able to give you good photos and thwart the main pitfalls. By changing the exposure setting, however, you can do more creative photos, here’s how.
Lessons and personalized support to learn more with my photo training
Adjust exposure for creative photos
Basic principle
The correct exposure for a photo is the combination of three settings:
- the exposure time,
- the opening,
- ISO sensitivity.
By combining these settings in the best way, your camera’s automatic light metering gives you the ideal exposure. “Ideal” means your photo is neither too light nor too dark.
If the sky is bright, it should not be burnt. If the shadows are very dark, they should not be blocked. The main subject should be pleasing to the eye.
This default operation of your camera is the one you use most of the time. But adjusting exposure isn’t just about taking properly exposed photos. Besides, what does “correctly exposed” mean?
Exposure compensation
The exposure setting given by your camera can be corrected. This means that you have the right to modify the value given by the automatism to make creative photos that correspond to your desires. Why not brighten the scene, or darken it on the contrary (find out more)?
By correcting the exposure, you adapt the rendering of the photo to your wishes. To correct the exposure, you base yourself on the value given by the automatism, then you underexpose or overexpose. This means that you are changing:
- the exposure time with identical aperture and sensitivity,
- opening with identical exposure time and sensitivity,
- sensitivity with identical exposure time and opening.
This is the principle of the exposure triangle, one of the three settings affects the brightness of the photo, the other two remaining equal.
To correct the exposure, use the exposure compensation. On most cameras this is a dial to turn, a button to press before turning the dial, or a specific key. Consult your camera’s manual to find out how.
Creative photos: landscape photography
Auto exposure
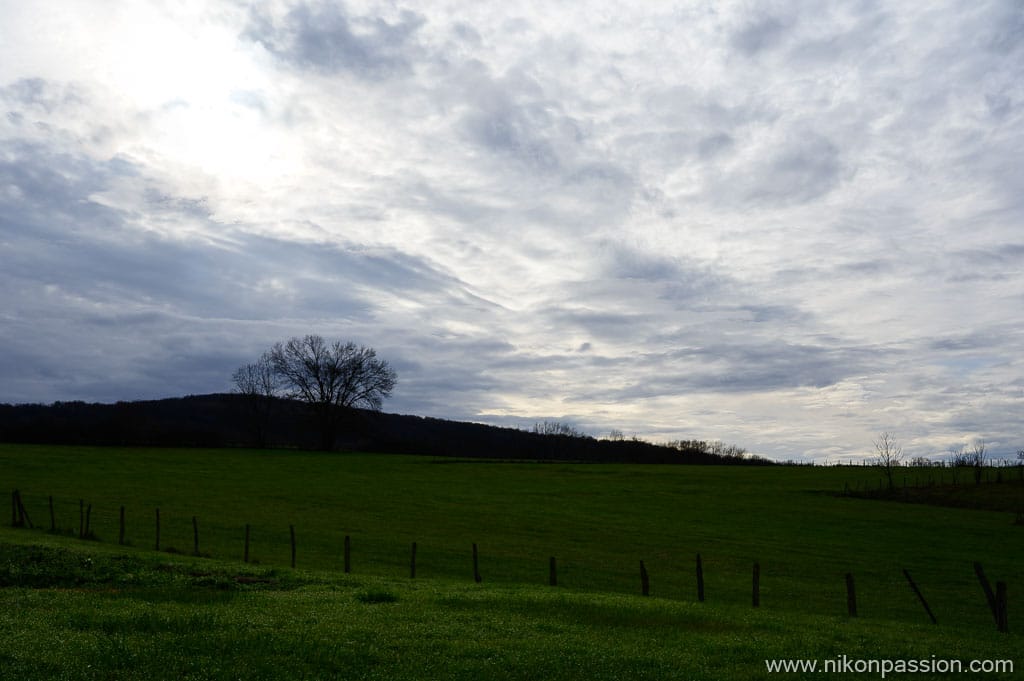
Exposure compensation: 0 Ev (measurement matrix automatic Nikon Z 6II)
The landscape photo above was taken in winter, you can see the sky is very bright with scorched areas while the field is poorly lit. The difficulty here is to adjust the exposure so that the sky is not too white, and that the details of the field are clearly visible.
At the edge of the sky and the earth you see a tree. Its branches are superimposed on the sky, causing a silhouette effect that can be of interest graphically. The hill in the background is hardly visible.
In the foreground, the barrier and the posts mark the space. It is a graphic element to be taken into consideration in the final rendering of the photo.
The average light measurement value given by the automation enables detail to be preserved in the sky as well as in the field. Clouds are visible, but the burnt area is large. Grass and poles are visible too, though the whole thing lacks detail.
It is a photo correctly exposed in the sense of automatism but very bland. By correcting the exposure, you can give it a whole new look.
Under exposure
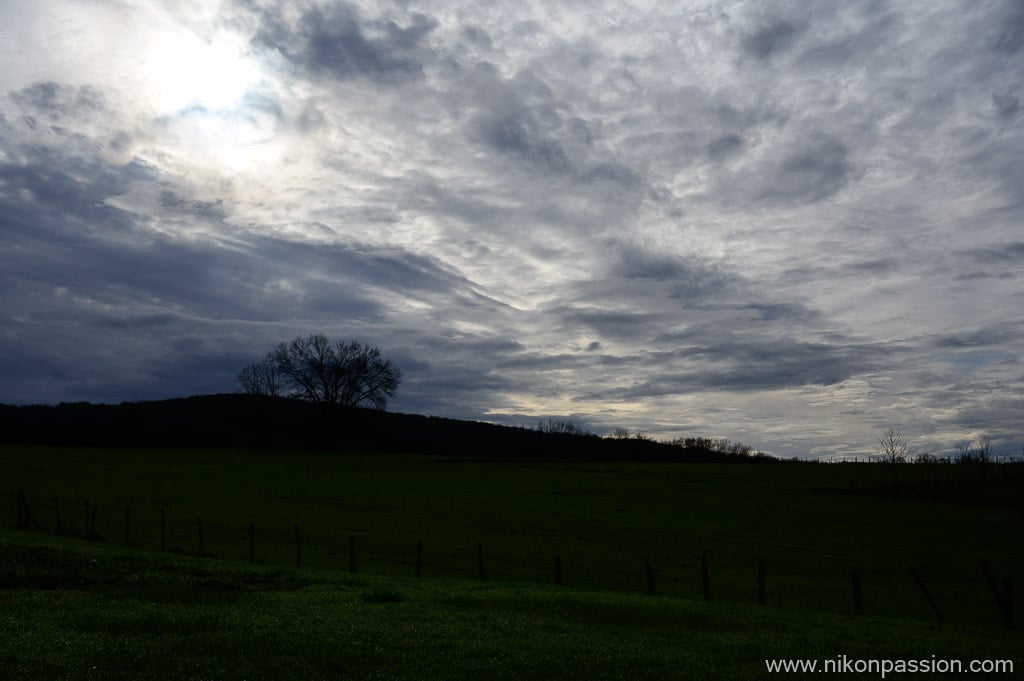
Exposure compensation: -1 Ev
On this second example, I underexposed by 1 Ev by changing the exposure time, at aperture (f / 8) and ISO 100 constant. The photo is darker, there is more detail in the sky, the clouds are more visible. The burnt areas are less important. The field is darker, it is more difficult to see the poles, as well as the details in the grass.
This version interests me because the patterns created by the clouds are more interesting. I also like the darker atmosphere better.
The field in the foreground, however, remains too dark for the result to suit me.
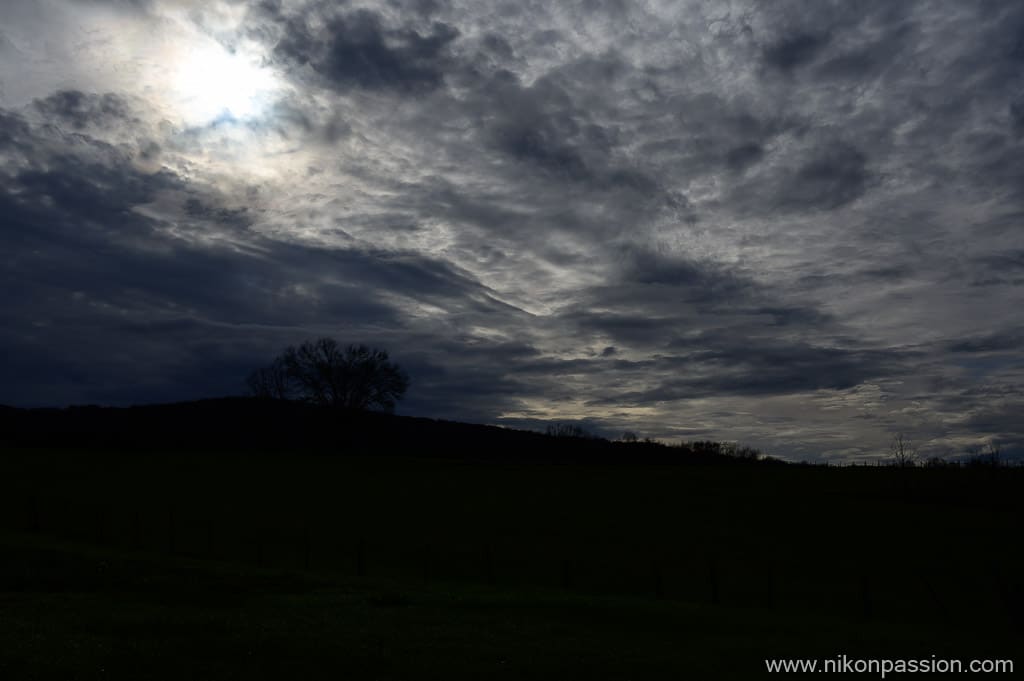
Exposure compensation: -2 Ev
For this third example I have underexposed 2 Ev. The foreground is very dark, the details are hardly visible anymore. The material in the sky, brought by the clouds, becomes interesting. The burnt area is reduced and the border between sky and earth is very graphic.
It may be interesting, but the overall rendering is still way too dark.
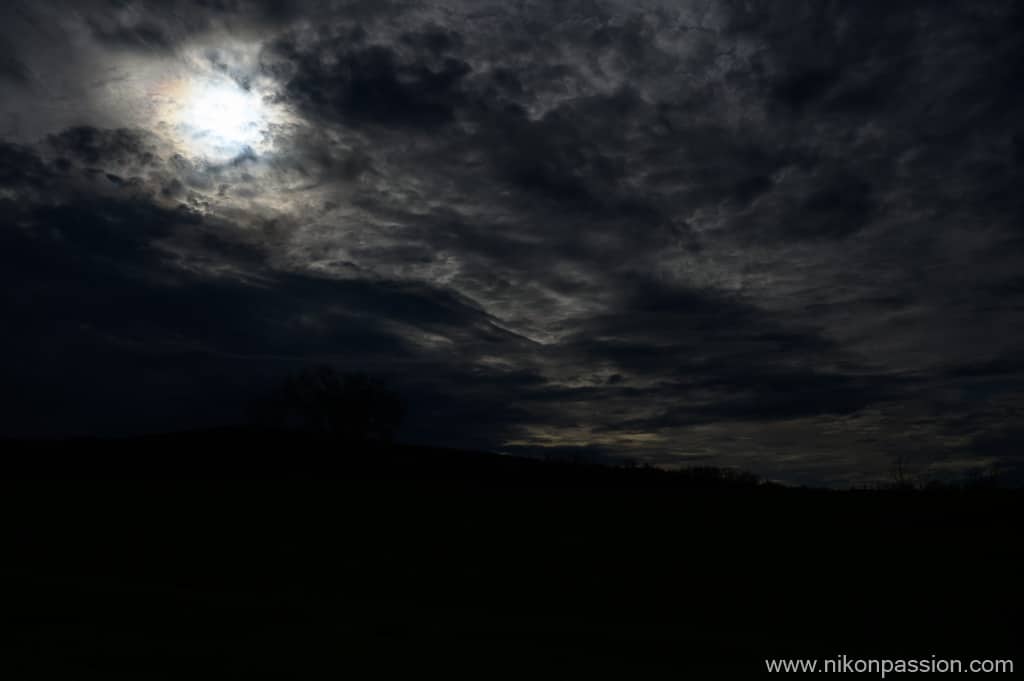
Exposure compensation: -3 Ev
To push the exercise to the end, I applied here an exposure correction of -3 Ev. If the foreground is completely dark, the sky takes on a new appearance. Dark clouds predominate, the sun appears behind the clouds. It is the previous very bright area that is hardly burnt here.
This demonstrates in passing the ability of the sensor to absorb the highlights. Test drive your camera to see how far it can go when it comes to dynamics. I will not keep this version as is, but the sky interests me.
Overexposure
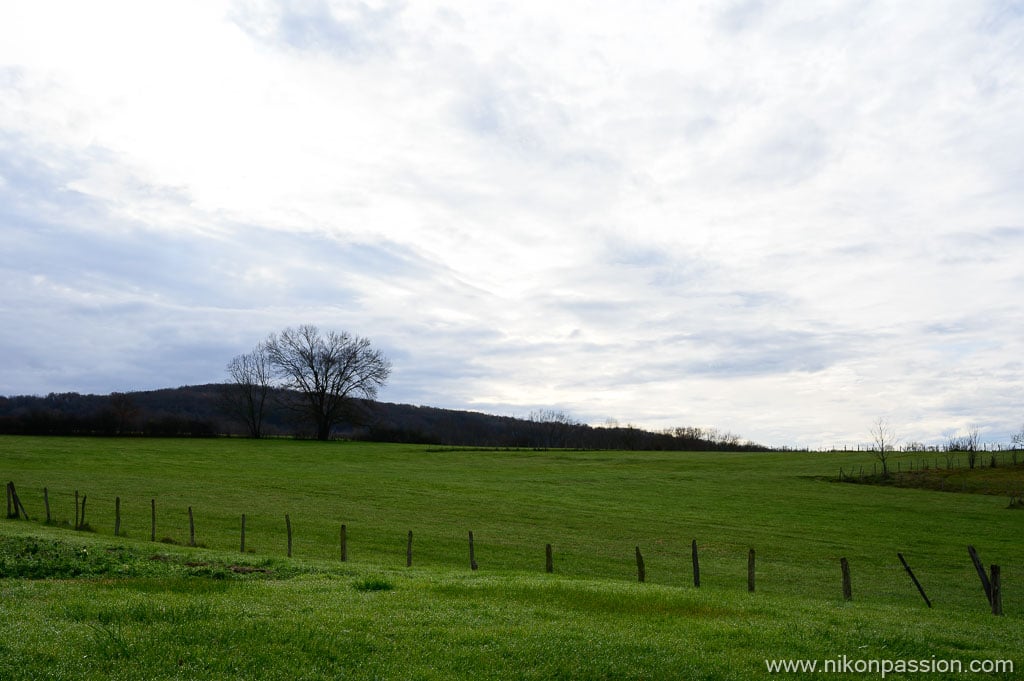
Exposure compensation: +1 Ev
For this fifth version of the photo, I applied an exposure compensation of +1 Ev. The rendering is totally different.
The foreground is bright, the details in the grass very visible, the fence posts too.
At the border of the earth and the sky you perceive many details in the trees and the branches, as well as the hill at the bottom. The sky is on the other hand very bright, this clear mass weighs down the photo, it is not interesting as it is.
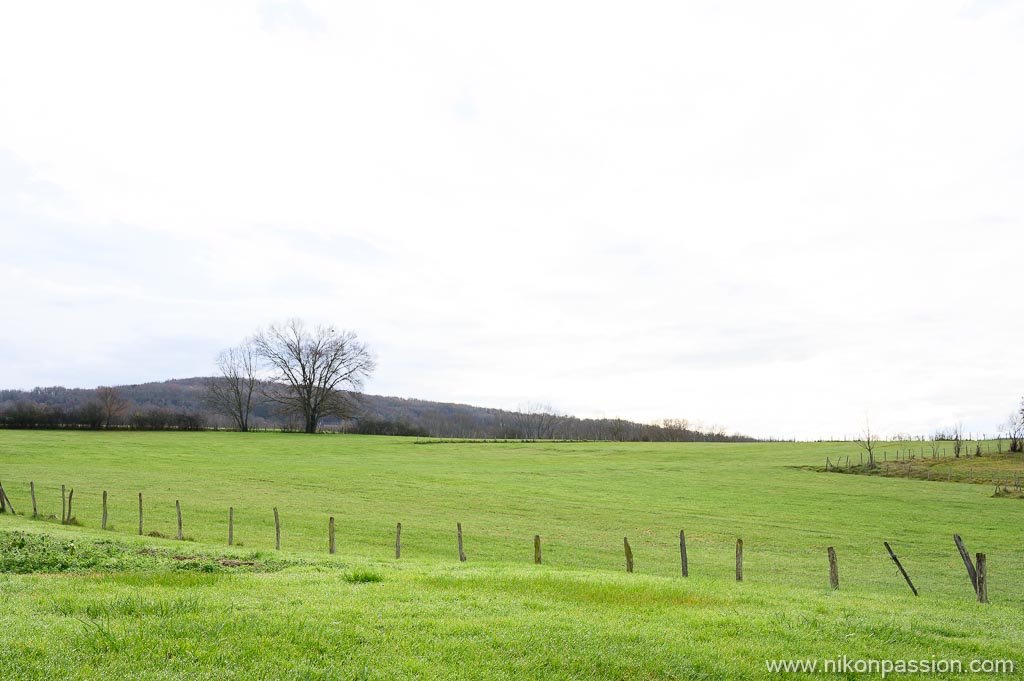
Exposure compensation: +2 Ev
In order to see what I could hope for from this scene and this light, I exhibited here at + 2 Ev. The sky is much whiter, much of it burnt. Cloud matter is no longer visible, its graphic interest is lost.
The field is very bright, too much for my taste. The general mood of the photo is very different. It’s almost hard to believe yourself in the middle of winter. I will not keep this version either, but this beautiful foreground brightness interests me.
What should we conclude from this?
By doing this, by successive variations of the exposure setting in one direction or the other, I can analyze the scene. Underexposure informs me about details available in very bright areas, overexposure gives me information about details available in dark areas.
My camera’s sensor is not able to record all of this dynamic range, this is normal. But by correcting the exposure, and working on the final rendering in post-processing, I will be able to adapt the final rendering of the image to my wishes.
Whenever you are faced with a scene like this, with a large gap between high and low lights, feel free to adjust the exposure by shifting it. This allows you to distinguish what is possible to see in light areas as well as in dark areas.
If you’re using an SLR, take multiple shots with exposure correcting and watch the rear screen to see what works best for you.
If you are using a hybrid, adjust the exposure before shooting, view the result in the viewfinder, and choose the value that suits you.
In both cases, use the RAW format to be able to correct in post processing. This is what we are going to do now.
Creative photos: refine the rendering in post-processing
Which version do you think I’m going to start with?
I chose to go from the underexposed -2 Ev version. It’s a personal choice, you could make another one, I took this version because it allows me to recover a maximum of details in the sky without losing anything in the foreground.
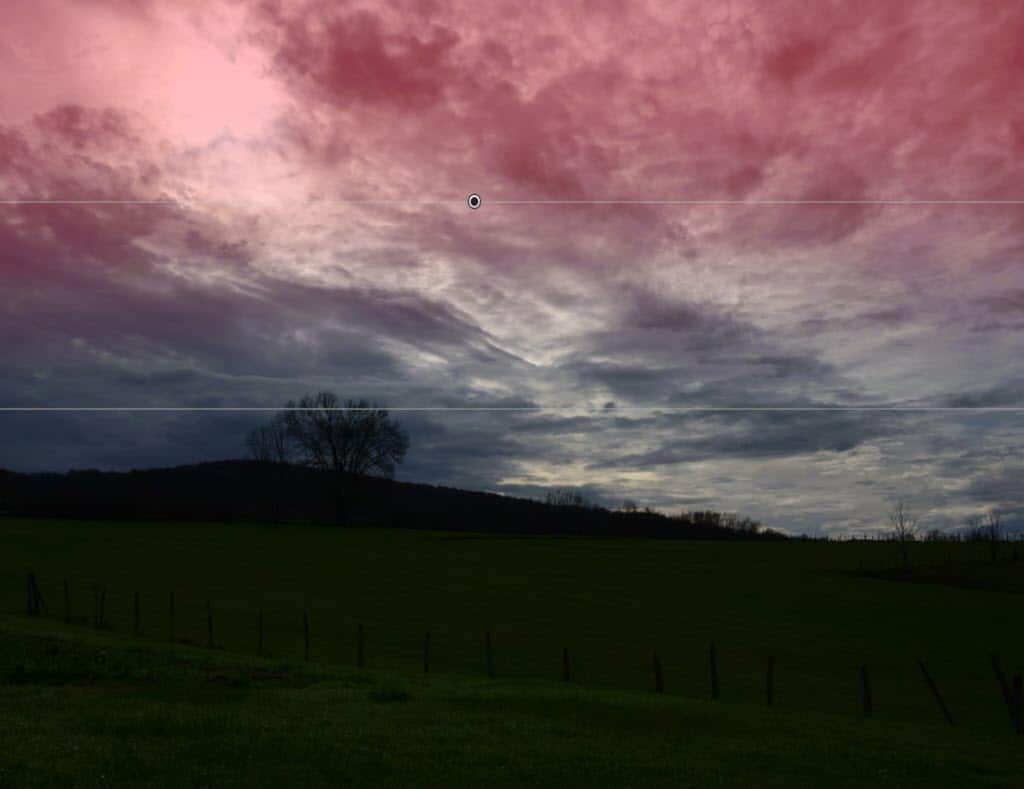
First, I adjust the exposure on the sky, I increase the exposure to recover material in the clouds without lightening the very bright area too much. I work it separately to reduce the highlights I assume the fact that the sun is burnt, there is a logic.
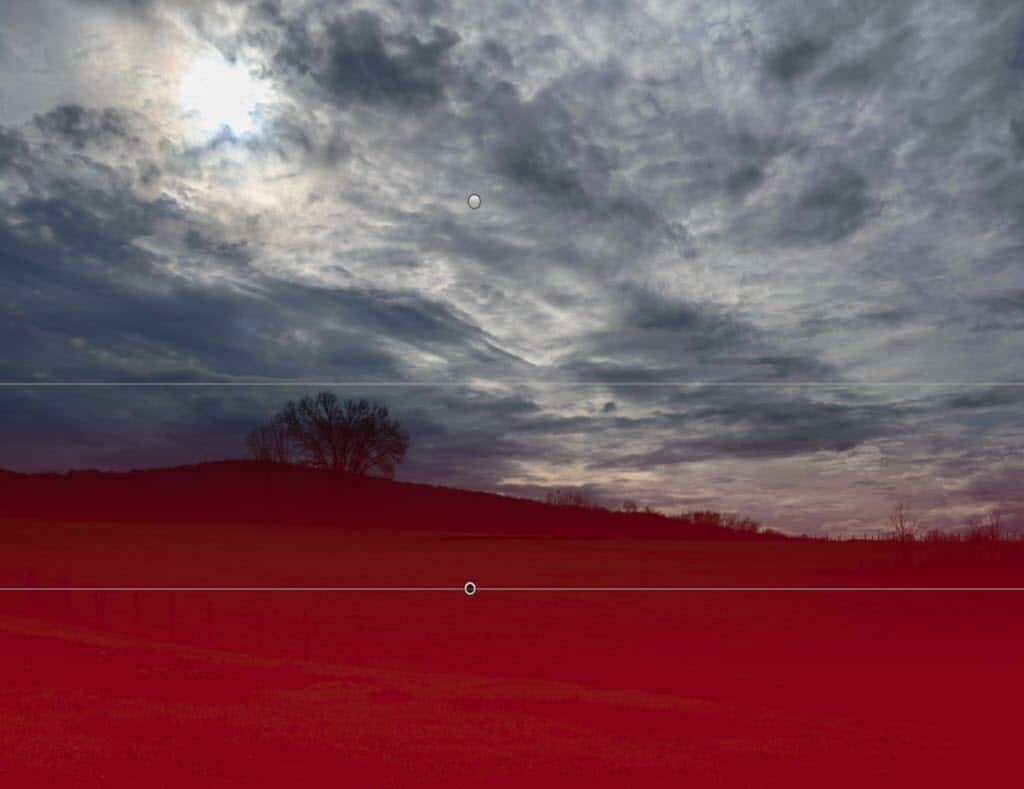
Secondly, I adjust the foreground by raising the exposure. I decrease the shadows adjustment, to bring out detail in the foreground, before the barrier.
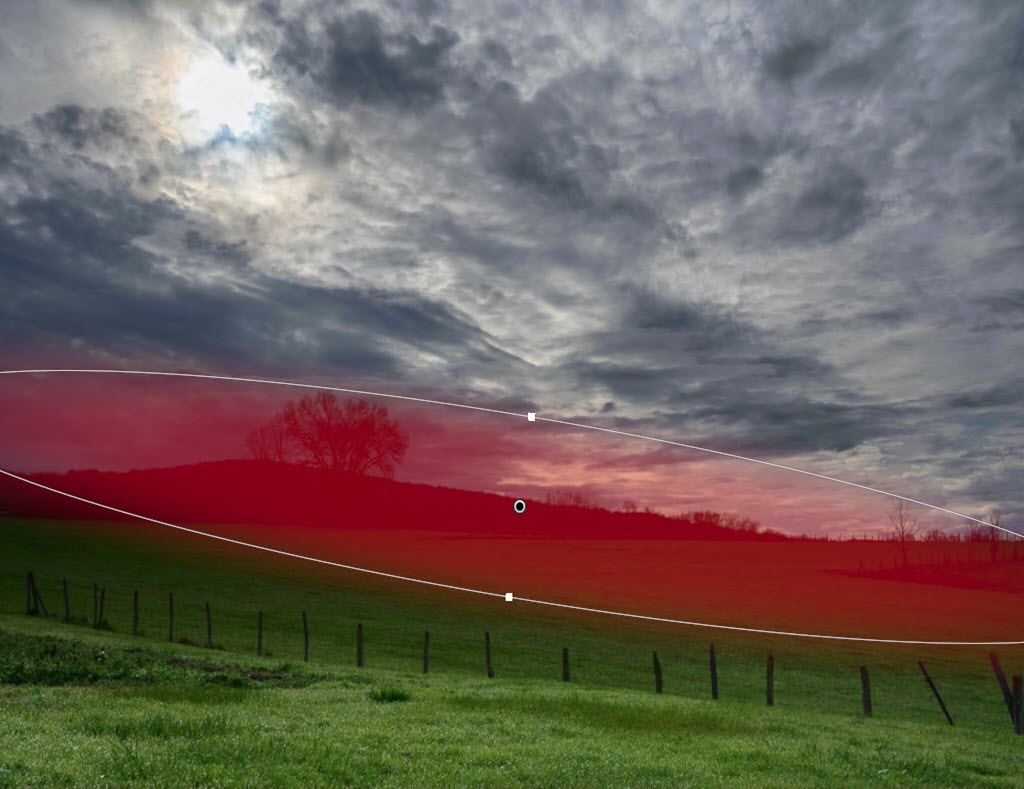
This first result does not satisfy me yet, I adjust the exposure on the intermediate part between the barrier and the trees. This allows me in passing to recover blue in the sky at the limit between sky and earth. The right part of the image becomes brighter.
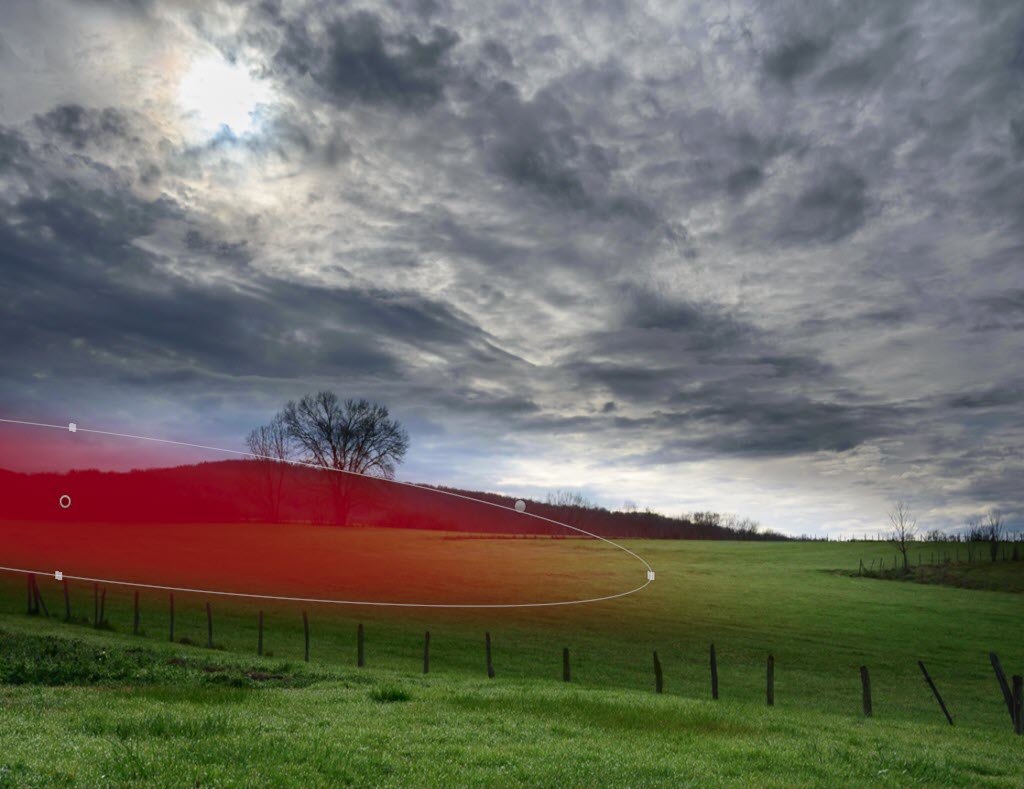
The left area under the tree being still very dark, I also lighten it up, making sure to make the link with the previous area. I could have treated this whole area at once, but I find it easier to do it in two passes, the precision is greater.
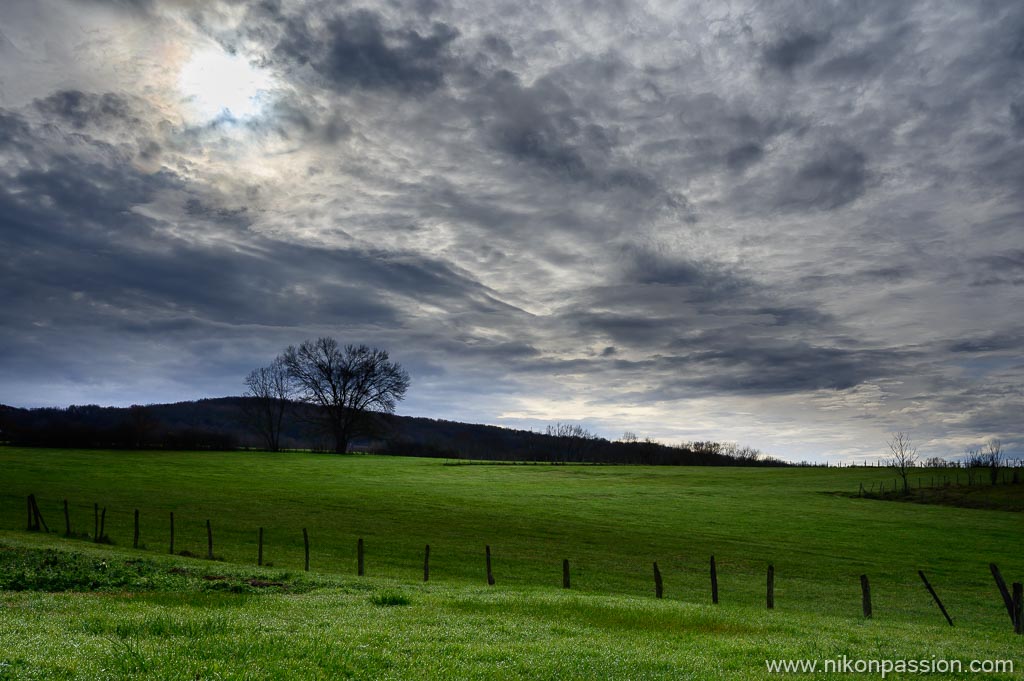
All I have to do is adjust the colors. I reinforce the greens and blues by increasing the luminance of these hues. Finally, I slightly increase the clarity on the whole image, it plays on the accentuation to reinforce the details. A few points of vibrancy allow me to reinforce the dark blue areas of the sky.
Creative photos and exposure correction: in conclusion
The approach implemented here allowed me to switch from a photo taken in automatic mode to a photo with personalized rendering.
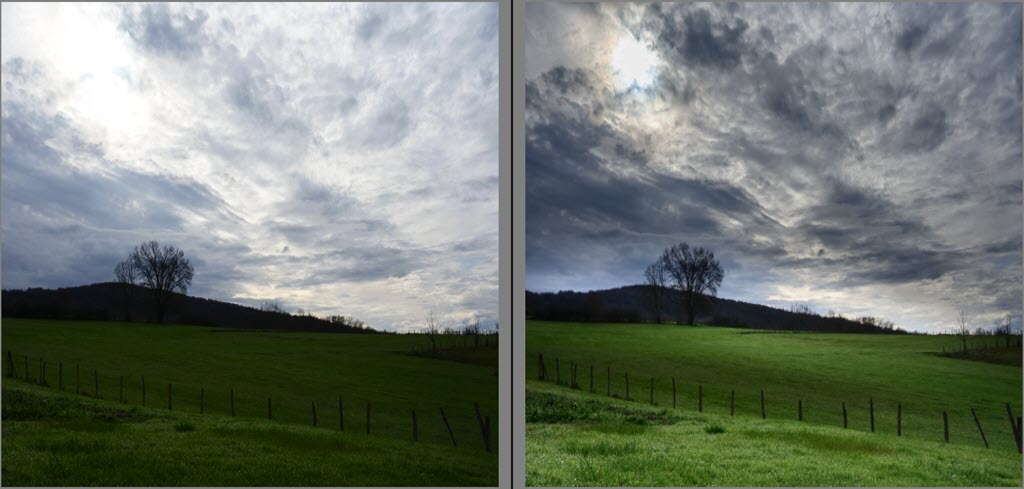
Before after
Some will prefer the original rendering, others will appreciate this brighter version. It doesn’t matter. What I’m trying to show you is that adjusting the exposure allows you to take creative photos with ease.
This photo would perhaps have deserved another treatment, an HDR fusion… all the solutions have an interest. Adjusting the exposure when shooting is still the easiest thing to do, however, even if you don’t do any final post-processing.
If you’re into the JPG format when shooting, correcting the exposure to your liking is a great way to make creative photos that won’t be “everyone else’s”.
Lessons and personalized support to learn more with my photo training
The automation of your camera allows you to adjust the exposure so that your photos are well exposed. He must be able to give you good photos and thwart the main pitfalls. By changing the exposure setting, however, you can do more creative photos, here’s how.

Lessons and personalized support to learn more with my photo training
Adjust exposure for creative photos
Basic principle
The correct exposure for a photo is the combination of three settings:
- the exposure time,
- the opening,
- ISO sensitivity.
By combining these settings in the best way, your camera’s automatic light metering gives you the ideal exposure. “Ideal” means your photo is neither too light nor too dark.
If the sky is bright, it should not be burnt. If the shadows are very dark, they should not be blocked. The main subject should be pleasing to the eye.
This default operation of your camera is the one you use most of the time. But adjusting exposure isn’t just about taking properly exposed photos. Besides, what does “correctly exposed” mean?
Exposure compensation
The exposure setting given by your camera can be corrected. This means that you have the right to modify the value given by the automatism to make creative photos that correspond to your desires. Why not brighten the scene, or darken it on the contrary (find out more)?
By correcting the exposure, you adapt the rendering of the photo to your wishes. To correct the exposure, you base yourself on the value given by the automatism, then you underexpose or overexpose. This means that you are changing:
- the exposure time with identical aperture and sensitivity,
- opening with identical exposure time and sensitivity,
- sensitivity with identical exposure time and opening.
This is the principle of the exposure triangle, one of the three settings affects the brightness of the photo, the other two remaining equal.
To correct the exposure, use the exposure compensation. On most cameras this is a dial to turn, a button to press before turning the dial, or a specific key. Consult your camera’s manual to find out how.
Creative photos: landscape photography
Auto exposure

Exposure compensation: 0 Ev (measurement matrix automatic Nikon Z 6II)
The landscape photo above was taken in winter, you can see the sky is very bright with scorched areas while the field is poorly lit. The difficulty here is to adjust the exposure so that the sky is not too white, and that the details of the field are clearly visible.
At the edge of the sky and the earth you see a tree. Its branches are superimposed on the sky, causing a silhouette effect that can be of interest graphically. The hill in the background is hardly visible.
In the foreground, the barrier and the posts mark the space. It is a graphic element to be taken into consideration in the final rendering of the photo.
The average light measurement value given by the automation enables detail to be preserved in the sky as well as in the field. Clouds are visible, but the burnt area is large. Grass and poles are visible too, though the whole thing lacks detail.
It is a photo correctly exposed in the sense of automatism but very bland. By correcting the exposure, you can give it a whole new look.
Under exposure

Exposure compensation: -1 Ev
On this second example, I underexposed by 1 Ev by changing the exposure time, at aperture (f / 8) and ISO 100 constant. The photo is darker, there is more detail in the sky, the clouds are more visible. The burnt areas are less important. The field is darker, it is more difficult to see the poles, as well as the details in the grass.
This version interests me because the patterns created by the clouds are more interesting. I also like the darker atmosphere better.
The field in the foreground, however, remains too dark for the result to suit me.

Exposure compensation: -2 Ev
For this third example I have underexposed 2 Ev. The foreground is very dark, the details are hardly visible anymore. The material in the sky, brought by the clouds, becomes interesting. The burnt area is reduced and the border between sky and earth is very graphic.
It may be interesting, but the overall rendering is still way too dark.

Exposure compensation: -3 Ev
To push the exercise to the end, I applied here an exposure correction of -3 Ev. If the foreground is completely dark, the sky takes on a new appearance. Dark clouds predominate, the sun appears behind the clouds. It is the previous very bright area that is hardly burnt here.
This demonstrates in passing the ability of the sensor to absorb the highlights. Test drive your camera to see how far it can go when it comes to dynamics. I will not keep this version as is, but the sky interests me.
Overexposure

Exposure compensation: +1 Ev
For this fifth version of the photo, I applied an exposure compensation of +1 Ev. The rendering is totally different.
The foreground is bright, the details in the grass very visible, the fence posts too.
At the border of the earth and the sky you perceive many details in the trees and the branches, as well as the hill at the bottom. The sky is on the other hand very bright, this clear mass weighs down the photo, it is not interesting as it is.

Exposure compensation: +2 Ev
In order to see what I could hope for from this scene and this light, I exhibited here at + 2 Ev. The sky is much whiter, much of it burnt. Cloud matter is no longer visible, its graphic interest is lost.
The field is very bright, too much for my taste. The general mood of the photo is very different. It’s almost hard to believe yourself in the middle of winter. I will not keep this version either, but this beautiful foreground brightness interests me.
What should we conclude from this?
By doing this, by successive variations of the exposure setting in one direction or the other, I can analyze the scene. Underexposure informs me about details available in very bright areas, overexposure gives me information about details available in dark areas.
My camera’s sensor is not able to record all of this dynamic range, this is normal. But by correcting the exposure, and working on the final rendering in post-processing, I will be able to adapt the final rendering of the image to my wishes.
Whenever you are faced with a scene like this, with a large gap between high and low lights, feel free to adjust the exposure by shifting it. This allows you to distinguish what is possible to see in light areas as well as in dark areas.
If you’re using an SLR, take multiple shots with exposure correcting and watch the rear screen to see what works best for you.
If you are using a hybrid, adjust the exposure before shooting, view the result in the viewfinder, and choose the value that suits you.
In both cases, use the RAW format to be able to correct in post processing. This is what we are going to do now.
Creative photos: refine the rendering in post-processing
Which version do you think I’m going to start with?
I chose to go from the underexposed -2 Ev version. It’s a personal choice, you could make another one, I took this version because it allows me to recover a maximum of details in the sky without losing anything in the foreground.

First, I adjust the exposure on the sky, I increase the exposure to recover material in the clouds without lightening the very bright area too much. I work it separately to reduce the highlights I assume the fact that the sun is burnt, there is a logic.

Secondly, I adjust the foreground by raising the exposure. I decrease the shadows adjustment, to bring out detail in the foreground, before the barrier.

This first result does not satisfy me yet, I adjust the exposure on the intermediate part between the barrier and the trees. This allows me in passing to recover blue in the sky at the limit between sky and earth. The right part of the image becomes brighter.

The left area under the tree being still very dark, I also lighten it up, making sure to make the link with the previous area. I could have treated this whole area at once, but I find it easier to do it in two passes, the precision is greater.

All I have to do is adjust the colors. I reinforce the greens and blues by increasing the luminance of these hues. Finally, I slightly increase the clarity on the whole image, it plays on the accentuation to reinforce the details. A few points of vibrancy allow me to reinforce the dark blue areas of the sky.
Creative photos and exposure correction: in conclusion
The approach implemented here allowed me to switch from a photo taken in automatic mode to a photo with personalized rendering.

Before after
Some will prefer the original rendering, others will appreciate this brighter version. It doesn’t matter. What I’m trying to show you is that adjusting the exposure allows you to take creative photos with ease.
This photo would perhaps have deserved another treatment, an HDR fusion… all the solutions have an interest. Adjusting the exposure when shooting is still the easiest thing to do, however, even if you don’t do any final post-processing.
If you’re into the JPG format when shooting, correcting the exposure to your liking is a great way to make creative photos that won’t be “everyone else’s”.
Lessons and personalized support to learn more with my photo training
The automation of your camera allows you to adjust the exposure so that your photos are well exposed. He must be able to give you good photos and thwart the main pitfalls. By changing the exposure setting, however, you can do more creative photos, here’s how.

Lessons and personalized support to learn more with my photo training
Adjust exposure for creative photos
Basic principle
The correct exposure for a photo is the combination of three settings:
- the exposure time,
- the opening,
- ISO sensitivity.
By combining these settings in the best way, your camera’s automatic light metering gives you the ideal exposure. “Ideal” means your photo is neither too light nor too dark.
If the sky is bright, it should not be burnt. If the shadows are very dark, they should not be blocked. The main subject should be pleasing to the eye.
This default operation of your camera is the one you use most of the time. But adjusting exposure isn’t just about taking properly exposed photos. Besides, what does “correctly exposed” mean?
Exposure compensation
The exposure setting given by your camera can be corrected. This means that you have the right to modify the value given by the automatism to make creative photos that correspond to your desires. Why not brighten the scene, or darken it on the contrary (find out more)?
By correcting the exposure, you adapt the rendering of the photo to your wishes. To correct the exposure, you base yourself on the value given by the automatism, then you underexpose or overexpose. This means that you are changing:
- the exposure time with identical aperture and sensitivity,
- opening with identical exposure time and sensitivity,
- sensitivity with identical exposure time and opening.
This is the principle of the exposure triangle, one of the three settings affects the brightness of the photo, the other two remaining equal.
To correct the exposure, use the exposure compensation. On most cameras this is a dial to turn, a button to press before turning the dial, or a specific key. Consult your camera’s manual to find out how.
Creative photos: landscape photography
Auto exposure

Exposure compensation: 0 Ev (measurement matrix automatic Nikon Z 6II)
The landscape photo above was taken in winter, you can see the sky is very bright with scorched areas while the field is poorly lit. The difficulty here is to adjust the exposure so that the sky is not too white, and that the details of the field are clearly visible.
At the edge of the sky and the earth you see a tree. Its branches are superimposed on the sky, causing a silhouette effect that can be of interest graphically. The hill in the background is hardly visible.
In the foreground, the barrier and the posts mark the space. It is a graphic element to be taken into consideration in the final rendering of the photo.
The average light measurement value given by the automation enables detail to be preserved in the sky as well as in the field. Clouds are visible, but the burnt area is large. Grass and poles are visible too, though the whole thing lacks detail.
It is a photo correctly exposed in the sense of automatism but very bland. By correcting the exposure, you can give it a whole new look.
Under exposure

Exposure compensation: -1 Ev
On this second example, I underexposed by 1 Ev by changing the exposure time, at aperture (f / 8) and ISO 100 constant. The photo is darker, there is more detail in the sky, the clouds are more visible. The burnt areas are less important. The field is darker, it is more difficult to see the poles, as well as the details in the grass.
This version interests me because the patterns created by the clouds are more interesting. I also like the darker atmosphere better.
The field in the foreground, however, remains too dark for the result to suit me.

Exposure compensation: -2 Ev
For this third example I have underexposed 2 Ev. The foreground is very dark, the details are hardly visible anymore. The material in the sky, brought by the clouds, becomes interesting. The burnt area is reduced and the border between sky and earth is very graphic.
It may be interesting, but the overall rendering is still way too dark.

Exposure compensation: -3 Ev
To push the exercise to the end, I applied here an exposure correction of -3 Ev. If the foreground is completely dark, the sky takes on a new appearance. Dark clouds predominate, the sun appears behind the clouds. It is the previous very bright area that is hardly burnt here.
This demonstrates in passing the ability of the sensor to absorb the highlights. Test drive your camera to see how far it can go when it comes to dynamics. I will not keep this version as is, but the sky interests me.
Overexposure

Exposure compensation: +1 Ev
For this fifth version of the photo, I applied an exposure compensation of +1 Ev. The rendering is totally different.
The foreground is bright, the details in the grass very visible, the fence posts too.
At the border of the earth and the sky you perceive many details in the trees and the branches, as well as the hill at the bottom. The sky is on the other hand very bright, this clear mass weighs down the photo, it is not interesting as it is.

Exposure compensation: +2 Ev
In order to see what I could hope for from this scene and this light, I exhibited here at + 2 Ev. The sky is much whiter, much of it burnt. Cloud matter is no longer visible, its graphic interest is lost.
The field is very bright, too much for my taste. The general mood of the photo is very different. It’s almost hard to believe yourself in the middle of winter. I will not keep this version either, but this beautiful foreground brightness interests me.
What should we conclude from this?
By doing this, by successive variations of the exposure setting in one direction or the other, I can analyze the scene. Underexposure informs me about details available in very bright areas, overexposure gives me information about details available in dark areas.
My camera’s sensor is not able to record all of this dynamic range, this is normal. But by correcting the exposure, and working on the final rendering in post-processing, I will be able to adapt the final rendering of the image to my wishes.
Whenever you are faced with a scene like this, with a large gap between high and low lights, feel free to adjust the exposure by shifting it. This allows you to distinguish what is possible to see in light areas as well as in dark areas.
If you’re using an SLR, take multiple shots with exposure correcting and watch the rear screen to see what works best for you.
If you are using a hybrid, adjust the exposure before shooting, view the result in the viewfinder, and choose the value that suits you.
In both cases, use the RAW format to be able to correct in post processing. This is what we are going to do now.
Creative photos: refine the rendering in post-processing
Which version do you think I’m going to start with?
I chose to go from the underexposed -2 Ev version. It’s a personal choice, you could make another one, I took this version because it allows me to recover a maximum of details in the sky without losing anything in the foreground.

First, I adjust the exposure on the sky, I increase the exposure to recover material in the clouds without lightening the very bright area too much. I work it separately to reduce the highlights I assume the fact that the sun is burnt, there is a logic.

Secondly, I adjust the foreground by raising the exposure. I decrease the shadows adjustment, to bring out detail in the foreground, before the barrier.

This first result does not satisfy me yet, I adjust the exposure on the intermediate part between the barrier and the trees. This allows me in passing to recover blue in the sky at the limit between sky and earth. The right part of the image becomes brighter.

The left area under the tree being still very dark, I also lighten it up, making sure to make the link with the previous area. I could have treated this whole area at once, but I find it easier to do it in two passes, the precision is greater.

All I have to do is adjust the colors. I reinforce the greens and blues by increasing the luminance of these hues. Finally, I slightly increase the clarity on the whole image, it plays on the accentuation to reinforce the details. A few points of vibrancy allow me to reinforce the dark blue areas of the sky.
Creative photos and exposure correction: in conclusion
The approach implemented here allowed me to switch from a photo taken in automatic mode to a photo with personalized rendering.

Before after
Some will prefer the original rendering, others will appreciate this brighter version. It doesn’t matter. What I’m trying to show you is that adjusting the exposure allows you to take creative photos with ease.
This photo would perhaps have deserved another treatment, an HDR fusion… all the solutions have an interest. Adjusting the exposure when shooting is still the easiest thing to do, however, even if you don’t do any final post-processing.
If you’re into the JPG format when shooting, correcting the exposure to your liking is a great way to make creative photos that won’t be “everyone else’s”.
Lessons and personalized support to learn more with my photo training
The automation of your camera allows you to adjust the exposure so that your photos are well exposed. He must be able to give you good photos and thwart the main pitfalls. By changing the exposure setting, however, you can do more creative photos, here’s how.

Lessons and personalized support to learn more with my photo training
Adjust exposure for creative photos
Basic principle
The correct exposure for a photo is the combination of three settings:
- the exposure time,
- the opening,
- ISO sensitivity.
By combining these settings in the best way, your camera’s automatic light metering gives you the ideal exposure. “Ideal” means your photo is neither too light nor too dark.
If the sky is bright, it should not be burnt. If the shadows are very dark, they should not be blocked. The main subject should be pleasing to the eye.
This default operation of your camera is the one you use most of the time. But adjusting exposure isn’t just about taking properly exposed photos. Besides, what does “correctly exposed” mean?
Exposure compensation
The exposure setting given by your camera can be corrected. This means that you have the right to modify the value given by the automatism to make creative photos that correspond to your desires. Why not brighten the scene, or darken it on the contrary (find out more)?
By correcting the exposure, you adapt the rendering of the photo to your wishes. To correct the exposure, you base yourself on the value given by the automatism, then you underexpose or overexpose. This means that you are changing:
- the exposure time with identical aperture and sensitivity,
- opening with identical exposure time and sensitivity,
- sensitivity with identical exposure time and opening.
This is the principle of the exposure triangle, one of the three settings affects the brightness of the photo, the other two remaining equal.
To correct the exposure, use the exposure compensation. On most cameras this is a dial to turn, a button to press before turning the dial, or a specific key. Consult your camera’s manual to find out how.
Creative photos: landscape photography
Auto exposure

Exposure compensation: 0 Ev (measurement matrix automatic Nikon Z 6II)
The landscape photo above was taken in winter, you can see the sky is very bright with scorched areas while the field is poorly lit. The difficulty here is to adjust the exposure so that the sky is not too white, and that the details of the field are clearly visible.
At the edge of the sky and the earth you see a tree. Its branches are superimposed on the sky, causing a silhouette effect that can be of interest graphically. The hill in the background is hardly visible.
In the foreground, the barrier and the posts mark the space. It is a graphic element to be taken into consideration in the final rendering of the photo.
The average light measurement value given by the automation enables detail to be preserved in the sky as well as in the field. Clouds are visible, but the burnt area is large. Grass and poles are visible too, though the whole thing lacks detail.
It is a photo correctly exposed in the sense of automatism but very bland. By correcting the exposure, you can give it a whole new look.
Under exposure

Exposure compensation: -1 Ev
On this second example, I underexposed by 1 Ev by changing the exposure time, at aperture (f / 8) and ISO 100 constant. The photo is darker, there is more detail in the sky, the clouds are more visible. The burnt areas are less important. The field is darker, it is more difficult to see the poles, as well as the details in the grass.
This version interests me because the patterns created by the clouds are more interesting. I also like the darker atmosphere better.
The field in the foreground, however, remains too dark for the result to suit me.

Exposure compensation: -2 Ev
For this third example I have underexposed 2 Ev. The foreground is very dark, the details are hardly visible anymore. The material in the sky, brought by the clouds, becomes interesting. The burnt area is reduced and the border between sky and earth is very graphic.
It may be interesting, but the overall rendering is still way too dark.

Exposure compensation: -3 Ev
To push the exercise to the end, I applied here an exposure correction of -3 Ev. If the foreground is completely dark, the sky takes on a new appearance. Dark clouds predominate, the sun appears behind the clouds. It is the previous very bright area that is hardly burnt here.
This demonstrates in passing the ability of the sensor to absorb the highlights. Test drive your camera to see how far it can go when it comes to dynamics. I will not keep this version as is, but the sky interests me.
Overexposure

Exposure compensation: +1 Ev
For this fifth version of the photo, I applied an exposure compensation of +1 Ev. The rendering is totally different.
The foreground is bright, the details in the grass very visible, the fence posts too.
At the border of the earth and the sky you perceive many details in the trees and the branches, as well as the hill at the bottom. The sky is on the other hand very bright, this clear mass weighs down the photo, it is not interesting as it is.

Exposure compensation: +2 Ev
In order to see what I could hope for from this scene and this light, I exhibited here at + 2 Ev. The sky is much whiter, much of it burnt. Cloud matter is no longer visible, its graphic interest is lost.
The field is very bright, too much for my taste. The general mood of the photo is very different. It’s almost hard to believe yourself in the middle of winter. I will not keep this version either, but this beautiful foreground brightness interests me.
What should we conclude from this?
By doing this, by successive variations of the exposure setting in one direction or the other, I can analyze the scene. Underexposure informs me about details available in very bright areas, overexposure gives me information about details available in dark areas.
My camera’s sensor is not able to record all of this dynamic range, this is normal. But by correcting the exposure, and working on the final rendering in post-processing, I will be able to adapt the final rendering of the image to my wishes.
Whenever you are faced with a scene like this, with a large gap between high and low lights, feel free to adjust the exposure by shifting it. This allows you to distinguish what is possible to see in light areas as well as in dark areas.
If you’re using an SLR, take multiple shots with exposure correcting and watch the rear screen to see what works best for you.
If you are using a hybrid, adjust the exposure before shooting, view the result in the viewfinder, and choose the value that suits you.
In both cases, use the RAW format to be able to correct in post processing. This is what we are going to do now.
Creative photos: refine the rendering in post-processing
Which version do you think I’m going to start with?
I chose to go from the underexposed -2 Ev version. It’s a personal choice, you could make another one, I took this version because it allows me to recover a maximum of details in the sky without losing anything in the foreground.

First, I adjust the exposure on the sky, I increase the exposure to recover material in the clouds without lightening the very bright area too much. I work it separately to reduce the highlights I assume the fact that the sun is burnt, there is a logic.

Secondly, I adjust the foreground by raising the exposure. I decrease the shadows adjustment, to bring out detail in the foreground, before the barrier.

This first result does not satisfy me yet, I adjust the exposure on the intermediate part between the barrier and the trees. This allows me in passing to recover blue in the sky at the limit between sky and earth. The right part of the image becomes brighter.

The left area under the tree being still very dark, I also lighten it up, making sure to make the link with the previous area. I could have treated this whole area at once, but I find it easier to do it in two passes, the precision is greater.

All I have to do is adjust the colors. I reinforce the greens and blues by increasing the luminance of these hues. Finally, I slightly increase the clarity on the whole image, it plays on the accentuation to reinforce the details. A few points of vibrancy allow me to reinforce the dark blue areas of the sky.
Creative photos and exposure correction: in conclusion
The approach implemented here allowed me to switch from a photo taken in automatic mode to a photo with personalized rendering.

Before after
Some will prefer the original rendering, others will appreciate this brighter version. It doesn’t matter. What I’m trying to show you is that adjusting the exposure allows you to take creative photos with ease.
This photo would perhaps have deserved another treatment, an HDR fusion… all the solutions have an interest. Adjusting the exposure when shooting is still the easiest thing to do, however, even if you don’t do any final post-processing.
If you’re into the JPG format when shooting, correcting the exposure to your liking is a great way to make creative photos that won’t be “everyone else’s”.
Lessons and personalized support to learn more with my photo training



Discussion about this post