![🌌Night photography: the tips they never told you [2021]](https://big-photography.com/wp-content/uploads/2021/03/blog.jpg)
home
>
Blog
>
Photography
>
Night photography: you will never go out at night without your camera
Night photography: no …
Most of the photos we see every day are taken in broad daylight. Nevertheless, night photography is different. It has a mysterious and striking touch, since it usually shows us what our eyes cannot see with the naked eye. Even a simple photograph of a street becomes more interesting if you take it at night.
While shooting night photography is quite exhilarating, getting the correct exposure and proper focus in the dark can be challenging and difficult to achieve. In this article we will tell you the basics about night photography and we will give you the best tips so you know how to expose your photos and focus them at night. 📸
Are you ready to enter the world of night photography? Join us!
Index
- Night Photography: What is it?
- What do I need to do night photography?
- How to expose a night photograph correctly?
-
Night photography: the best tips to master it
The night photography It is an activity that consists of taking photos at night in open spaces or outdoors and is a very common practice in street photography. It is a way of representing and portraying the world we live in in unusual light conditions.
Night photography tends to evoke deep emotions and a feeling of abandonment or emptiness that is difficult to achieve with photographs taken in daylight.
Taking night photography requires some technical knowledge and a lot of imagination. In the following paragraphs we will tell you what you need to know to master the art of taking photos at night. 🌃
The first thing we have to be clear about is what equipment we will need to do night photography. The good news is that the only additional material you will need is a tripod, besides your camera Y target.
When taking photos in dark lighting conditions, we will need a longer shutter speed, which will allow us to capture enough light to expose our photos correctly. This implies that we will have to hold our camera firmly and move it as little as possible, which is why we need a tripod.
Source: Passion Passport
A remote Switch can also be very useful if we want the camera to remain stable and not suffer any type of vibration. If you don’t have one of these, you can choose to use the camera’s timer to avoid any contact with it when taking the picture.

Although they are not essential, these elements can be very useful when taking night photography.
A flashlight: Since you will shoot at night, it will serve to illuminate the controls of your camera, place your tripod and manipulate or find other accessories that you have in your briefcase or camera case. The flashlight of your cell phone can also be useful for this, but it is advisable to have a flashlight so as not to drain the entire battery of your cell phone in case you need to use a complementary cell phone application.
Lens hood: Since we will be shooting at night, it is very likely that we will have light sources (from the street, LED or neon) that come from different directions. The lens hood will help us avoid unwanted flashes of light.
Extra replacement battery: When taking night photography, we will need to do a lot of long exposures, we will use Live View, and we will probably be in cold weather conditions. This means that our battery will drain quickly, so it is very important to have spare batteries 100% charged.
If what we want is to capture photos of the sky, we also have to take into account the weather conditions. If you can, download some astronomy application that helps you to know the location of the constellations, the moon and the milky way. We recommend Star Walk 2, SkyView Lite, and PhotoPills.
Find out how to choose the shutter, aperture and ISO values to expose your night photos correctly.
Shutter speed for night photography
When we take pictures in the daytime, we tend to use a faster shutter speed. If we want to take photos at night, we will need to choose one shutter speed equal to or longer than one second. When shooting in the dark, the camera will need a longer exposure in order to register more light and expose the photo correctly.
This also means that we will need a tripod, as the shutter will be open longer. We definitely don’t want our image to be unintentionally out of focus or shaky. Using a tripod will give us the freedom to experiment with the exposure times we want.
Aperture for night photography
As you already know, the diaphragm aperture is the lens device that affects the depth of field and that allows more or less light to enter the camera in relation to the shutter speed.
Most of the time, the background of our photos at night will be black or very dark, so if we are just starting out, depth of field is not something we should focus on as much. The difference between taking photos during the day and at night in terms of exposure is that, if we use a small aperture, we will need a very long shutter speed.
The fact that our camera requires more light and does not need a large depth of field means that most photographers do not use high aperture values when shooting at night.
ISO
ISO, which measures the sensitivity to light of our digital sensor, is the third pillar of exposure in photography. A high ISO value will make our camera sensor more sensitive to light, and therefore we can use a shorter shutter speed or a more closed aperture.
The higher our ISO, the more noise or grain our photos will have, so try to avoid using too high an ISO value. When using a tripod, we will not need to choose a very high ISO value, since it will allow us to choose a longer shutter speed that allows enough light to enter the sensor.
If we want to portray a moving subject or we find ourselves in a situation where we cannot use a tripod, increasing the ISO can be a good resource.
If you shoot in aperture priority mode, which is the most common for night photography, you will only have to choose the aperture and the ISO. A good starting point for the aperture is f / 5.6. It won’t give you too much depth of field but it will allow enough light to enter. You can then choose an ISO 400 value, which is high enough not to use too long a shutter speed.
Don’t have a professional camera? Learn how to take stunning photos with your smartphone
Once you have your camera configured (and placed on the tripod), you can start shooting and adjust your values in relation to the result you obtained. If you don’t have a tripod, you can find a flat surface to support your camera and use the timer. You can also open the opening, raise the ISO to 1600 and use the shutter speed that your camera selects.
These settings can also be useful for exposing a night sky photo correctly:
Shutter speed: 15 s.
Diaphragm aperture: f / 2.8
ISO: 6400

We leave you some tips so that your night photographs stand out for their quality and originality.
1. Bulb Mode
The Bulb mode will allow you to keep the shutter open as long as you keep the shoot button pressed. The advantage is that it can help you use a slower shutter speed than your camera has. This can be very useful if you want to take a creative photograph that records the movement of light trails or light drawings.

Source: Pinterest
2. Shoot in analog
If you shoot in film or analog you will be able to take advantage of some typical effects and textures of analog photography. If you are not [email protected] of what configuration to use for your analog camera, you can take your DSLR camera and go testing different configurations there.
When you have the correct settings, select those same values on your analog and start shooting. This way you will save surprises, money and badly exposed photos.
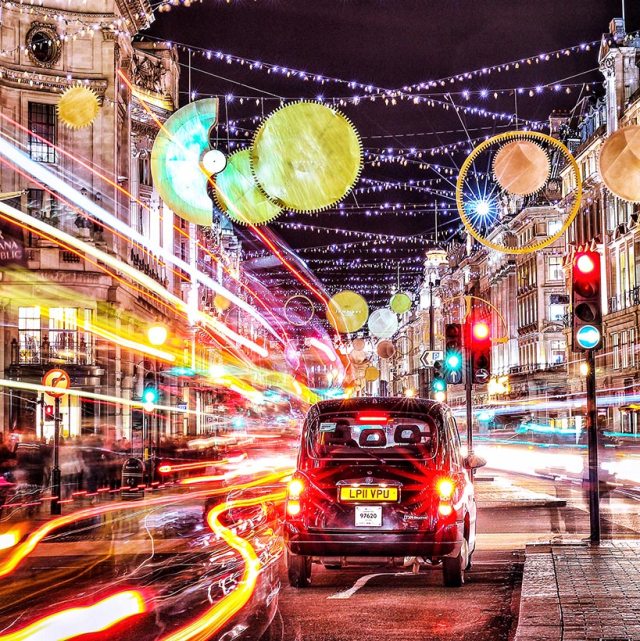
3. Experiment with light strokes or trails
Traces of light are a typical resource for night photography. If you have the ideal settings, you can achieve really impressive and creative photos. Remember that it is important to use a tripod! Try this setup: f / 5.6 / ISO 100 / 0.004

Source: Expert Photography
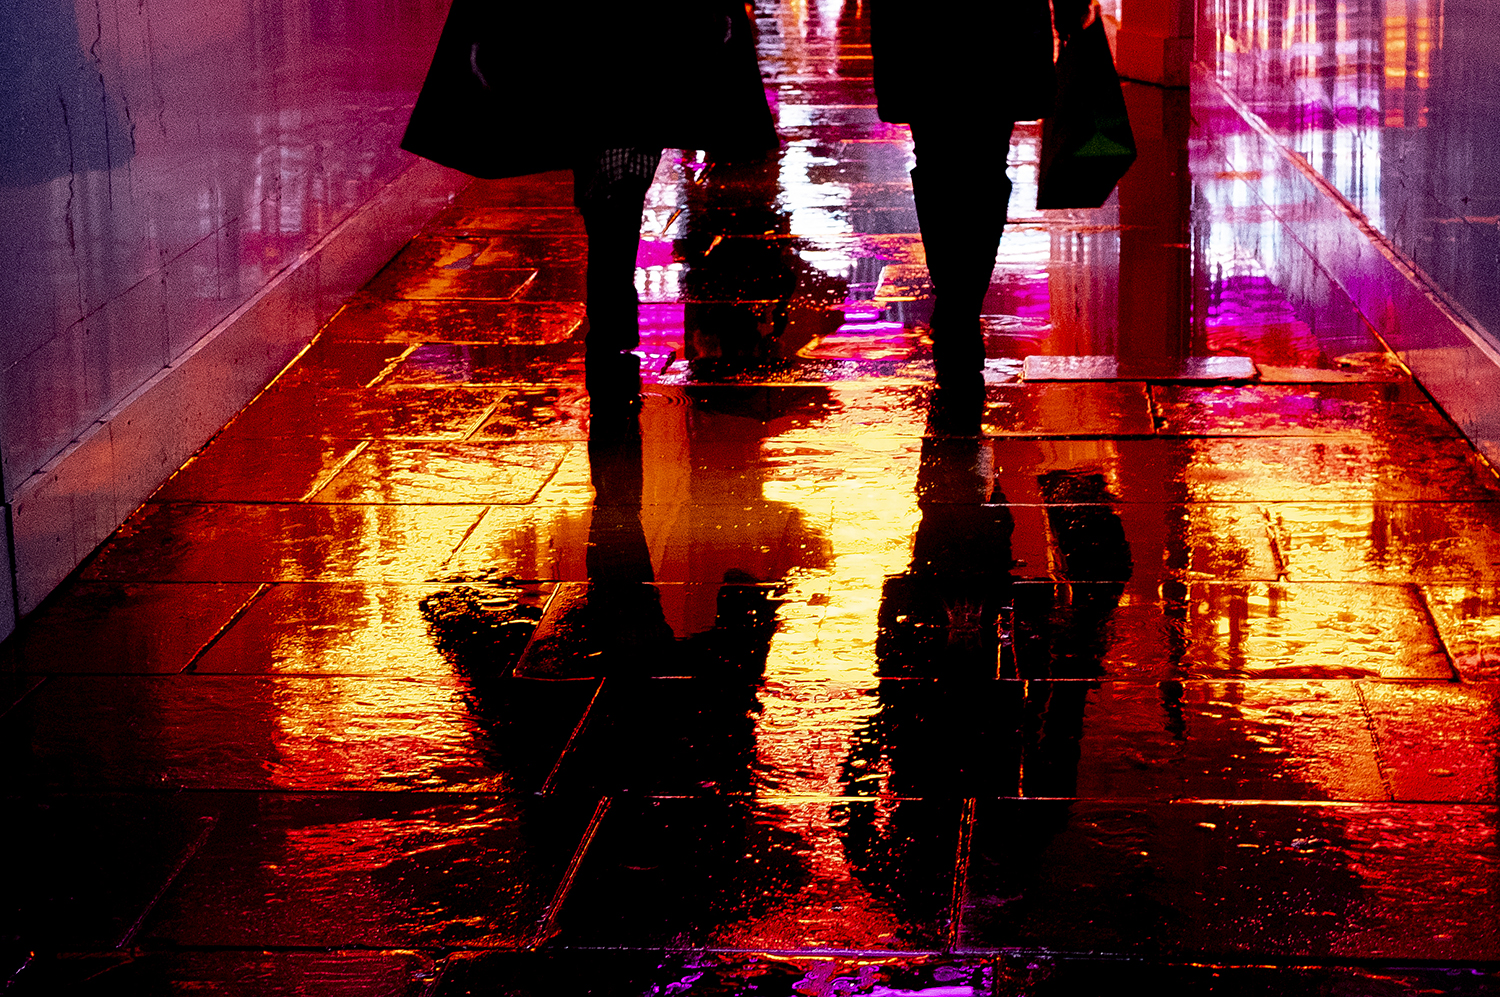
4. Play with reflexes
When we shoot during the day, it is more difficult to capture reflections. Not so when we do night photography. Try to take advantage of as much color as possible and blend the color of the lights with the reflections in the water. This combination will create a very interesting contrast between sharpness and softness in your photos. If there are bridges in your city, it may be an ideal location to experiment.
 Source: Fujifilm-X
5. Night photography: How to focus?
One of the hardest things about night photography is focus correctly. This is because most modern cameras focus automatically when contrast is detected. So if the scene we want to capture is very dark, there won’t be enough contrast for the camera to focus.
To focus correctly, you can focus on a bright light that is in your frame, it could be a beacon of light. Try to focus on the border between the bright part and your black background to have an ideal contrast. It is important to focus at the same distance that you will shoot your photograph. When you have your focus set up, you can start shooting and testing.
6. Shoot in RAW
When you do night photography, shooting in RAW format is highly recommended. Why? RAW files for most cameras are 14 bit, while JPGs are 8 bit. Having more bits means that you will have a wider range of colors and that the transitions between them will be more subtle and natural.
When shooting at night, using the RAW format is even more important, as most of the colors we will capture are at the extremes of the color scale (light and dark).

Source: Photolemur
7. Explore the unknown
When looking for the best locations for night photography, you have two options: opt for the places you already know or choose an unknown location.
As we said before, taking photos at night can reveal things that we don’t normally see. If we use a long exposure, we could see stars or lights that we didn’t know were there. The locations you already know will look different if you shoot them at night, but you can run the risk of getting stuck creatively.
If you explore the unknown, you will be stepping out of your comfort zone and tackling night photography in an exciting and creative way. Cheer up!
Once you understand the basics of the night photography, it is very fun and stimulating to experiment with it. The most important thing is to understand the exposure settings, which will allow you to play with different combinations.
Try experimenting with different subjects, light sources, and frames. And we repeat it once more: A tripod will be your best ally! 🙌
Until the next article.


![👁️ Fisheye: Ideas for Shocking Photos [2021]](https://big-photography.com/wp-content/uploads/2021/03/blog_1-75x75.jpg)
Discussion about this post