Are you at home and looking for something to occupy your days? You like photography but you can’t go out? Here’s how to make a portrait with silhouette effect, whatever your level and equipment.
Taking pictures at home: the portrait with silhouette effect
One of the advantages of being at home is that you are usually with relatives who know your passion for photography and know how to play the game when you need to. But this is not always the case. As I told you in the previous subject (see photo and explanations), teenagers, in particular, do not always enjoy being photographed. It’s like that and forcing them doesn’t help.
I have the same problem as you do, so I’m trying to find approach techniques that allow me to take pictures without being too intrusive. The silhouette effect technique works pretty well.

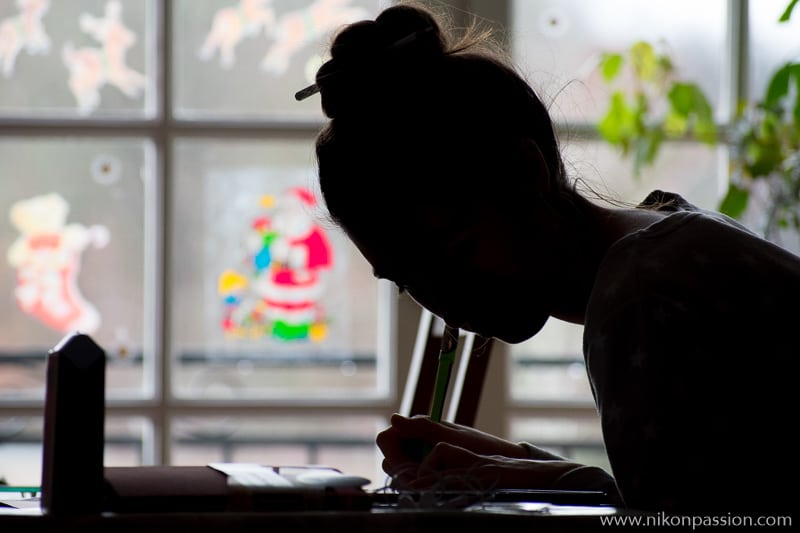
Nikon D3400 + AF-S NIKKOR 70-300 mm f/4.5-6.3 to 255 mm
1/250th of a second. – f/5 – ISO 1000
The approach
I have rarely been able to get a pretty picture by asking my girl victims to pose. They don’t want to, make faces, turn around or run away. However, when I manage to take a picture and they find it successful, they appreciate it. So I don’t have too many moods left to try.
To achieve my goals while dealing with these constraints, I use the same techniques as in street photography. I set my camera beforehand, I approach without getting too much attention, I make sure to frame quickly and well and I shoot in the process. Everything happens in a split second, that’s also what photography is all about.
Here I did this after noticing that my daughter was sitting in front of a large, well-lit bay window. The image imposed itself on me: by underexposing my subject, I could hope to make a profile portrait with a nice silhouette effect, keep some detail in the background and not bother my teenager too much by photographing her from a distance.
Also note that the silhouette effect masks the facial features, which makes the photo look much better on younger people.
The framing
I tried to play with the graphics of the bay window and tile frames, the horizontal and vertical lines were interesting. I also took advantage of the colours of the background, a green plant on the right, colourful Christmas decorations on the left.
I had a problem with the table because it doesn’t show on the picture, but it’s a long table and my daughter was at the end. I couldn’t frame it closely with a short focal length without including in the field peripheral elements that didn’t interest me. I chose a long focal length (for me, a 35mm enthusiast!), the 255mm position of a 70-300mm DX zoom lens mounted on a Nikon D3400.
This focal length, coupled with an aperture of f/5, allowed me to play with the background blur. The focus is made on the main subject, plunged in the dark thanks to a measure of light on the background. I could have underexposed voluntarily but here it was not necessary, the contrast difference between the background and the subject was enough to generate this silhouette effect.
An exposure time of 1/250th allowed me to freeze the position of my daughter, who was moving slightly while she was writing.
The silhouette effect also allowed me to mask the few elements in the sharpness plane, they were not visually interesting.
Treatment
I applied minimal post-processing on this image because it suited me on the back screen.
I cropped it to eliminate a bottle that appeared on the left side of the picture and was not pleasant.
I then adjusted the black point and added a mask on the bottom of the face (Brush tool in Lightroom) to underexpose the face with an Ev and reinforce the silhouette effect. This is a personal choice I could come back to if I process the photo again today.
Nothing more, I did not touch the bottom or the colours I wanted to be as natural as possible.
Portrait with silhouette effect: in conclusion
This photo is another souvenir, a snapshot that has joined the family album (but not yet my portrait portfolio). It evokes something to us when we look at it, a period, an event, and beyond its visual interest, it is what matters most to me.
The choice of the silhouette effect allowed me to make this portrait that I could not have done in backlighting without using additional lighting, which would hardly have been possible to keep the naturalness of the scene. The flash used in frontal would have given a disastrous result.
This effect can be used for this type of photo, like any other indoor photo, as long as you have background lighting. It can be a window as well as artificial lighting, so it’s up to you to be creative.
Take care to focus on an area of the subject that does not interfere with autofocus, as the subject is in the dark and the autofocus may be hesitant to focus, although newer cameras, both SLR and hybrid, are capable of focusing in near darkness.
The RAW format allows you to adjust the final result, but remember to underexpose the main subject when shooting so you don’t have to do too much post-processing. Learn more about the silhouette effect if you’re interested.


Discussion about this post