You’ve read the articles on the exhibition carefully, and now you’re beginning to understand its mechanisms, and to work on it when you take a picture.
That said, in some situations a little difficult (in particular in backlight or low light conditions), you always have trouble getting the correct exposure unless you shoot in the Manual total, which is not always the most practical. And then you saw in the manual and on your device this thing “measuring mode”but you don’t really know what it’s for or how to use it. Follow the guide.
Let’s take a look at what happens in your device when you use a semi-automatic mode such as aperture priority mode (Av or A) or shutter speed priority mode (Tv or S).
For example, if you select the shutter speed priority mode and set it to 1/250th, the camera will determine the aperture and ISO sensitivity needed to obtain the desired shutter speed. correct exposure in the picture.
Obviously, it does not determine its parameters by magicbut by making measures. In fact, the camera measures the brightness of the image and determines with which settings it will be exposed correctly. But how does he measure that brightness?
By default, the device measures the brightness on the whole picture. But you have the option of modify this behaviour thanks to the brightness measurement mode. Let’s have a look at the different modes generally proposed by modern SLRs (but also by some bridges and compacts).
 Evaluative / matrix / multiple measurement mode
The name changes a lot depending on the brand: we talk about evaluative measurement at Canon, matrix at Nikon, or multiple at Panasonic Lumix.
That said, it’s the same principle: it’s the mode by default used by your device, the one that measures the brightness on the entire image.
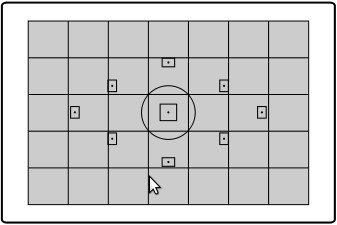
It provides an image that is properly exposed in all its parts No place is overexposed (or “burnt”) or under-exposed (or “plugged”), within the limits of the technical capabilities of the equipment of course, including its dynamic range.
To make it clear, I voluntarily took a contrasting scene that you can reproduce at home it’s just a figurine in front of a window.
The outside is very bright (it’s broad daylight), but the table and the figurine are quite dark. The evaluative / matrix measurement is doing what she can to avoid overexposing the sky: we have an image exposed for the average of the tones.

It is not for nothing that this is the default mode: it works in most situationsand most of the time you won’t need to change it.
But sometimes this mode works badly enough with the situation, such as if the image is markedly contrastingas here: scene in backlight, photo of concert where the singer is illuminated by a single spotlight and the rest is in the shade, etc…
 The spot / point measurement mode
This mode measures the brightness only on the center part of the images, i.e. the circle that you see in the center of your viewfinder. This represents approximately 4 to 5% of the total imagewhich is a very small circle.
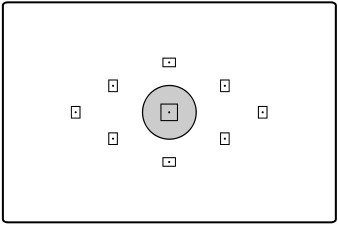
It allows to obtain a correct exposure of the subject when the rest of the image is illuminated in a very different way, such as in the case of a backlight.
Attention, in this case the luminous part of the image (the sky for example), will be clearly visible. overexposed. You have to know it, and play with it. It is generally not used to achieve silhouette effects, on the contrary, unless you measure the brightness on the sun for example: in this case the sun/sky will be well exposed, and the rest of the image very dark and therefore in silhouette.
Let’s take our example again: on my device, I can select exactly where I want to make the spot measurement (more about this below). I focused on the head of mini Groot. The camera does the exposure so that this point is well exposed. And it is the case: mini Groot is in the middle tones, neither too light nor too dark..
But then, the rest of the picture is obviously much clearer ! (which is not necessarily always very serious, even if it’s a bit ugly here).

Note that on some cameras, notably Canon SLRs, there is also a rather similar measurement mode, selective measurement, which is basically the same but with a wider circle, of the order of 9 to 10% of the image.
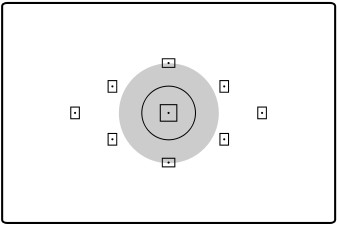
 The center-weighted measuring mode
This somewhat barbaric term actually means that the brightness is measured central focusbut that the rest of the image is also taken into consideration.
In other words, the camera measures the light over the entire image, but gives more weight to measurements made at the centre than those carried out in the periphery. Here the diagram is very useful to understand how brightness is evaluated:
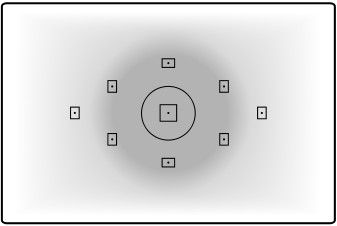
This mode is a bit of a intermediary between evaluative and spot measurement mode. It can be used more or less in similar situationsespecially when you don’t really know how to measure the light and you just know you want to properly expose the center (center more widened than in a spot measure).
Here, I used this mode on the same scene. You can see we have a scene even darker than on the first one. I think that the device simply detected the midtones well (the reflection of the sky on the wood of the table), but didn’t take into account the shadows around (which were not to be part of the area under consideration). As a result, it further reduced the exposure.

Regarding the use of these different modes, I refer you to the manual of your device, I’m not going to do it for all brands of course 😉
ATTENTION the measuring mode setting is maintained when you turn off your camera: remember to check it when you take a new series of photos 😉
Where is brightness actually measured?
I ask this question because I’ve always talked about “centre“of the image. But as you know, we don’t always (or even not often) want to put our subject in the center. So how do you do it? Just hang on a little bit, it’s not necessarily the same thing. very simple 😉
On many reflex cameras (especially the Canon), the spot measurement will be done at the center of the picturewhatever collimator was used to focus the camera.
On some hybrids and also some reflex cameras (notably the Nikon), the spot measurement will be done on the other hand. in the spotlightwhich often makes more sense.
So if you use the spot mode on an SLR, the measurement will often be done at the centre of the image, even if your subject is positioned elsewhere. How bypass this problem? By using the exposure memorizationoften represented by a asterisk *or by the abbreviation AE-L (such as “auto-exposure lock”, which translates as “auto exposure lock”).
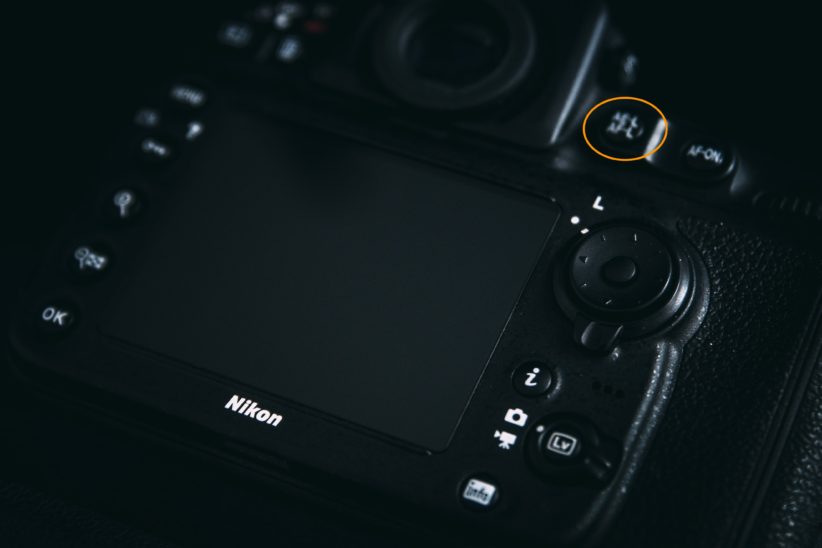
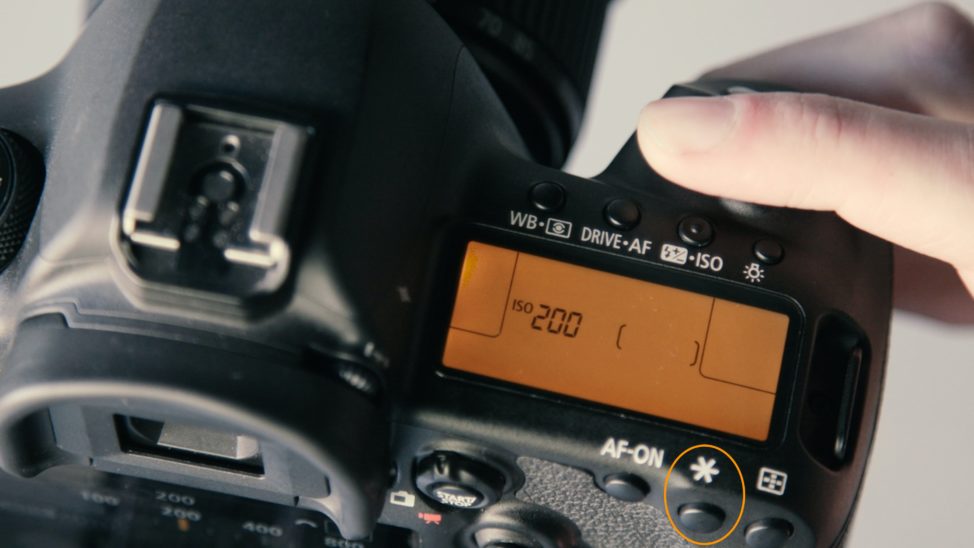
Attention Depending on the model, it may be necessary to adjust its behaviour in the menus. Consult your device’s manual to find out exactly how it behaves, and possibly do some tests!
How does this button work? It’s simple. You place the subject you wish to expose with a spot measurement at the centre of the image. You support on the button *. Then a * in the viewfinder.
The exhibition is then storedand all you have to do is… focus and frame your image the way you want it, and trigger it, of course. It’s a bit like pressing the shutter release button halfway down, but instead of locking the clarificationit locks the brightness measurement (and thus the exhibition).
Now you have the keys to use these different measurement modes to their full potential. Having said that, it is not easy to master them (especially the spot measurement mode), and you will need a bit of practice before intuitively using them to their full potential. But this tool is often indispensable in difficult lighting situations, and knowing this will help you to manage them better.
If you liked that article, share it with your friends, and subscribe for free to the newsletter to be notified of the next one. I would like to point out that I wrote this article following comments in a previous article, guessing that not everyone would understand what was going on. So you too leave a comment! 😉
And don’t forget to share the article! 🙂



Discussion about this post