
Without light, no photography. In other words, light can be our best friend, as well as our worst enemy. The characteristic of the photographer is to know tame the light, and for that, you first need the get to know. Then let’s get to know each other!
Pin this article on Pinterest for future reference!
– Hey, Lumière, how are you?
– Nickel, I rayon !
– Ha ha! We have the same shitty sense of humor I see! Could you tell us a little bit about yourself? Yes because we see each other every day, but we don’t know each other very well! 😀
– I suppose you and your readers don’t give a damn about my dual nature, particulate and wave?
– Absolutely, we are not physicists and therefore we are more interested in what can influence our photographs!
– Well, then you should know that I have 4 main characteristics that play on the rendering of a cliché:
(note : So we’ll stop the interview style for the rest of the article, otherwise it can quickly become heavy :P)
Make a note of one thing first: every light source has these 4 characteristics, and there are sometimes several light sources depending on the situation. It is therefore important to be able to take this into account.
1. My intensity

It’s quite easy, it corresponds to the “strength”, to the brightness from a given light source. What you need to know is that it is relative. Basically, the headlights of a car in the middle of the night seem much more powerful than in the middle of the day.
This intensity raises several questions:
- First of all, is the light sizable for enlightenment correctly What’s your story? In other words, are you going to have problems with theexhibition of the image? And if it’s not strong enough, how are you going to solve the problem?
- What are the intensities of various sources of light, and is the one that illuminates your subject strong enough in relation to to the one that lights up the background?
If you can check one or more of the light sources (if you work with artificial light), the problem is simpler because you can usually control their intensity. Otherwise, the intensity of the light sources present is important, and it is necessary to control the intensity of the light. determine to possibly be able toadapt (moving you or your subject if necessary).
2. My direction
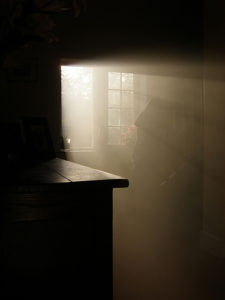
Yes, it seems obvious, but it’s very important: the direction of the light influences the image a lot. In broad daylight around noon, it comes from onwhile at sunrise or sunset, for example, it comes from the sidewhich results in renderings widely differing. Try a little portrait with a light coming from above or a light coming from the side, you will see that the effect is only not at all the same one!
Think also of the light coming from across the street, from behind an object: the one that creates backlights…or silhouette effects, or grapes of light through the trees of a forest… You know what I’m talking about? Well, in this case, the simple direction of light creates a ambiance particular, often a little mysterious or fairy tale.
Of course you can also use a light from above to your advantage. The trick is to be aware of this direction, to know how it will influence the mood of your image, and to know theuse to your advantage to produce the effect you desire.
3. My quality
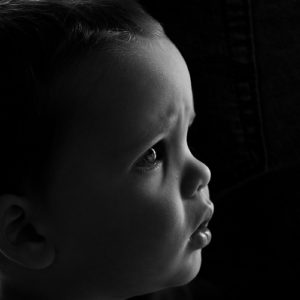
What is called “quality” of light actually refers to a light soft (or diffused, such as sunlight on overcast days, or a flash wrapped in a handkerchief) or to a light hard (not broadcast, such as the one of the sun at 2pm in August in the Mediterranean, or the one of a powerful flash). And unless you want to create a particular effect, a soft light is generally more flattering (especially for portraits).
Be careful not to confuse a very directional and a light hard ! For example, on the image on the left (which is an excellent portrait by the way), the light is both highly directional (she is clearly fromone light source on the right), and rather soft (we can see that the transitions between light and shadow areas are rather progressive). You see the difference?
The “quality” of light is directly related to its size:
- The more a light source will be smallthe more she’ll be hard.
- The more a light source will be greatthe more she’ll be soft.
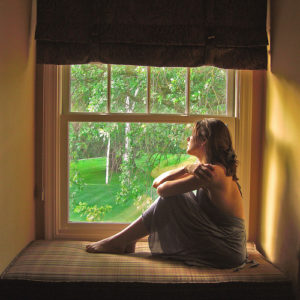
That’s why to diffuse your flash, I had advised you to surround it with a handkerchief: this enlarge in fact the light source 😉 You can also use this with natural light: if the one coming through the window is too hard, you can place a thin curtain, a large sheet of tracing paper… In short anything that increases the surface that emits light!
But you’re going to tell me: “Yes, but the sun is very big, and yet in the middle of August it can be a very hard source of light!” And you’re right, because a second parameter comes into play: the…remoteness from the source.
- The more the light source is close of the subject, the brighter the light is soft.
- The more the light source is remotethe brighter the light hard.
It’s hard to get close to the Sun (and it’s getting hot enough as it is, let’s avoid making things worse! :D). On the other hand, this notion can be of great help when you use a light source. artificial. But don’t forget that if you bring closer. your source, she’s probably going to come out more intense (because less light will be lost), and that its intensity may have to be adapted!
4. My colour temperature
You already know a little bit about this concept, which we may have touched on when we were talking about white balance. In fact, any light source has a colored dominant it can be more or less hot (red, orange) or cold (blue). This has a lot to do with theoverall ambience of your image. It is not possible to change this temperature when you work in natural light, but good news: if you shoot in RAW, you will easily be able to choose your own white balance thanks to digital development, and thus give an ambiance more or less warm (or cold) in your image. You will see, it is often one of the adjustments that take place in first to development, and an important photographic choice!
– Thanks Lumière, and see you soon through the viewfinder! 😉
There, I hope this presentation of light will serve you well. By the way, I have a little exercise for you. Whenever you’re in a photographic situation, ask yourself:
- What is theintensity light?
- What is her direction ?
- What is her quality ?
- What is her colour temperature ?
And most importantly, play with these settings, and adapt yourself according to the rendering you want for your images! Do not hesitate to ask your questions in the light in commentshe won’t hesitate to answer you, and don’t forget to subscribe to the newsletter if you haven’t already done so 😀
And don’t forget to share the article! 🙂


Discussion about this post