
Yes, that’s all! Generally speaking, I don’t like to use flash and prefer natural light. Indeed, the camera’s built-in flash crushes the images, makes faces look pale, produces big, greasy drop shadows everywhere. In short, it’s ugly. Find out how to get around this problem by yourself and without spending a fortune!
Pin this article on Pinterest for future reference!
And yes, in some situations light is really lacking, and unless you have a very bright lens and a body that can go very high in ISO sensitivities, you can’t see anything. So we find ourselves obliged to use the camera’s built-in flash, and frankly… bêrk!
But why is it ugly, anyway?
To make it quick and easy, the light from your camera’s flash is nearly unidirectionalplus she’s coming straight in. face about you.
- Too directive To give you an idea, a laser pointer is a light… unidirectionaland the sunlight veiled by the clouds is the opposite, i.e. light. diffuse. In other words, light that is too directional comes from a single point, and therefore produces very strong drop shadows. marked and very net. And that’s usually ugly.
- Facing the subject A light in front of the subject flattens the reliefswhich makes it look like people in a flash photograph have their faces completely flat. Especially since they are usually all white, because the flash is too powerful. And this, in general, is ugly too.

What are the solutions? Well, in order for the light to become more diffuse, you have to… diffuse it. Yes, it does. And so that it no longer comes directly to the subject, it must be reflected, that is to say, it must “bounce” the light rays off a surface so that they arrive on the subject from another direction. And at the same time, they are also diffused.
The handkerchief dispenser
A simple way for a light to be diffused is to place something of white and semi-opaque around. Making a diffuser with a ping pong ball works well, but if you haven’t done art, I have a solution yet. simpler for you.
The paper handkerchief. Nine preferably 😀 In general you have them with you all the time, and if not ask for one, preferably from a woman, who usually have 10,000 things in their bag 😛
Just unfold it, then fold it in two or three, and wrap it around your camera’s flash, as I did on the picture below. It also works with paper towels, especially since it’s bigger so more practical! If it doesn’t hold well, place a piece of tape to help you hold it.
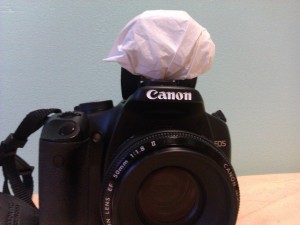
And here’s what it does for use:

See? 15 seconds to make a diffuser, about 2 euro cents, and that’s a hell of a game-changer! Here the shadow remains a little hard for my taste, but you can put an extra thickness to diffuse a little more.
We also note that loses some light. It’s normal, some of the light from the flash doesn’t pass through. If the pictures are really underexposed because of this difference, do not hesitate to use the exposure compensation at +1/3 or +1/2.
The paper-canon reflector
Normally a reflector is best used with a flash that is already oriented in another direction than the subject’s, and therefore only reflects the light once.
Here, we’re gonna have to block that light first. Only one solution the manifestation, we will reflect the light back to the ceiling (or a wall), which will reflect a second time the light towards the subject. Corollary: if you have walls or ceiling that are too dark, it will not work as well.
So we’re going to use a small rectangle of paper thick and whiteCanson type. You must not see through, otherwise there will be a shadow of the shape of your cardboard on the picture. Other than that, use whatever you’ve got on hand. As far as I’m concerned, I used the membership card of an association which is about 6.5 cm by 4.5 cm, to give you an idea 😀. The smaller it is, the harder it will be, but you can opt for bigger one.
Here’s what it looks like:

The important thing here is to orient the map uprightso as to:
- block the light which should not reach the subject directly.
- reflect light up to the ceiling
To make it stick, I made two little notches of about 2mm in the card, which correspond to the two amounts of flash on my camera. It may not be very clear, so let’s take a picture:

The way you will maintain it depends on the brands of course, so be aware of your device. Don’t make the notches too wide, otherwise it won’t hold, obviously.
And this is what it looks like:

We notice that there is plus of shade. The brightness is more or less the same than when you’re broadcasting the flash. But here, we notice that the light comes from the left (click on the image to enlarge if you don’t see it). Indeed, I was holding my camera in portrait mode: the light reflected on the map, then on the wall on the left mainly, and finally landed on Jack, to the left.
Here, I hope these two accessories won’t leave you anymore, it can still be useful, and it will allow you to save money for the purchase of more useful material, like a random luminous lens 😉 Post one comment if you have any questions or other ideas, and consider subscribing to the newsletter if you haven’t already done so 😉
And don’t forget to share the article! 🙂


Discussion about this post