This guest article was written by Régis Moscardini of the animal photo blog Auxois Nature. On his website, he offers a collection of advice from the best wildlife photographers as well as a buying guide for beginners in photography.
A few definitions
Before getting into the technical side of things, I’m sorry to have to go through all this, but I have to give you two definitions to know what we’re talking about.
What is a panorama?
In the broadest sense (no pun intended), a panorama is a view of a vast landscape. Another definition, much more precise this one because borrowed from the Académie française (hang on anyway because it’s not kidding!): “.a panorama is a large, circular, continuous picture, arranged so that the viewer in the centre sees the objects represented, as if, placed on a height, he or she is looking at the objects in the picture. discovered the whole horizon around which he would be surrounded.” Are you still okay?
What is a panoramic photo?
From the viewer’s point of view The latter definition is the basis of the notion of panoramic photography, in spite of its encyclopaedic aspect. Have you ever observed a large panoramic photograph in an exhibition? I had this chance at the last nature and animal photography festival in Montier-en-Der and that’s exactly what I felt: placed in the centre of the photo, I discovered the whole horizon before me, a real panorama….
From the photographer’s point of view : is the stitching together of several photos. Thus, it is the length/width ratio that will determine the format of an image. A famous format is that of postcards: it is 3/2, said in centimeters, it gives an image of 10 cm x 15 cm. A panoramic photoThe length to width ratio is not at all the same: it is 1/2, 1/3, or more. When the length is 1 cm, the width is 2 cm, 3 cm or more. It is therefore an elongated image format. We can even go to reports like 1/7 which give full-length photos, typical of 360° photographs.
Digital technology has made a big mess of these stories of image formats with the emergence of new media. On the other hand, it has greatly facilitated the work of photographers in photographic creation, panoramic photography being the best example. Any photographer is no longer limited as it was in the age of film!
To sum up this intro which is perhaps not very digestible but necessary: a photo is panoramic when it is wider than long or elongated … it’s true that without the numbers it’s much simpler! You have now well deserved to read the following 🙂 .
What to take in a panoramic photo?
Let’s start with a basic rule: a panoramic photo is used to highlight a subject. Don’t pan just to create a long image, it’s within everyone’s reach. No, to stand out from the common photographers, I repeat, the panoramic format has the sole purpose of sublimate a particular element of the horizon. Then what?
Let’s look at some examples:
- a lone tree
- a lighthouse on the sea
- a particular building
- a sunset / sunrise (be careful, it’s difficult)
- a country house
- a large mammal, …
As always in photography, your imagination will be your limit …and also what you’re looking at! I remind you that a panoramic photo is the taking of a vast landscape. OK for the isolated tree but with many, many horizons in front of you.
A tip to benefit from optimal conditions, is to stand tall. Don’t go as far as climbing to the top of a tree with camera, lenses and tripods. Often, just standing on a rock, a pole or even the roof of your car (!) will give you access to a viewpoint that 99% of people can’t see. Loyal readers of this blog, Laurent often repeats to get down to the ground in the middle of the city to change his point of view, I tell you the contrary 😉 In panoramic photography, get up and make yourself big!
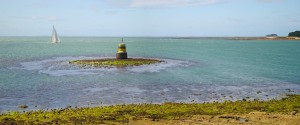
In the example below, the surrounding scene shows the isolation of the lighthouse. We agree, the panoramic format is at the service of the chosen subject, and not the other way around The star is the lighthouse, the pano is a point (you can count, there are twelve of them, it’s an alexandrine 🙂 )
Abstract
- Choosing a subject and surrounding it with its environment
- Finding, if possible, a viewpoint in height
Choosing your equipment
It is imperative that your device is disengageable It should allow you to access the manual settings, in short, to abandon the fully automatic. If you’re not ready for that, you might be disappointed with the result. Ok, some cameras have scene modes called Panoramic, and that must work well … but honestly, what fun is there in taking pictures and letting the camera do everything? Be active, don’t let processors think for you!
So why is the manual mode indispensable? The photographs that will make up your image must be exhibited identically. Same requirement for white balance. So, with the Auto mode, the camera could very well shoot a first picture with a particular setting and the next one with another setting! You’ll have a good laugh afterwards to put the two together with different exposures! You must therefore keep your hand on the exposure, the white balance and not change anything on the successive shots.
Without any budget constraints, the ideal configuration would be as follows:
- A reflex
I don’t linger on this point, your SLR will necessarily be suitable, and if you have a compact camera, switching to manual mode will be fine… on the other hand, the imposed lens is not optimal. - A fixed focal length lens
This is very important! A panoramic photo being the stitching of several photos, this association is done by pasting the edges of the photos … problem, these peripheral parts are where the defects of the images are concentrated ! A good lens for the panoramic photo is therefore the one that reduces the defects on the edges. The annoying defects for stitching are the following:- Vignetting : darkening of the corners of the photo
- Loss of net worth in relation to the center
- The distortions curvature of straight lines
Apparently, fixed focal length lenses, i.e. without zoom, are the ones that best reduce these defects. It would take a whole article on this fascinating subject of optics, that’s not the subject here. Those who are into this topic can go into the comments!
Keep in mind that photos taken with lenses described above will normally fit together better. I think the use of focal lengths from 28mm to 50mm is very interesting (24×36 equivalent, or about 18 to 35mm on an APS-C sensor). No interest in using an ultra-wide-angle because distortions are very present.
- a good tripod
It must be very stable (still a minimum for a tripod). If you are satisfied with yours, keep it, it will fit very well.
With a bit of practice, you can take freehand pictures that will assemble well, but you’ll put all the chances on your side with a tripod. We’ll see why later.
Abstract
- Have a camera in manual mode, the best being an SLR.
- Have a fixed focal length lens from 28mm to 50mm equivalent 24x36mm.
- Have a tripod.
Device settings
As we’ve seen, drop the automatic settings because they can change your exposures from one image to the next and ruin your panorama.
How to define the right exposure
It is an important, indispensable moment, but not very difficult to implement. The idea here is to make an average light measurement over the entire area to be photographed. Today’s devices are all equipped with efficient integrated light meters: matrix light measurements and other multi-zone systems work very well, regardless of the brand used.
The principle having been laid down, now how to measure the light on the panorama. Follow the guide:
- Set your device to opening priority.
- Choose a landscape aperture such as f/8 or f/11, and don’t change it anymore.
- Find an area of the horizon with medium brightness easy, it’s neither the darkest nor the lightest part 🙂
- Take a picture of this area.
- Look at the histogram displayed by the reflex: it should normally be well balanced.
- If other areas of the landscape are not too shaded or not too bright, keep your settings.
- However, if the brightness is too extreme at this time, you can make a exposure compensation in order to find a histogram identical to that of the first photo.
How to adjust the white balance
A little reminder: the white balance is basically what will give the tone of color to the image. This is also called the color temperature.
You guessed it, I hope! Here again, manual adjustment is the norm. Let the camera choose and here’s what can happen: a first picture in sun mode, the next in cloud mode, and the third in shadow mode! The assembly of these three images with disparate color temperatures will give a panorama … strange.
Disable Auto White Balance and choose the one corresponding to the sunny situation. As you will always be outdoors it will generally be “sunny” or “cloudy”. Whether it’s for light or color temperature, the key word is consistency..
Note from Laurent : If you are working in RAW, there is no problem, since you will be able to set the same white balance for all images during development 😉.
Abstract :
- Set the knob to Aperture Priority.
- Choose an aperture such as f/8 or f/11.
- Take a picture of an area in medium light.
- Check that the light differences are not too great.
- If this is the case, make the necessary exposure corrections.
- Turn off auto white balance.
- Choose the “sun” or “cloud” mode and keep it until the end.
The shooting
Ideally, the tripod to which the camera is attached must be level. Your tripod may be equipped with a tripod, otherwise accessories can be placed on the SLR camera’s claw holder. And if you don’t have any of these, don’t worry, don’t break your head, just adjust at a glance! We’re not going to deny ourselves a picture just because we don’t have a spirit level. And then forget about the do-it-yourself level, which is too heavy and bulky 😉.
Intuitively, we rather want to orientate our camera in landscape mode, normal since we take a landscape 🙂 . Just one thing: remember that the goal is ultimately to stitch photos together: a portrait (vertical) mode will give a more balanced ratio between height and width. So don’t hesitate to test this orientation!
All you have to do is set it off. Start with the left (do you prefer the right? Ok!), shoot and rotate the reflex to the right, taking great care of overlap each new image by approximately 25 to 30 percent over the previous one; and. Personally, one of my collimators (the small focus squares) placed in the right place in the viewfinder serves as a reference point. Otherwise, use elements of the landscape : a tree, a building, a cloud, … This trick is essential : if you don’t think about overlapping the successive images, your computer will be unable to assemble the photos, for lack of common elements.
That is, unless you want to try the turn-of-the-century effect, I advise you not to take panoramic pictures in windy weather……at least enough time to make your weapons. The leaves, the grasses in the foreground could be blurred, and assembly could be problematic. The problem can be easily solved with a high shutter speed, think about it! Same thing with waves: a slow shutter speed should produce a nice yarn effect, except that again the assembly will be difficult. Otherwise, give it a try, just to see: if it’s a dud, nobody will know 😉
Abstract
- Make sure your tripod is level.
- Orient the DSLR in portrait mode.
- Overlap the successive shots by 25 to 30%.
- Be careful about spinning at slow speeds.
Stitching your images
You just did the hard part! The technical part of assembly is very easy … provided that you have worked well in the previous stages!
I must tell you that it is imperative that we have a dedicated software program for this task. Fortunately, there are many free, paid, expensive, cheap, good, not so good. Maybe there’s a ready-made feature under Raw Therapee. If so, Laurent could make us a little video?
Note from Laurent : No, RawTherapee only does RAW, not pano 😉
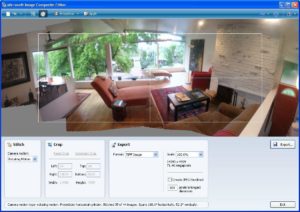
Below is a non-exhaustive list of some tools:
- Microsoft Ice from Microsoft free of charge
- Hugin free of charge (Note from Laurent: and free of charge, I heard a lot of good ones 😉 )
- Autopano from Kolor : paying, from 120 to 240 €
- ImageAssembler from Panavue : paying, from 50 to 150 €
There are others, from the link given at the end of the article, you will have more information.
As you can imagine, I’m not going to explain the procedures step by step for each program. I don’t have the time, and neither do you! I’m not going to run away from it, here, as a general rule, is thehe method to be applied for any software :
- First load the images to be assembled into the relevant software.
- Fill in the requested information: the lens used, the focal length, …
- Keep all the default settings, don’t bother too much. In particular, leave the automatic alignment of the best results.
- Press … Enter, Ok, Validate, in short, the button to launch the operation.
- After a few moments, the length of which depends on your photos, your computer and the software, your superb panorama is finally here!
- Cheer up, it’s almost over! Now make sure to cut the edges on the outside, there might be some black areas to remove.
- All right, you’ve reached your destination. Save the new image in the format of your choice: Jpeg for sharing, PSD for retouching in Photoshop or elsewhere.
Abstract
- Choose free or paid assembly software.
- Follow the instructions given by the software.
- Export your photo in the chosen format.
- Possibly rework the photo.
Important note
With what you’ve just read, you should make beautiful panoramas. These tips are enough to make very interesting pictures. But I have to be honest with you: this is only a very small part of what can be done. As in many fields, if you dig a little bit, you can go very far in panoramic photography: very advanced settings, dedicated hardware, advanced software, the only limit will be your time … and your money!
You’ve made some nice panos and just want to improve? There is a site where you can find out everything about everything. Particularly well done, it’s a gold mine. Click this link to visit Arnaud Frich’s website : Panoramic photo guide
Have fun!
If you are particularly interested in wildlife and nature photography, I would be happy to welcome you on my blog www.auxoisnature.com.
And don’t forget to share the article! 🙂


Discussion about this post