Here is a photo studio tutorial that shows you how to take a photo of liquid spurting out of several glasses. This tutorial is brought to you by Vincent riemersma on his Flickr account.
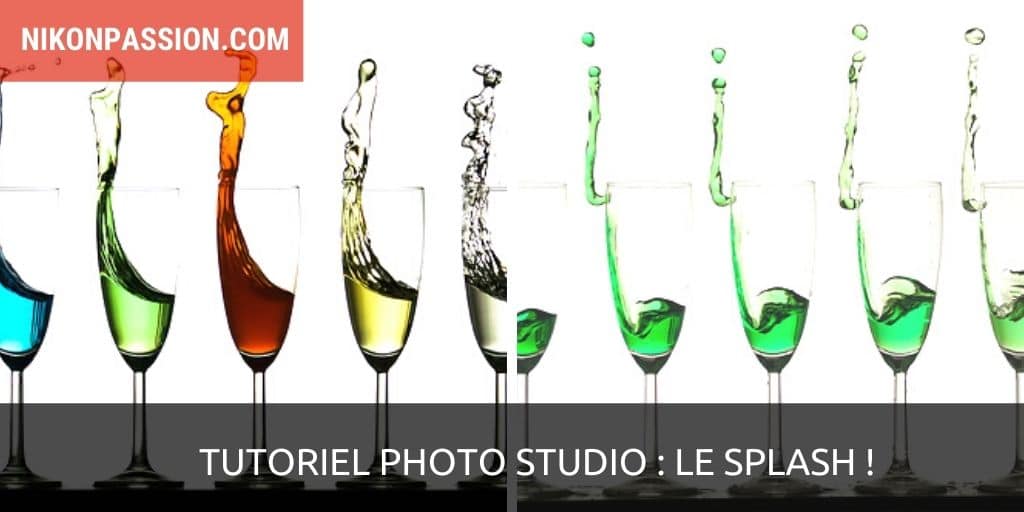
Photos (C) Vincent Riemersma
Photo studio tutorial: Preparation
As with some studio photos (see for example “Black or White”) the preparation necessary to take this photo is substantial but completely within your reach if you take the time to follow the proposed process.
The idea is to design a mini-studio flexible enough to be able to change the shooting parameters because this realization is quite technical.
Photographing glasses may seem simple, but it requires a minimum of care. The lenses are glued to their support so as not to tip over when triggered. This support is a tray fixed on an old skateboard.
This assembly makes it possible to move the plate at the right speed (skate wheels) and more fluidly than if the latter were moved by itself. A bit like using a Dolly, but it’s homemade!
The assembly is placed on an inclined shelf with a metal stopper allowing the skateboard to be positioned always in the same place during each attempt to take a picture.
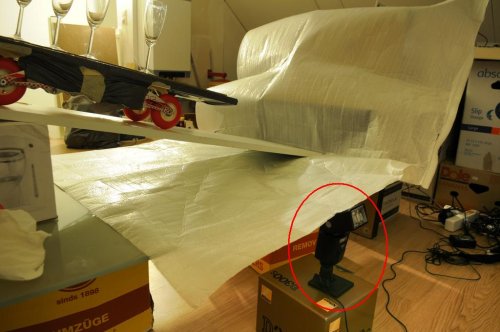
Photo studio tutorial: studio preparation
Lighting
Nothing complex, only one cobra flash is used to take the photo.
The flash is directed towards the white wall which forms the backdrop of the studio, it is triggered using a sound-sensitive trigger (the sound of the skate touching the stop). Directing the flash towards the wall allows to have a very diffuse light on the glasses, by reflection. Using a frontal light would have given harder lighting, unsuitable for this photo due to the very nature of the glasses, which is reflective.
The shooting
At the time of the shooting the glasses are filled, the light of the room is cut, the shutter of the body is opened (manual mode, 3 second exposure).
The tray with the glasses is released. It starts rolling and hits a stopper: the sound of the shock activates the shutter release which makes the flash go off. The shutter closes after 3 seconds, the picture is taken.
The plastic sheet visible on the left serves to prevent liquid splashes and allows easy cleaning of the stage. The shock being not very violent, there is not a lot of projections but it is better to be safe than sorry!
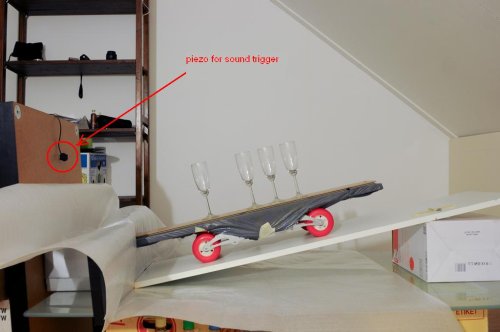
Photo studio tutorial: preparation
The sound trigger (for DIY enthusiasts)
When the platter hits the stopper, a piezo element detects the noise. An electronic trigger activates the flash. You can find the schematic of the trigger and the list of components on the Hiviz website. This complex principle has the advantage of being flexible in use and allows the photographer to easily adjust all the parameters. Any other trigger system can do the trick.
The flash trigger time is an essential criterion: if the flash fires too early, the liquid is still in the glasses, if it fires too late the liquid is… on the ground.
You can use a commercial flash trigger that will have to be adapted to detect noise if you are not too handy (learn more about this type of assembly).
Splash studio photo tutorial: the result
Take the time to experiment to verify that the set will give you the required framing, it’s always easier to do this as long as the glasses are empty!
Focus should be done on the lenses all aligned to avoid sharpness defects. You will also need to adjust shooting parameters like aperture and ISO sensitivity to get the correct exposure.
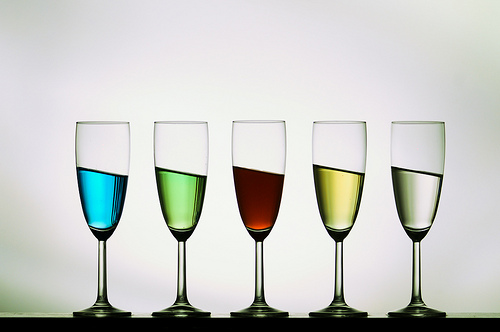
And the end result:
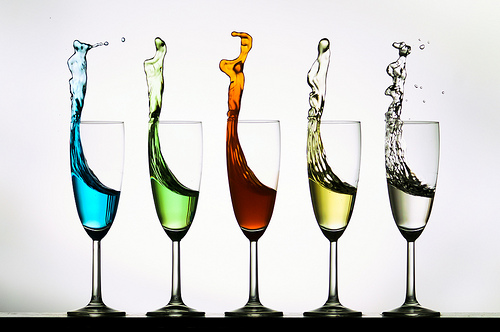
Once the result is achieved, you can have fun varying the content of the glasses, the rolling speed, the nature of the light, etc.
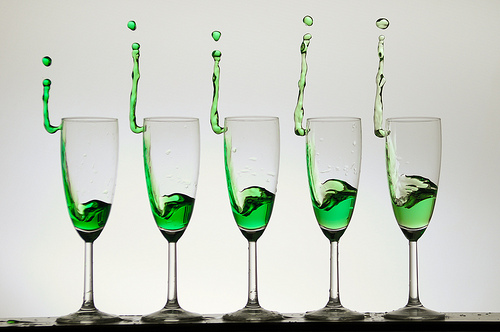
Good photos !!
Source: DIY Photography
Photos: Vincent Riemersma
Here is a photo studio tutorial that shows you how to take a photo of liquid spurting out of several glasses. This tutorial is brought to you by Vincent riemersma on his Flickr account.

Photos (C) Vincent Riemersma
Photo studio tutorial: Preparation
As with some studio photos (see for example “Black or White”) the preparation necessary to take this photo is substantial but completely within your reach if you take the time to follow the proposed process.
The idea is to design a mini-studio flexible enough to be able to change the shooting parameters because this realization is quite technical.
Photographing glasses may seem simple, but it requires a minimum of care. The lenses are glued to their support so as not to tip over when triggered. This support is a tray fixed on an old skateboard.
This assembly makes it possible to move the plate at the right speed (skate wheels) and more fluidly than if the latter were moved by itself. A bit like using a Dolly, but it’s homemade!
The assembly is placed on an inclined shelf with a metal stopper allowing the skateboard to be positioned always in the same place during each attempt to take a picture.

Photo studio tutorial: studio preparation
Lighting
Nothing complex, only one cobra flash is used to take the photo.
The flash is directed towards the white wall which forms the backdrop of the studio, it is triggered using a sound-sensitive trigger (the sound of the skate touching the stop). Directing the flash towards the wall allows to have a very diffuse light on the glasses, by reflection. Using a frontal light would have given harder lighting, unsuitable for this photo due to the very nature of the glasses, which is reflective.
The shooting
At the time of the shooting the glasses are filled, the light of the room is cut, the shutter of the body is opened (manual mode, 3 second exposure).
The tray with the glasses is released. It starts rolling and hits a stopper: the sound of the shock activates the shutter release which makes the flash go off. The shutter closes after 3 seconds, the picture is taken.
The plastic sheet visible on the left serves to prevent liquid splashes and allows easy cleaning of the stage. The shock being not very violent, there is not a lot of projections but it is better to be safe than sorry!

Photo studio tutorial: preparation
The sound trigger (for DIY enthusiasts)
When the platter hits the stopper, a piezo element detects the noise. An electronic trigger activates the flash. You can find the schematic of the trigger and the list of components on the Hiviz website. This complex principle has the advantage of being flexible in use and allows the photographer to easily adjust all the parameters. Any other trigger system can do the trick.
The flash trigger time is an essential criterion: if the flash fires too early, the liquid is still in the glasses, if it fires too late the liquid is… on the ground.
You can use a commercial flash trigger that will have to be adapted to detect noise if you are not too handy (learn more about this type of assembly).
Splash studio photo tutorial: the result
Take the time to experiment to verify that the set will give you the required framing, it’s always easier to do this as long as the glasses are empty!
Focus should be done on the lenses all aligned to avoid sharpness defects. You will also need to adjust shooting parameters like aperture and ISO sensitivity to get the correct exposure.

And the end result:

Once the result is achieved, you can have fun varying the content of the glasses, the rolling speed, the nature of the light, etc.

Good photos !!
Source: DIY Photography
Photos: Vincent Riemersma
Here is a photo studio tutorial that shows you how to take a photo of liquid spurting out of several glasses. This tutorial is brought to you by Vincent riemersma on his Flickr account.

Photos (C) Vincent Riemersma
Photo studio tutorial: Preparation
As with some studio photos (see for example “Black or White”) the preparation necessary to take this photo is substantial but completely within your reach if you take the time to follow the proposed process.
The idea is to design a mini-studio flexible enough to be able to change the shooting parameters because this realization is quite technical.
Photographing glasses may seem simple, but it requires a minimum of care. The lenses are glued to their support so as not to tip over when triggered. This support is a tray fixed on an old skateboard.
This assembly makes it possible to move the plate at the right speed (skate wheels) and more fluidly than if the latter were moved by itself. A bit like using a Dolly, but it’s homemade!
The assembly is placed on an inclined shelf with a metal stopper allowing the skateboard to be positioned always in the same place during each attempt to take a picture.

Photo studio tutorial: studio preparation
Lighting
Nothing complex, only one cobra flash is used to take the photo.
The flash is directed towards the white wall which forms the backdrop of the studio, it is triggered using a sound-sensitive trigger (the sound of the skate touching the stop). Directing the flash towards the wall allows to have a very diffuse light on the glasses, by reflection. Using a frontal light would have given harder lighting, unsuitable for this photo due to the very nature of the glasses, which is reflective.
The shooting
At the time of the shooting the glasses are filled, the light of the room is cut, the shutter of the body is opened (manual mode, 3 second exposure).
The tray with the glasses is released. It starts rolling and hits a stopper: the sound of the shock activates the shutter release which makes the flash go off. The shutter closes after 3 seconds, the picture is taken.
The plastic sheet visible on the left serves to prevent liquid splashes and allows easy cleaning of the stage. The shock being not very violent, there is not a lot of projections but it is better to be safe than sorry!

Photo studio tutorial: preparation
The sound trigger (for DIY enthusiasts)
When the platter hits the stopper, a piezo element detects the noise. An electronic trigger activates the flash. You can find the schematic of the trigger and the list of components on the Hiviz website. This complex principle has the advantage of being flexible in use and allows the photographer to easily adjust all the parameters. Any other trigger system can do the trick.
The flash trigger time is an essential criterion: if the flash fires too early, the liquid is still in the glasses, if it fires too late the liquid is… on the ground.
You can use a commercial flash trigger that will have to be adapted to detect noise if you are not too handy (learn more about this type of assembly).
Splash studio photo tutorial: the result
Take the time to experiment to verify that the set will give you the required framing, it’s always easier to do this as long as the glasses are empty!
Focus should be done on the lenses all aligned to avoid sharpness defects. You will also need to adjust shooting parameters like aperture and ISO sensitivity to get the correct exposure.

And the end result:

Once the result is achieved, you can have fun varying the content of the glasses, the rolling speed, the nature of the light, etc.

Good photos !!
Source: DIY Photography
Photos: Vincent Riemersma
Here is a photo studio tutorial that shows you how to take a photo of liquid spurting out of several glasses. This tutorial is brought to you by Vincent riemersma on his Flickr account.

Photos (C) Vincent Riemersma
Photo studio tutorial: Preparation
As with some studio photos (see for example “Black or White”) the preparation necessary to take this photo is substantial but completely within your reach if you take the time to follow the proposed process.
The idea is to design a mini-studio flexible enough to be able to change the shooting parameters because this realization is quite technical.
Photographing glasses may seem simple, but it requires a minimum of care. The lenses are glued to their support so as not to tip over when triggered. This support is a tray fixed on an old skateboard.
This assembly makes it possible to move the plate at the right speed (skate wheels) and more fluidly than if the latter were moved by itself. A bit like using a Dolly, but it’s homemade!
The assembly is placed on an inclined shelf with a metal stopper allowing the skateboard to be positioned always in the same place during each attempt to take a picture.

Photo studio tutorial: studio preparation
Lighting
Nothing complex, only one cobra flash is used to take the photo.
The flash is directed towards the white wall which forms the backdrop of the studio, it is triggered using a sound-sensitive trigger (the sound of the skate touching the stop). Directing the flash towards the wall allows to have a very diffuse light on the glasses, by reflection. Using a frontal light would have given harder lighting, unsuitable for this photo due to the very nature of the glasses, which is reflective.
The shooting
At the time of the shooting the glasses are filled, the light of the room is cut, the shutter of the body is opened (manual mode, 3 second exposure).
The tray with the glasses is released. It starts rolling and hits a stopper: the sound of the shock activates the shutter release which makes the flash go off. The shutter closes after 3 seconds, the picture is taken.
The plastic sheet visible on the left serves to prevent liquid splashes and allows easy cleaning of the stage. The shock being not very violent, there is not a lot of projections but it is better to be safe than sorry!

Photo studio tutorial: preparation
The sound trigger (for DIY enthusiasts)
When the platter hits the stopper, a piezo element detects the noise. An electronic trigger activates the flash. You can find the schematic of the trigger and the list of components on the Hiviz website. This complex principle has the advantage of being flexible in use and allows the photographer to easily adjust all the parameters. Any other trigger system can do the trick.
The flash trigger time is an essential criterion: if the flash fires too early, the liquid is still in the glasses, if it fires too late the liquid is… on the ground.
You can use a commercial flash trigger that will have to be adapted to detect noise if you are not too handy (learn more about this type of assembly).
Splash studio photo tutorial: the result
Take the time to experiment to verify that the set will give you the required framing, it’s always easier to do this as long as the glasses are empty!
Focus should be done on the lenses all aligned to avoid sharpness defects. You will also need to adjust shooting parameters like aperture and ISO sensitivity to get the correct exposure.

And the end result:

Once the result is achieved, you can have fun varying the content of the glasses, the rolling speed, the nature of the light, etc.

Good photos !!
Source: DIY Photography
Photos: Vincent Riemersma



Discussion about this post