Here’s how to use Nikon Picture Controls with Luminar AI, Skylum’s RAW file post-processing software.
This procedure is valid for other brands of cameras which offer film simulations and particular renderings.
Take advantage of the discount code NIKONPASSION for the purchase of Luminar AI
How to use Nikon Picture Controls with Luminar: background
Only Nikon software (such as Nikon NX Studio) can truly change Picture Control after shooting when using RAW format. Nikon, like other manufacturers, does not allow this change in other software.
This limit prevents you from seeing which rendering would be the most appropriate for your photos if you had any doubts during the shooting. You have to try to reproduce the Picture Control, depending on the software it’s tedious.
However, there is a way to get out of this faster, by using Adobe Color Profiles instead of your software’s profiles, if your software allows it. This is the case with Luminar AI.
You can then display the equivalent of the Nikon rendering of your choice in Luminar AI without any prior conversion.
Warning: Luminar AI simulates Picture Control, it doesn’t really change it like Nikon NX Studio would. But the result on the screen is very satisfactory and allows you to finalize the processing of your NEF without having to spend time getting closer to the original Nikon rendering. Luminar AI does it for you.
Install Adobe DNG Converter
To use Nikon Picture Controls in Luminar AI, first download the free Adobe DNG Converter utility from the Adobe website.
Download link DNG Converter for Windows or MacOS
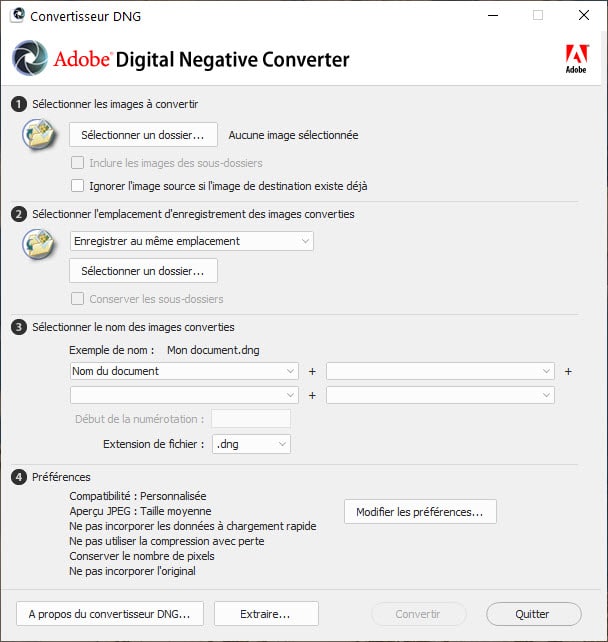
Once the download is complete, install this utility (installation details are given on the download site).
That’s all you have to do. This installation copies the files necessary for reading and interpreting Picture Controls in Luminar AI to your computer.
Note that you do not have to convert your RAW files or open this utility later. The only installation, once and for all, is enough.
Using Nikon Picture Controls in Luminar
Once the installation of DNG Converter is complete, restart your computer and launch Luminar AI.
Choose a Nikon RAW file (NEF extension) and open it in the Edit module.
Select the Light tool.
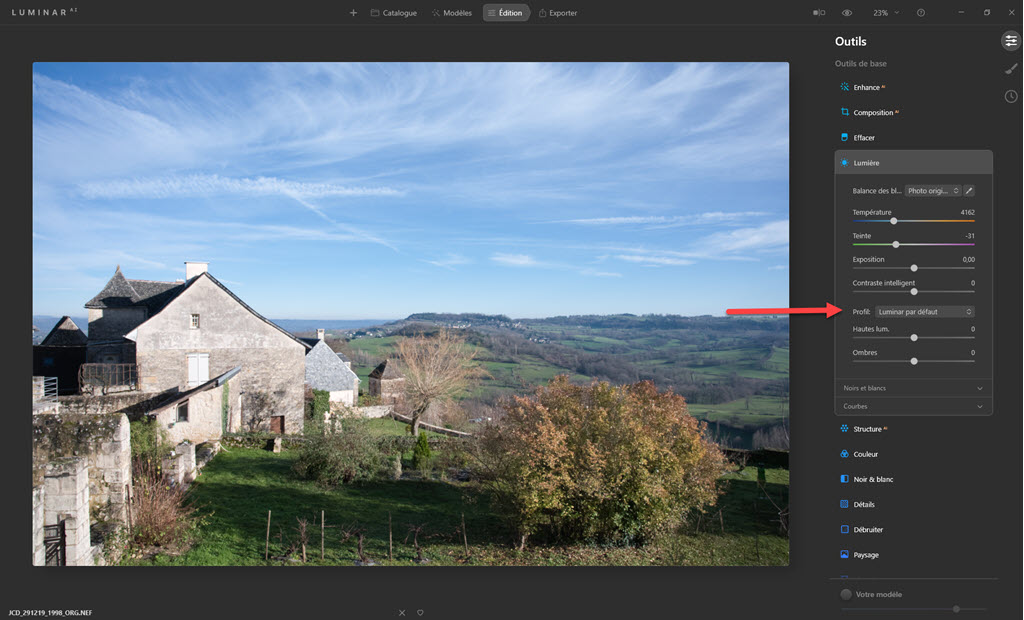
Default Luminar Profile in Luminar AI
Click on the drop-down list next to “Profile:”
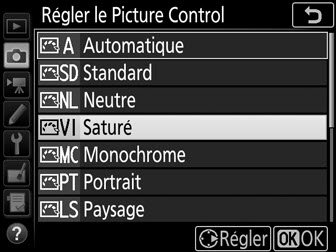
All you have to do is choose the Picture Control that interests you. The main Picture Controls are available:
- neutral (flat)
- standard
- landscape
- portrait
- saturated (vivid)
- monochrome
Creative Picture Controls from recent Nikon’s aren’t available, however, but Luminar models are just as easy to come to your aid.
The names of the Picture Controls may appear in English, I translated them to you above.
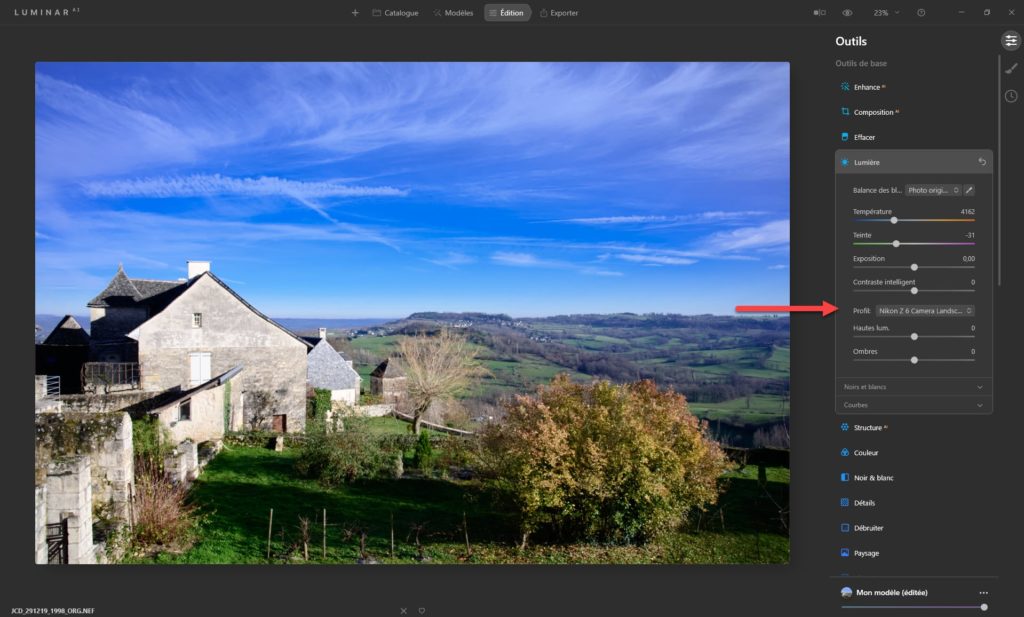
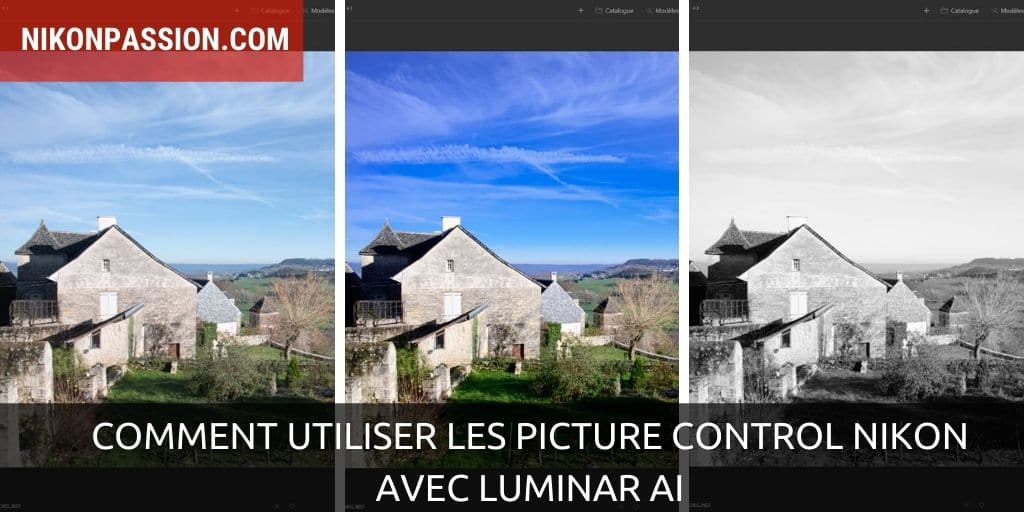
Nikon Z 6 NEF – Landscape Picture Control profile
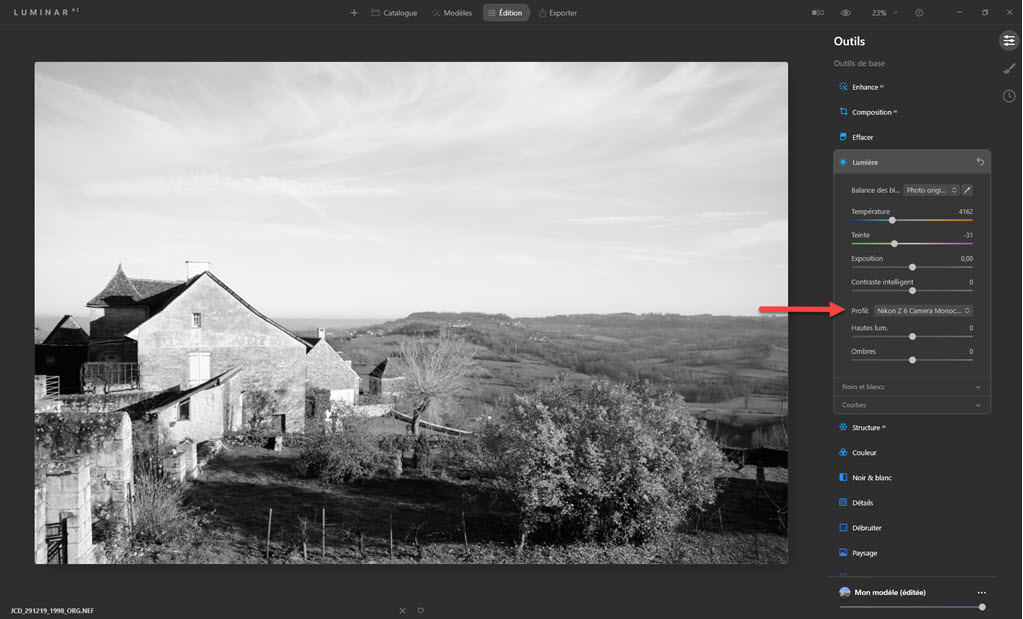
Nikon Z 6 – Monochrome (Black and White) Picture Control in Luminar AI
But also …
This procedure allows the display of other types of renderings and / or simulations of other brands of cameras in Luminar AI. Do the test with yours if it is not a Nikon, you should find your renderings if they are known to DNG Converter.
Take advantage of the discount code NIKONPASSION for the purchase of Luminar AI
Here’s how to use Nikon Picture Controls with Luminar AI, Skylum’s RAW file post-processing software.
This procedure is valid for other brands of cameras which offer film simulations and particular renderings.
Take advantage of the discount code NIKONPASSION for the purchase of Luminar AI
How to use Nikon Picture Controls with Luminar: background
Only Nikon software (such as Nikon NX Studio) can truly change Picture Control after shooting when using RAW format. Nikon, like other manufacturers, does not allow this change in other software.
This limit prevents you from seeing which rendering would be the most appropriate for your photos if you had any doubts during the shooting. You have to try to reproduce the Picture Control, depending on the software it’s tedious.
However, there is a way to get out of this faster, by using Adobe Color Profiles instead of your software’s profiles, if your software allows it. This is the case with Luminar AI.
You can then display the equivalent of the Nikon rendering of your choice in Luminar AI without any prior conversion.
Warning: Luminar AI simulates Picture Control, it doesn’t really change it like Nikon NX Studio would. But the result on the screen is very satisfactory and allows you to finalize the processing of your NEF without having to spend time getting closer to the original Nikon rendering. Luminar AI does it for you.
Install Adobe DNG Converter
To use Nikon Picture Controls in Luminar AI, first download the free Adobe DNG Converter utility from the Adobe website.
Download link DNG Converter for Windows or MacOS
Once the download is complete, install this utility (installation details are given on the download site).
That’s all you have to do. This installation copies the files necessary for reading and interpreting Picture Controls in Luminar AI to your computer.
Note that you do not have to convert your RAW files or open this utility later. The only installation, once and for all, is enough.
Using Nikon Picture Controls in Luminar
Once the installation of DNG Converter is complete, restart your computer and launch Luminar AI.
Choose a Nikon RAW file (NEF extension) and open it in the Edit module.
Select the Light tool.
Default Luminar Profile in Luminar AI
Click on the drop-down list next to “Profile:”
All you have to do is choose the Picture Control that interests you. The main Picture Controls are available:
- neutral (flat)
- standard
- landscape
- portrait
- saturated (vivid)
- monochrome
Creative Picture Controls from recent Nikon’s aren’t available, however, but Luminar models are just as easy to come to your aid.
The names of the Picture Controls may appear in English, I translated them to you above.
Nikon Z 6 NEF – Landscape Picture Control profile
Nikon Z 6 – Monochrome (Black and White) Picture Control in Luminar AI
But also …
This procedure allows the display of other types of renderings and / or simulations of other brands of cameras in Luminar AI. Do the test with yours if it is not a Nikon, you should find your renderings if they are known to DNG Converter.
Take advantage of the discount code NIKONPASSION for the purchase of Luminar AI


Discussion about this post