Doing still life in the studio is not just planning the still life and a camera. It is a set of details that you must prepare in advance so that the session takes place in the best conditions. Here are some tips for organizing a typical session.
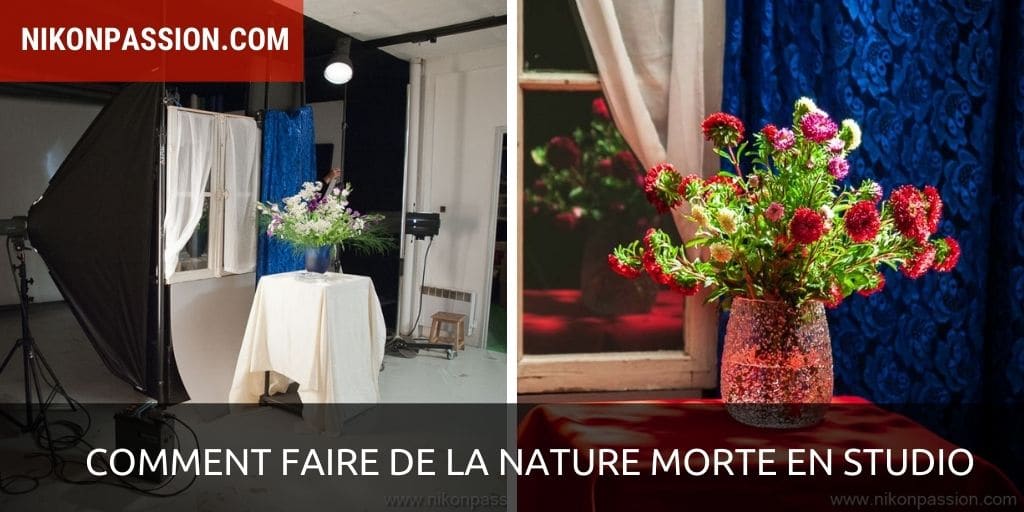
How to set up a photo studio at home, the guide
Making still life in the studio: preparing the decor elements
In a studio, unless it is already prepared, you will not have any particular setting for your session. So you have to think beforehand about what you want to have, the background you want to use, and group all the elements.
During this session, the studio was empty when we arrived, the set was built before starting any shooting. The idea was to reconstitute a corner of an apartment to photograph a still life, in this case a bouquet of flowers in different lighting situations (it was an initiation session at the studio).
It was therefore necessary to find and bring:
- 4 wooden studs placed one on top of the other to make the base of the window and simulate the wall
- a window with its two leaves (recovered from a demolition site)
- gray cardboard to simulate the wall covering (we see it folded towards the ground)
- a small support table with its tablecloth
- two bouquets (be careful not to buy them too early, the flowers wilt quickly)
- a blue sheer (and a red one for the rest) to simulate a wall decor
- two curtains for the window
- fasteners, string, gaffer, pliers, etc.
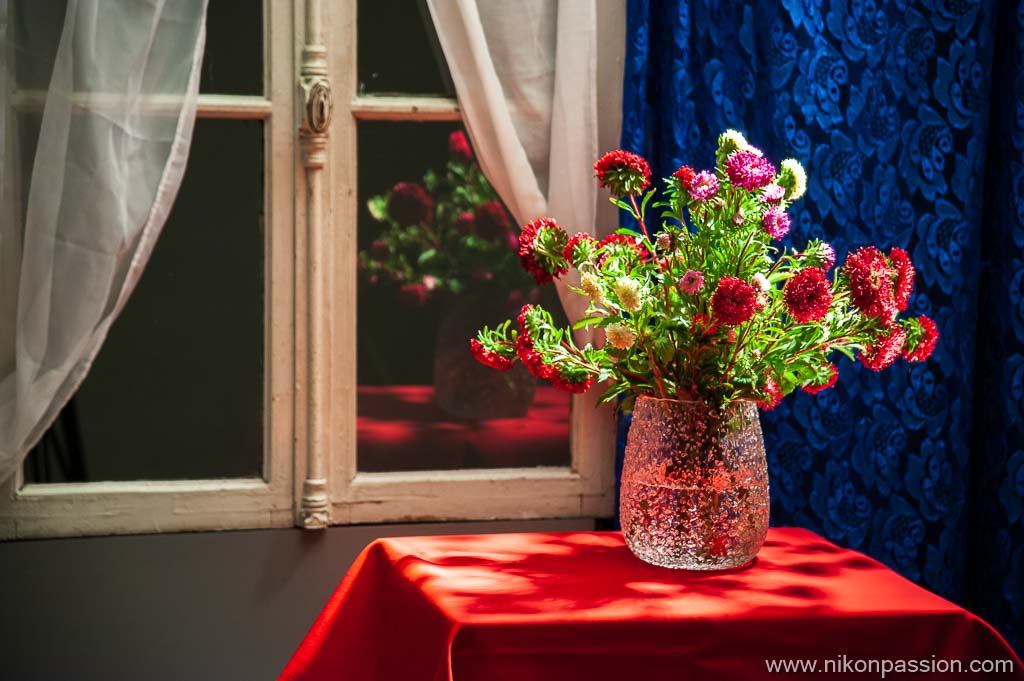
Example of a photo taken with the decoration presented below
Setting up the studio
Once the different elements have been assembled, here is the reconstituted apartment corner. The lights are arranged on either side of the decor in order to illuminate the scene. A large softbox on the left provides the main lighting, reproducing natural light. Background lighting placed behind the window reproduces the sunlight, arriving naturally through the panes.
The top right lighting illuminates the main subject by varying the effects. A honeycomb grid concentrates the light on the bouquet, a snoot gives a more intense light beam on some details.
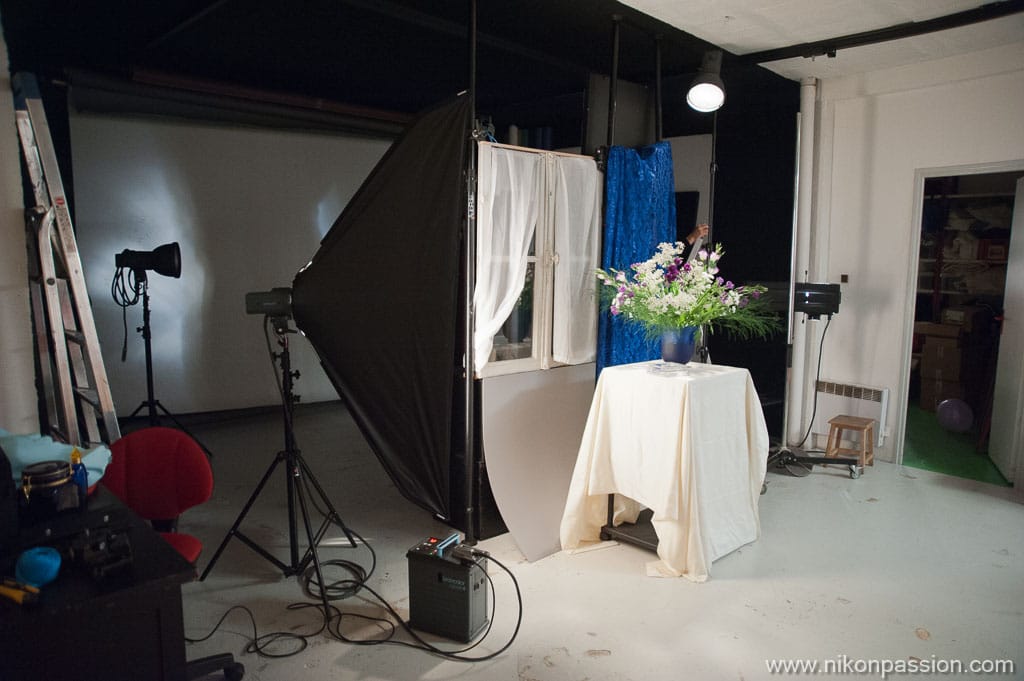
still life studio: the set created for the session
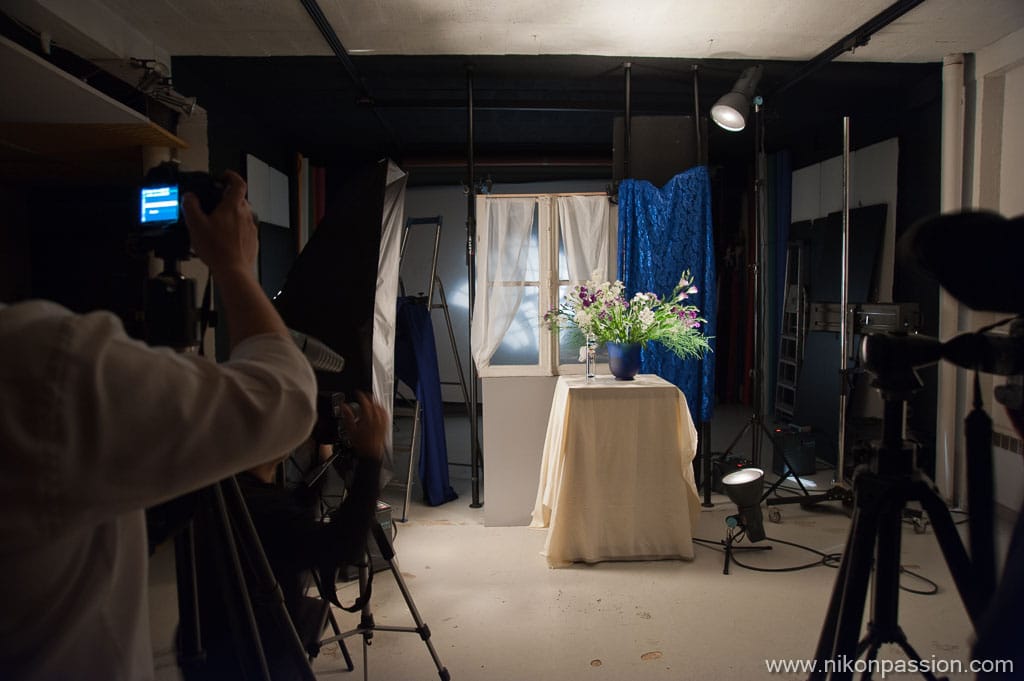
Still Life studio session – preparation
If you think about bringing elements of different colors, you can vary your decor easily during the session, it can be interesting depending on the subject. here it is the tablecloth and the wall fabric that have changed color.
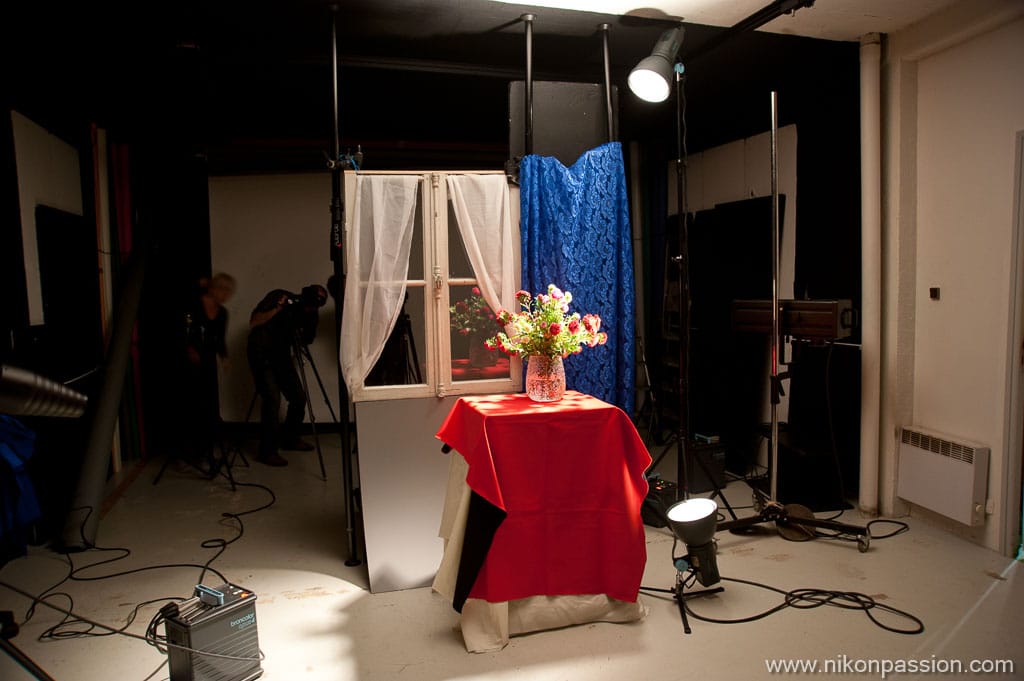
The decor that was used to make the introductory photo
Vary the decor and lighting
With additional elements, you can try variations in terms of composition and lighting. Here the idea was to play with the notion of frame, so a simple frame stripped of its glass was suspended in front of the main subject, held by a transparent nylon thread which is itself fixed to the ceiling.
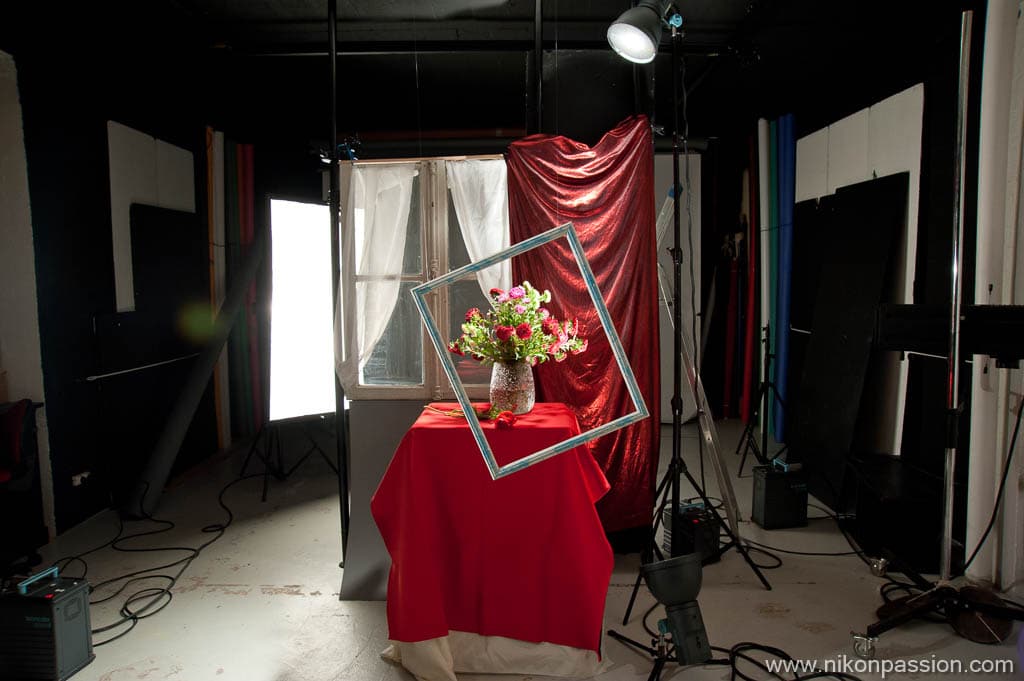
Let your creativity run free
At the end of the session, you can change your decor. Here the wall-window-wall decoration set has been removed to make room for the only original background of the studio. This, lit by two large light boxes, created a wall of light in the background. The subject, placed a few meters in front of this wall, is found against the light with interesting graphic effects.
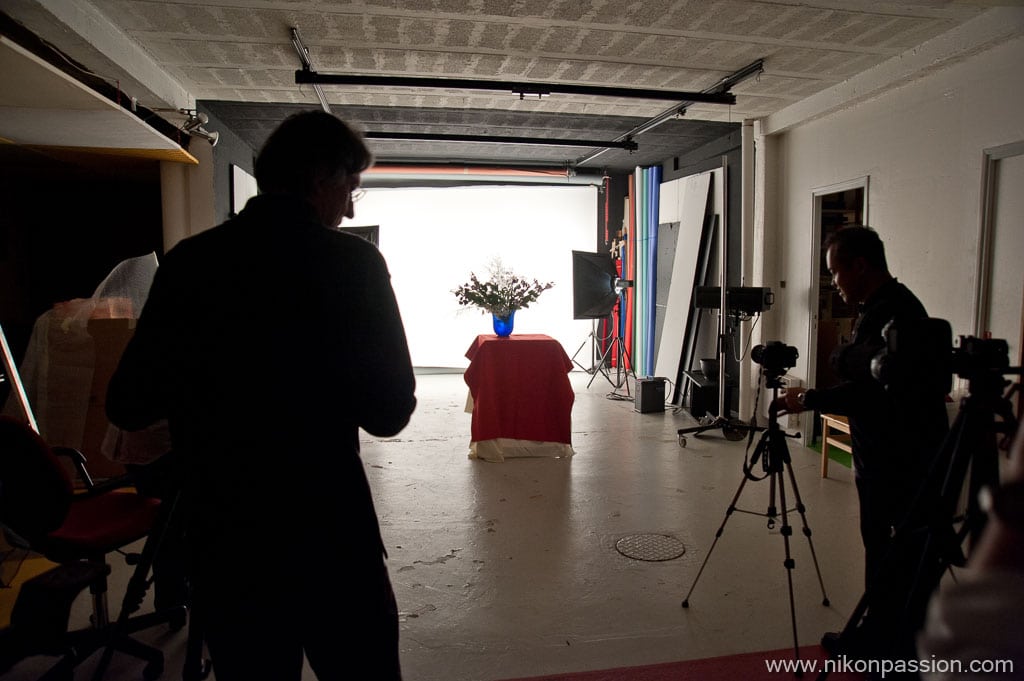
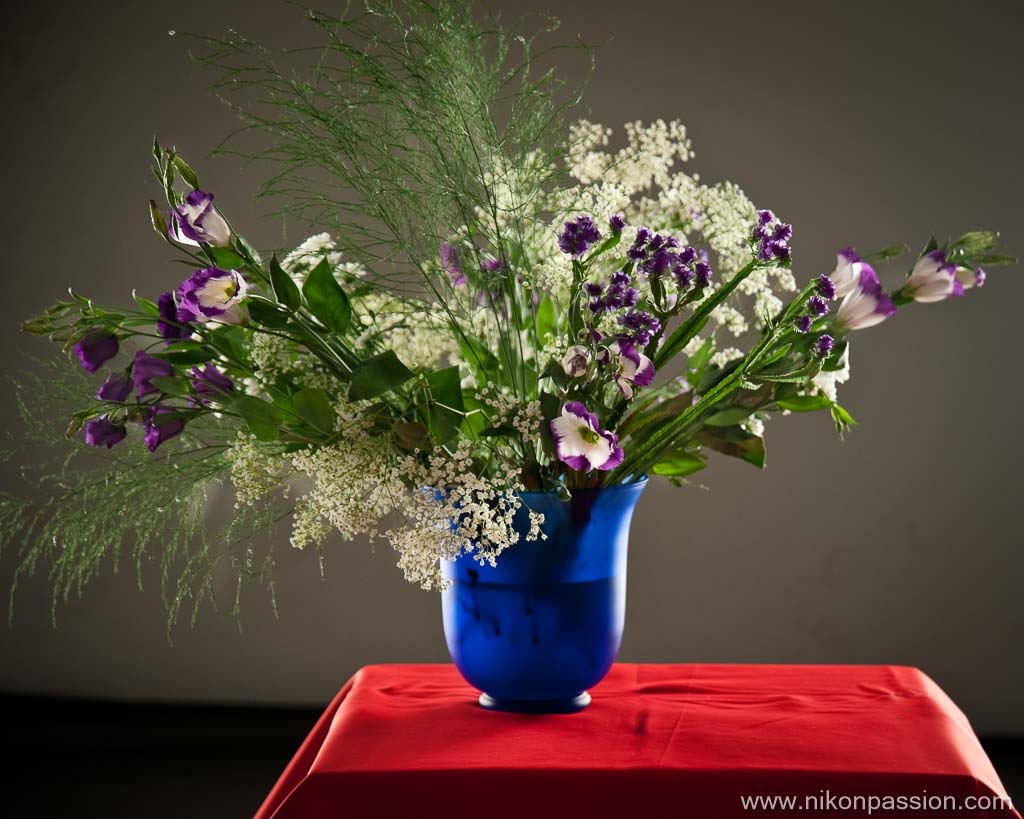
A stripped-down decor with a bright wall in the background,
varying the intensity of the lighting allows you to vary the rendering of the image
Making still life in the studio: conclusion
A still life session in the studio is getting ready, and all it takes is a few accessories to make it successful. Remember to plan in advance your session, your decor, what you want to photograph, in what context, for what rendering.
The session which served as an illustration for this article lasted three hours, setting up the set (and dismantling) including. With no other objective than that of studio training, it gives an idea of the creative possibilities available to you if you take care to prepare a minimum in advance.
Last advice: plan an adequate vehicle because transporting an entire window and the rest of the decor, it can quickly become problematic if you do not have a large trunk!
Want to learn more about studio photography? I invite you to get the guide below which presents the necessary equipment, shooting techniques and many examples.
How to set up a photo studio at home, the guide
Doing still life in the studio is not just planning the still life and a camera. It is a set of details that you must prepare in advance so that the session takes place in the best conditions. Here are some tips for organizing a typical session.

How to set up a photo studio at home, the guide
Making still life in the studio: preparing the decor elements
In a studio, unless it is already prepared, you will not have any particular setting for your session. So you have to think beforehand about what you want to have, the background you want to use, and group all the elements.
During this session, the studio was empty when we arrived, the set was built before starting any shooting. The idea was to reconstitute a corner of an apartment to photograph a still life, in this case a bouquet of flowers in different lighting situations (it was an initiation session at the studio).
It was therefore necessary to find and bring:
- 4 wooden studs placed one on top of the other to make the base of the window and simulate the wall
- a window with its two leaves (recovered from a demolition site)
- gray cardboard to simulate the wall covering (we see it folded towards the ground)
- a small support table with its tablecloth
- two bouquets (be careful not to buy them too early, the flowers wilt quickly)
- a blue sheer (and a red one for the rest) to simulate a wall decor
- two curtains for the window
- fasteners, string, gaffer, pliers, etc.

Example of a photo taken with the decoration presented below
Setting up the studio
Once the different elements have been assembled, here is the reconstituted apartment corner. The lights are arranged on either side of the decor in order to illuminate the scene. A large softbox on the left provides the main lighting, reproducing natural light. Background lighting placed behind the window reproduces the sunlight, arriving naturally through the panes.
The top right lighting illuminates the main subject by varying the effects. A honeycomb grid concentrates the light on the bouquet, a snoot gives a more intense light beam on some details.

still life studio: the set created for the session

Still Life studio session – preparation
If you think about bringing elements of different colors, you can vary your decor easily during the session, it can be interesting depending on the subject. here it is the tablecloth and the wall fabric that have changed color.

The decor that was used to make the introductory photo
Vary the decor and lighting
With additional elements, you can try variations in terms of composition and lighting. Here the idea was to play with the notion of frame, so a simple frame stripped of its glass was suspended in front of the main subject, held by a transparent nylon thread which is itself fixed to the ceiling.

Let your creativity run free
At the end of the session, you can change your decor. Here the wall-window-wall decoration set has been removed to make room for the only original background of the studio. This, lit by two large light boxes, created a wall of light in the background. The subject, placed a few meters in front of this wall, is found against the light with interesting graphic effects.


A stripped-down decor with a bright wall in the background,
varying the intensity of the lighting allows you to vary the rendering of the image
Making still life in the studio: conclusion
A still life session in the studio is getting ready, and all it takes is a few accessories to make it successful. Remember to plan in advance your session, your decor, what you want to photograph, in what context, for what rendering.
The session which served as an illustration for this article lasted three hours, setting up the set (and dismantling) including. With no other objective than that of studio training, it gives an idea of the creative possibilities available to you if you take care to prepare a minimum in advance.
Last advice: plan an adequate vehicle because transporting an entire window and the rest of the decor, it can quickly become problematic if you do not have a large trunk!
Want to learn more about studio photography? I invite you to get the guide below which presents the necessary equipment, shooting techniques and many examples.
How to set up a photo studio at home, the guide
Doing still life in the studio is not just planning the still life and a camera. It is a set of details that you must prepare in advance so that the session takes place in the best conditions. Here are some tips for organizing a typical session.

How to set up a photo studio at home, the guide
Making still life in the studio: preparing the decor elements
In a studio, unless it is already prepared, you will not have any particular setting for your session. So you have to think beforehand about what you want to have, the background you want to use, and group all the elements.
During this session, the studio was empty when we arrived, the set was built before starting any shooting. The idea was to reconstitute a corner of an apartment to photograph a still life, in this case a bouquet of flowers in different lighting situations (it was an initiation session at the studio).
It was therefore necessary to find and bring:
- 4 wooden studs placed one on top of the other to make the base of the window and simulate the wall
- a window with its two leaves (recovered from a demolition site)
- gray cardboard to simulate the wall covering (we see it folded towards the ground)
- a small support table with its tablecloth
- two bouquets (be careful not to buy them too early, the flowers wilt quickly)
- a blue sheer (and a red one for the rest) to simulate a wall decor
- two curtains for the window
- fasteners, string, gaffer, pliers, etc.

Example of a photo taken with the decoration presented below
Setting up the studio
Once the different elements have been assembled, here is the reconstituted apartment corner. The lights are arranged on either side of the decor in order to illuminate the scene. A large softbox on the left provides the main lighting, reproducing natural light. Background lighting placed behind the window reproduces the sunlight, arriving naturally through the panes.
The top right lighting illuminates the main subject by varying the effects. A honeycomb grid concentrates the light on the bouquet, a snoot gives a more intense light beam on some details.

still life studio: the set created for the session

Still Life studio session – preparation
If you think about bringing elements of different colors, you can vary your decor easily during the session, it can be interesting depending on the subject. here it is the tablecloth and the wall fabric that have changed color.

The decor that was used to make the introductory photo
Vary the decor and lighting
With additional elements, you can try variations in terms of composition and lighting. Here the idea was to play with the notion of frame, so a simple frame stripped of its glass was suspended in front of the main subject, held by a transparent nylon thread which is itself fixed to the ceiling.

Let your creativity run free
At the end of the session, you can change your decor. Here the wall-window-wall decoration set has been removed to make room for the only original background of the studio. This, lit by two large light boxes, created a wall of light in the background. The subject, placed a few meters in front of this wall, is found against the light with interesting graphic effects.


A stripped-down decor with a bright wall in the background,
varying the intensity of the lighting allows you to vary the rendering of the image
Making still life in the studio: conclusion
A still life session in the studio is getting ready, and all it takes is a few accessories to make it successful. Remember to plan in advance your session, your decor, what you want to photograph, in what context, for what rendering.
The session which served as an illustration for this article lasted three hours, setting up the set (and dismantling) including. With no other objective than that of studio training, it gives an idea of the creative possibilities available to you if you take care to prepare a minimum in advance.
Last advice: plan an adequate vehicle because transporting an entire window and the rest of the decor, it can quickly become problematic if you do not have a large trunk!
Want to learn more about studio photography? I invite you to get the guide below which presents the necessary equipment, shooting techniques and many examples.
How to set up a photo studio at home, the guide
Doing still life in the studio is not just planning the still life and a camera. It is a set of details that you must prepare in advance so that the session takes place in the best conditions. Here are some tips for organizing a typical session.

How to set up a photo studio at home, the guide
Making still life in the studio: preparing the decor elements
In a studio, unless it is already prepared, you will not have any particular setting for your session. So you have to think beforehand about what you want to have, the background you want to use, and group all the elements.
During this session, the studio was empty when we arrived, the set was built before starting any shooting. The idea was to reconstitute a corner of an apartment to photograph a still life, in this case a bouquet of flowers in different lighting situations (it was an initiation session at the studio).
It was therefore necessary to find and bring:
- 4 wooden studs placed one on top of the other to make the base of the window and simulate the wall
- a window with its two leaves (recovered from a demolition site)
- gray cardboard to simulate the wall covering (we see it folded towards the ground)
- a small support table with its tablecloth
- two bouquets (be careful not to buy them too early, the flowers wilt quickly)
- a blue sheer (and a red one for the rest) to simulate a wall decor
- two curtains for the window
- fasteners, string, gaffer, pliers, etc.

Example of a photo taken with the decoration presented below
Setting up the studio
Once the different elements have been assembled, here is the reconstituted apartment corner. The lights are arranged on either side of the decor in order to illuminate the scene. A large softbox on the left provides the main lighting, reproducing natural light. Background lighting placed behind the window reproduces the sunlight, arriving naturally through the panes.
The top right lighting illuminates the main subject by varying the effects. A honeycomb grid concentrates the light on the bouquet, a snoot gives a more intense light beam on some details.

still life studio: the set created for the session

Still Life studio session – preparation
If you think about bringing elements of different colors, you can vary your decor easily during the session, it can be interesting depending on the subject. here it is the tablecloth and the wall fabric that have changed color.

The decor that was used to make the introductory photo
Vary the decor and lighting
With additional elements, you can try variations in terms of composition and lighting. Here the idea was to play with the notion of frame, so a simple frame stripped of its glass was suspended in front of the main subject, held by a transparent nylon thread which is itself fixed to the ceiling.

Let your creativity run free
At the end of the session, you can change your decor. Here the wall-window-wall decoration set has been removed to make room for the only original background of the studio. This, lit by two large light boxes, created a wall of light in the background. The subject, placed a few meters in front of this wall, is found against the light with interesting graphic effects.


A stripped-down decor with a bright wall in the background,
varying the intensity of the lighting allows you to vary the rendering of the image
Making still life in the studio: conclusion
A still life session in the studio is getting ready, and all it takes is a few accessories to make it successful. Remember to plan in advance your session, your decor, what you want to photograph, in what context, for what rendering.
The session which served as an illustration for this article lasted three hours, setting up the set (and dismantling) including. With no other objective than that of studio training, it gives an idea of the creative possibilities available to you if you take care to prepare a minimum in advance.
Last advice: plan an adequate vehicle because transporting an entire window and the rest of the decor, it can quickly become problematic if you do not have a large trunk!
Want to learn more about studio photography? I invite you to get the guide below which presents the necessary equipment, shooting techniques and many examples.
How to set up a photo studio at home, the guide



Discussion about this post