To take creative pictures, you don’t always need a new camera or lens. If you already have both, simply identify what you want to photograph and rotate around the subject.
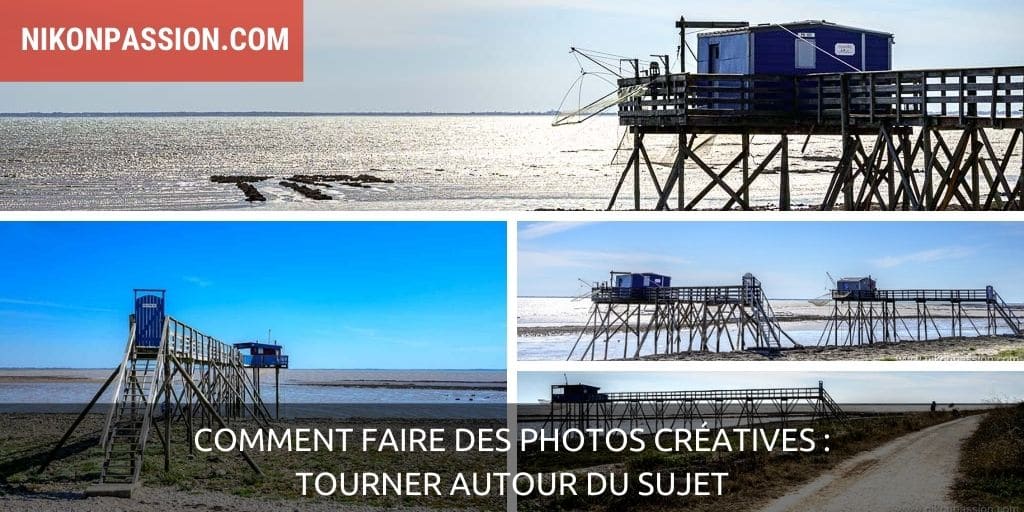
Rather than offering you a long theory on creativity in photography, I have chosen to share a series of images made on Isle Madame, on the Atlantic coast. I present them to you by explaining, as if you were next to me, how I approached the subject, why and how I turned around, and how I arrived at these results.
What is creative photography?
Maybe you think you’re not creative. That you’re making good pictures but not interesting enough. That you’ll never be able to make creative pictures. That’s not true.
A creative, original photo is nothing more than a photo that catches the eye of the viewer. There is something special about it, something that appeals, that expresses an emotion, a desire, that gives pleasure. It can be learned.
To make creative photos is to have these criteria in mind, before shooting, as well as after shooting, since the photographer’s work does not stop with the shot.
Identify a topic you like
To make creative pictures, you need a subject. Not just any subject: a subject you like.
If you don’t like what you photograph, there are few people who don’t like what you photograph either. If you like it and it doesn’t please others, it doesn’t matter, you’re doing the photo for yourself above all (I consider that you don’t respond to a precise order).
I see too many pictures where the subject doesn’t jump out at you. Sometimes there are even several subjects, and my eye doesn’t know which one to focus on. These pictures are not uninteresting, but the whole thing is confusing, the frame is loaded, it’s disturbing. What is disturbing keeps the viewer away.
Filling your frame with a single subject is always a better approach if you don’t master the composition.
Make a first wide shot image
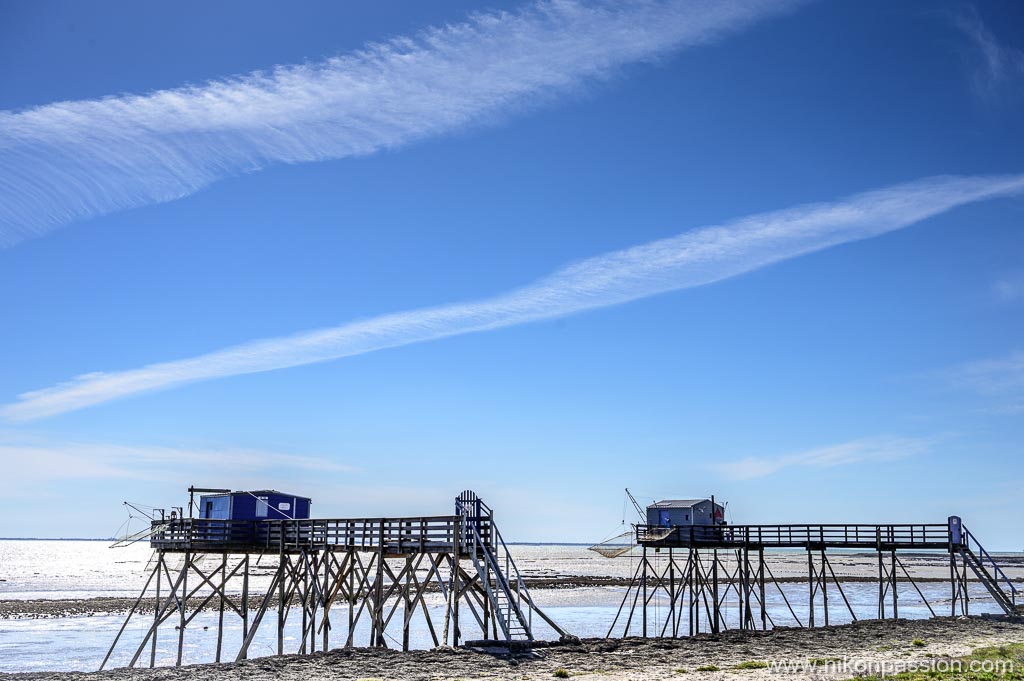
Nikon Z 6 + NIKKOR Z 24-70 mm f/4 – 39 mm -1/1600 sec. – f/8 – ISO 100
In this first picture, I’m quite far from the subject. I do not respect the rule stated above: there are two subjects, two fishermen’s huts, the carrelets of Île Madame.
It is a first approach, I will not retain this photo, but it allowed me to take a stand.
When you talk about your subject, it is important to take such pictures, even if you know you won’t remember them. It’s a warm-up, a way of getting to grips with the subject even when you haven’t yet got around to it.
I didn’t process this photo knowing I wouldn’t keep it, so there’s no point in wasting time.
Turn around the subject, one side…
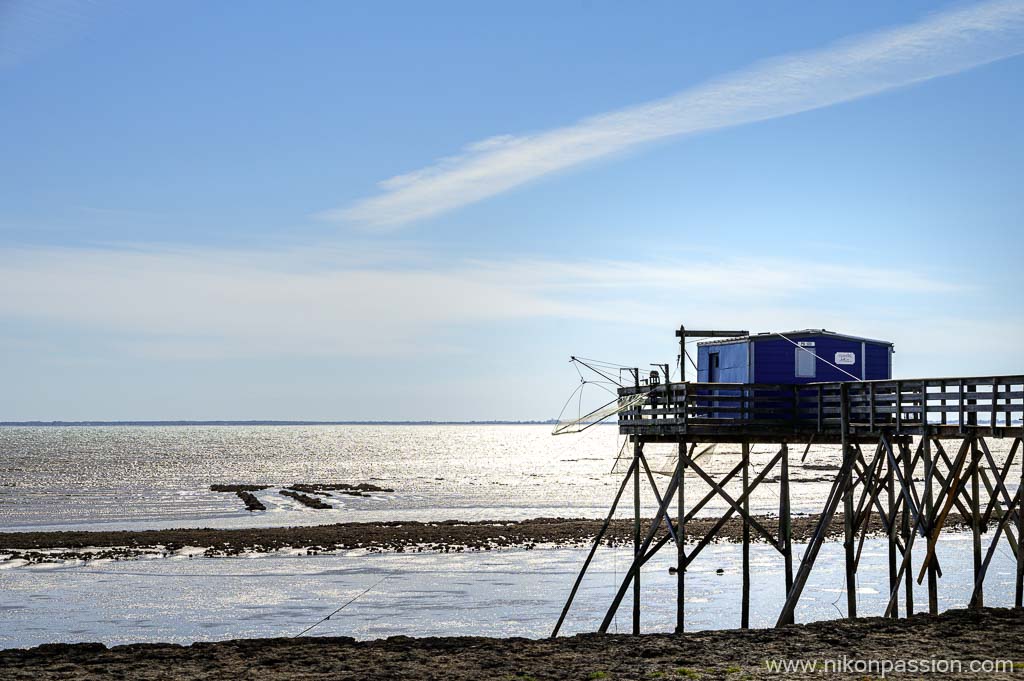
Nikon Z 6 + NIKKOR Z 24-70 mm f/4 – 70 mm -1/1600 sec. – f/8 – ISO 100
Realizing that two squares was one too many, I shifted. I was then able to frame a single hut, highlighting it in relation to the sky and the horizon, without neglecting the details: the wooden pillars, a few rocks in the water, and wires running from the hut to the ground.
This image is already more interesting, it focuses the gaze on the hut while letting it escape to the horizon in the distance, thanks to a very present light.
…then the other
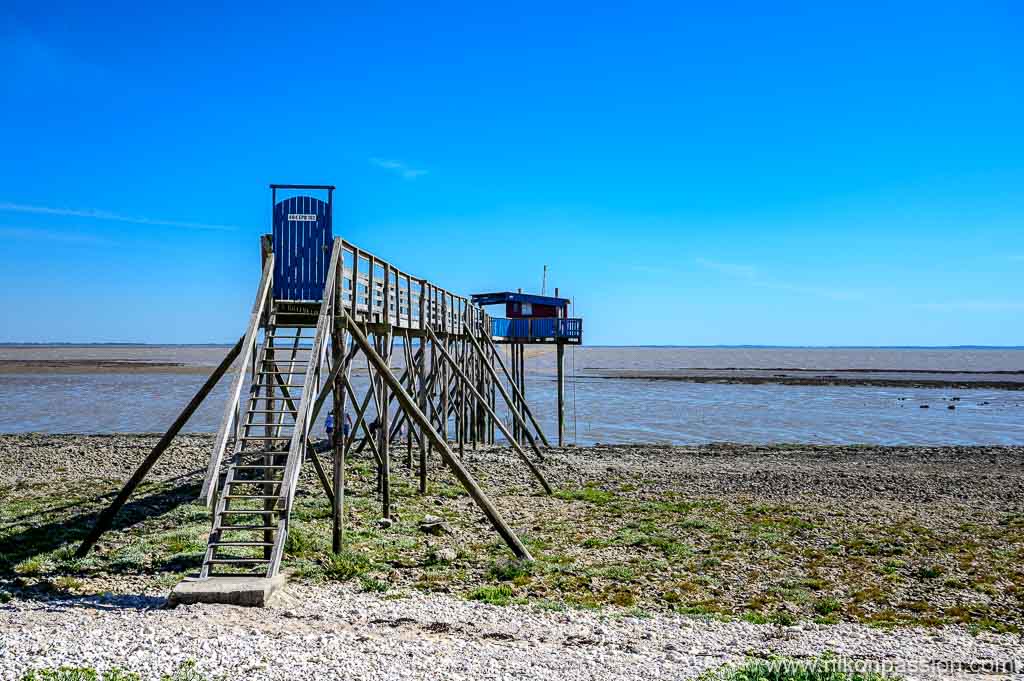
Nikon Z 6 + NIKKOR Z 24-70 mm f/4 – 34 mm -1/640 sec. – f/8 – ISO 100
A few dozen meters can change everything. For this third view, I went to the other side of the hut. The light is very different, the horizon too, you can see the back of the hut.
The staircase, clearly visible, leads us to the hut that takes us to the horizon. During the post-processing I adjusted the blue tones by working in particular on the darker blue of the hut and the blue of the sky.
I like this picture better than the previous one, its reading direction is more natural. The gaze starts from the left, goes to the center then the right before coming back to the left. This is the usual reading direction in our western culture.
Moving away
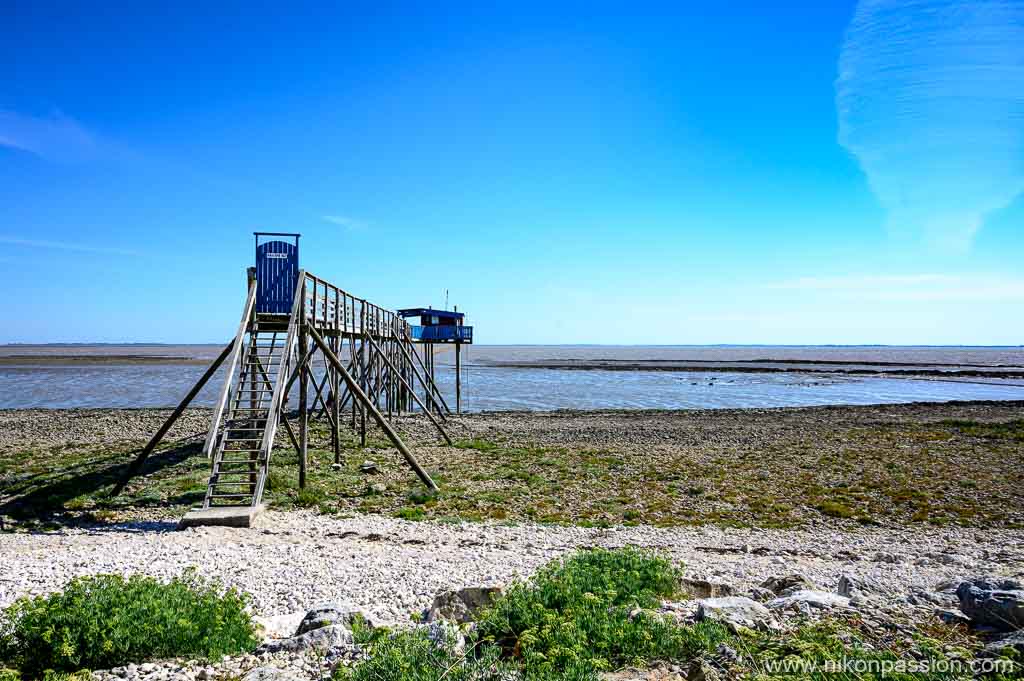
Nikon Z 6 + NIKKOR Z 24-70 mm f/4 – 24 mm -1/640 sec. – f/8 – ISO 100
Apart from portrait photography, I’m used to being wary of too tight shots. When I take pictures of nature, landscapes, I like to show the subject in its context.
For this new view, I moved back on the path, even out of it, so as to include the vegetation in the foreground. This allowed me to introduce a touch of green into the image, a color that counterbalances the blue of the hut and the sky, which is very present.
You notice in passing the very peculiar shape of the cloud on the right, it is not a retouch, it is the cloud as I saw it.
I prefer this picture to the previous one, for the context, the treatment of the colors, the light. With hindsight, I should have shifted so that the bottom of the hut is not aligned with the horizon line, so that it stands out from it to create a band of contrast between sky and earth. That would have made a more attractive arrangement.
To rotate around the subject, zoom in with your feet.
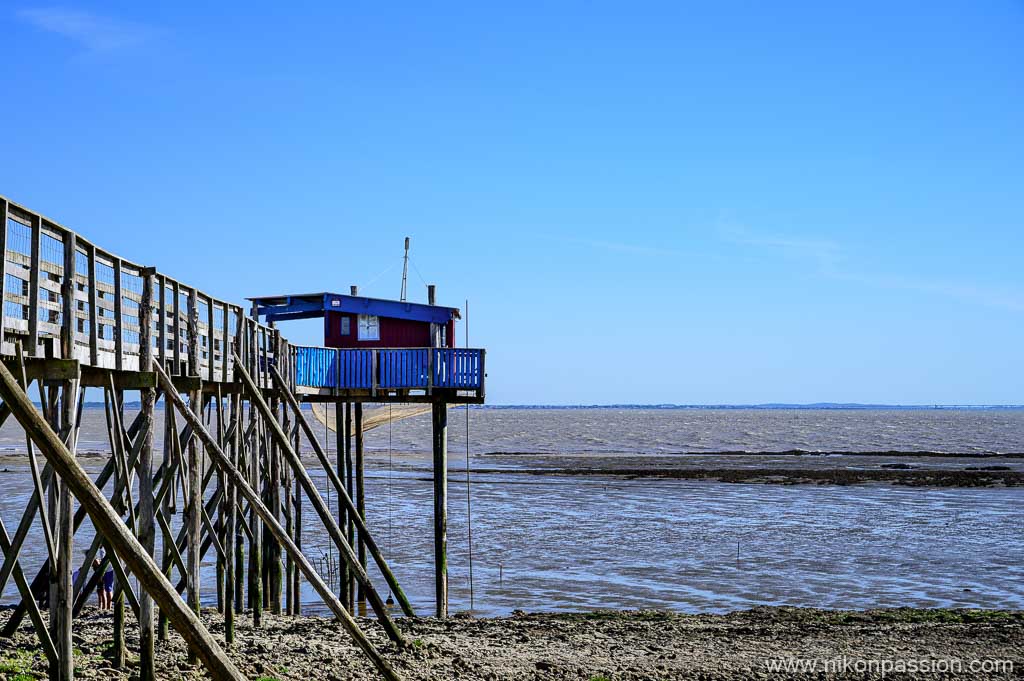
Nikon Z 6 + NIKKOR Z 24-70 mm f/4 – 70 mm -1/640 sec. – f/8 – ISO 100
New image and new framing. Here I approached the hut, I “zoomed with my feet”. Having a NIKKOR Z 24-7 mm f/4.0 on my Nikon Z 6, I couldn’t enlarge my subject too much by turning the zoom ring. It’s a bad for a good, zooming with your feet is a better way.
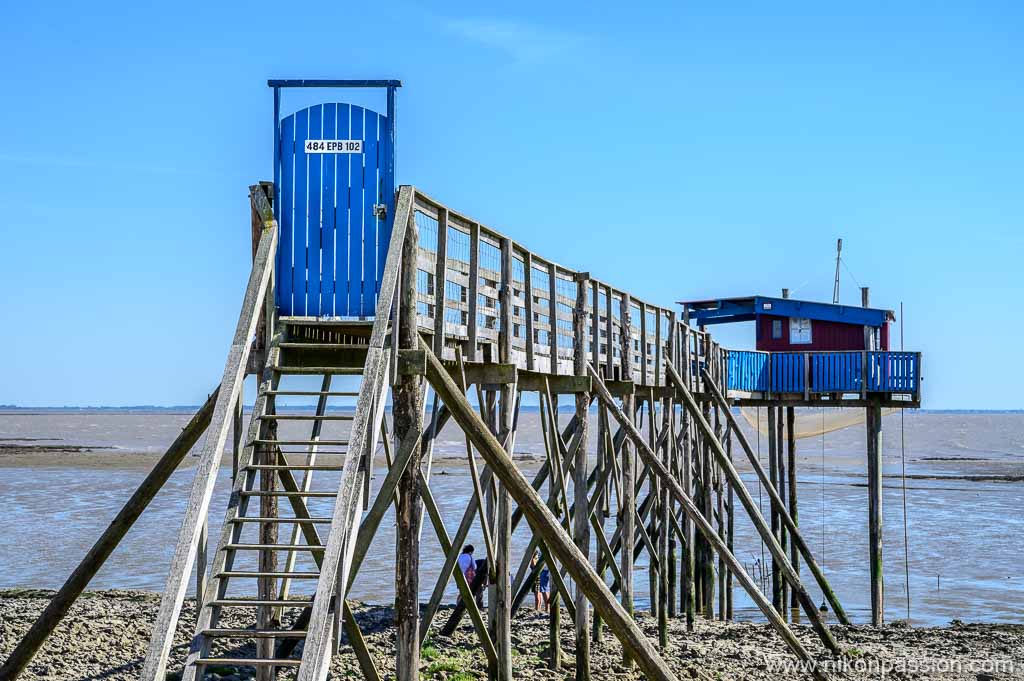
Nikon Z 6 + NIKKOR Z 24-70 mm f/4 – 70 mm -1/500 sec. – f/8 – ISO 100
The following picture highlights the beautiful wooden structure of the staircase and pillars. It is a picture without much interest, documentary at most. It will satisfy the carpenters and sinners but a little less the amateurs of creative photography.
Notice the people under the hut, that’s what I’m going to be interested in for the rest of this series.
Waiting for something to happen
“Photography” should rhyme with “patience.” Turning around is one thing, waiting for something to happen is another.
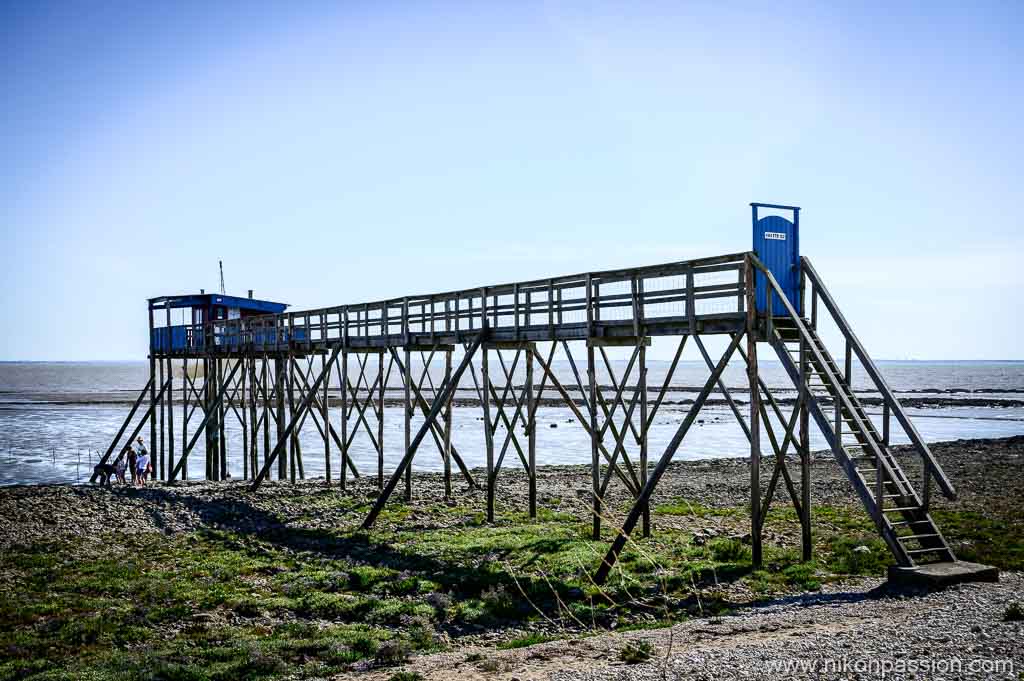
Nikon Z 6 + NIKKOR Z 24-70 mm f/4 – 43 mm -1/640 sec. – f/8 – ISO 100
Having seen these people nearby on the shore, I waited a few minutes. They then moved to the cabin, but as you can see in the previous picture, they stood behind the pillars.
I changed my position again, went back to the left side of the cabin. I was then able to include these people in my frame without the pillars hiding them.
The composition is more interesting, with this long step from the staircase to the hut and this wooden structure very present in the centre of the frame, reinforced by a slight vignetting in post-treatment. However the size of the figures does not satisfy me. They occupy too little space in the picture, are not visible enough, they lose their interest. Another photo that I will not keep.
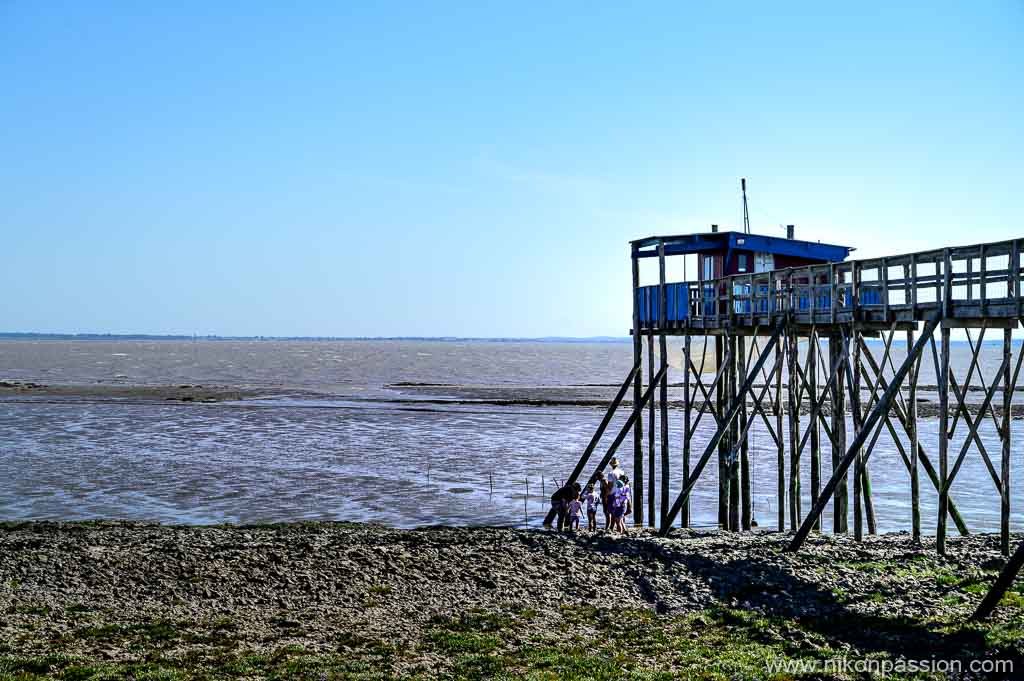
Nikon Z 6 + NIKKOR Z 24-70 mm f/4 – 70 mm -1/800 sec. – f/8 – ISO 100 -1/3 Ev
For this last still wide shot, I tightened the frame around the hut and the people at its feet. These are more visible, positioned in the triangular shape created by the supporting pillars of the hut.
However, I would have preferred these people to move to the left side of the shoreline, then they would have been a complementary element to the hut and would have rebalanced this area of the picture.
Why don’t people ever do what you want them to do! I waited a few more minutes in vain, no way I could get my way.
In the end, this other picture of the same subject is interesting but not my favorite, although I appreciate having a human element in each of my pictures.
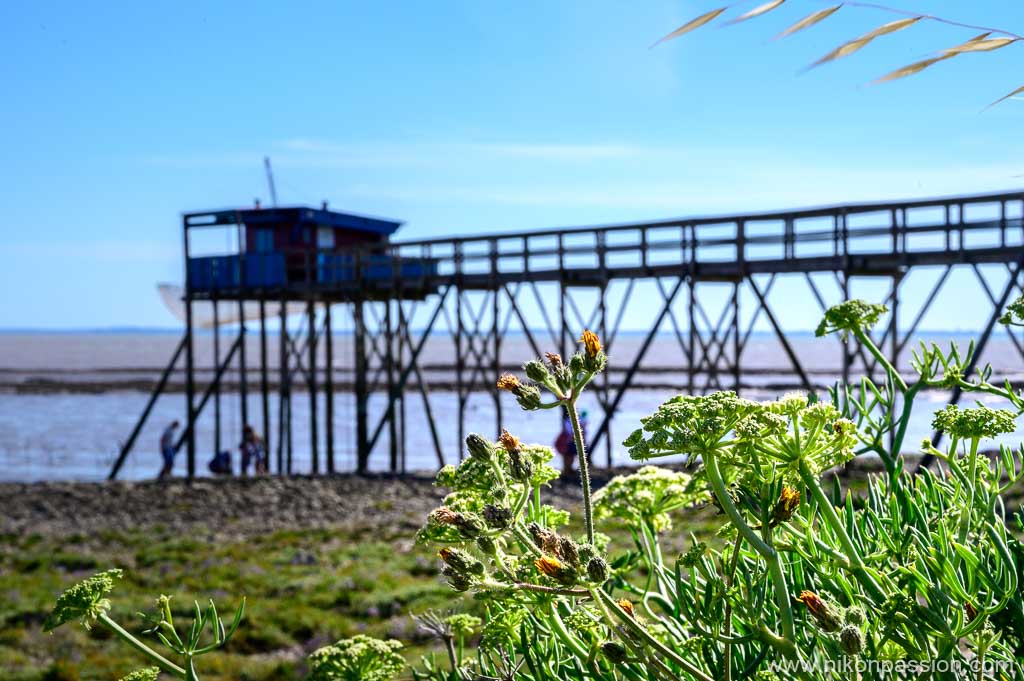
Nikon Z 6 + NIKKOR Z 24-70 mm f/4 – 68 mm -1/250 sec. – f/22 – ISO 280 -1/3 Ev
Since the characters didn’t want to move, I did it. I moved back, bent down, and then I was able to integrate some plants into the frame, in the very foreground. This touch of colour, sharp, while the hut is plunged into the depth of field blur, gives a very different look to the photo.
I was telling you about the choice of subject in the introduction, you see here that there has been a reversal. My subject, the hut, is evoked while the sharpness is set on the plant mass in the foreground. Your subject does not necessarily have to be sharp to be perceived as such.
In the post-treatment, I increased clarity and accentuation to highlight the colours of the plants in the foreground. This creates a visual contrast with the darker blue of the background.
Step back and contextualize
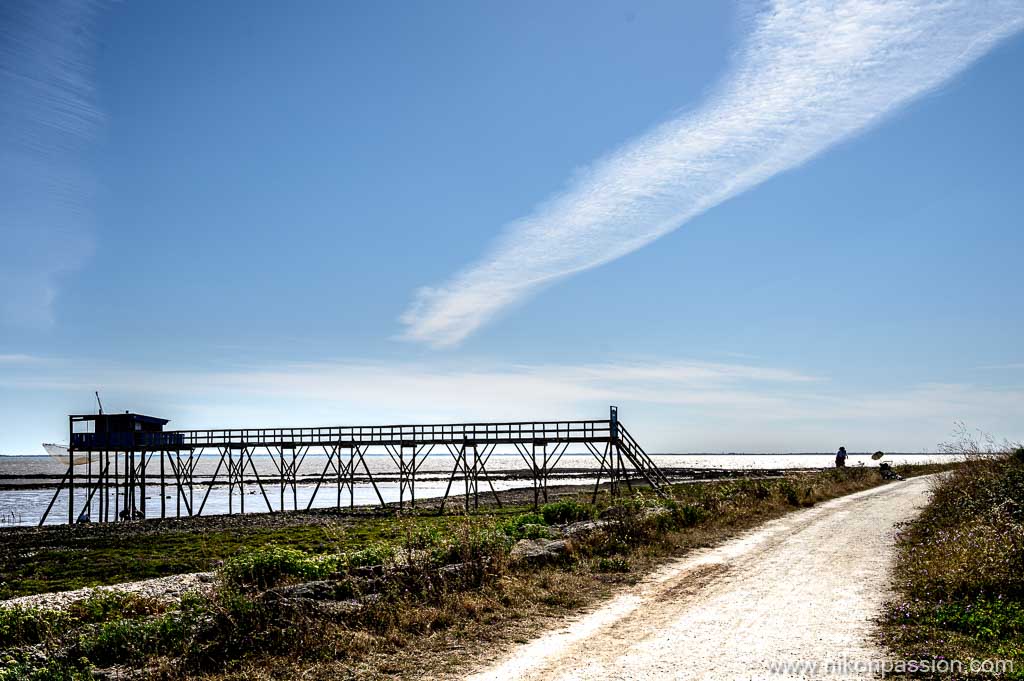
Nikon Z 6 + NIKKOR Z 24-70 mm f/4 – 32 mm -1/1000 sec. – f/8 – ISO 100
For this last picture of the series, I chose to turn around the subject by taking a step back, integrating in my frame both my subject, the hut, a person nearby, and the path on which I was standing.
The sky occupies an important place, a cloud passing by even brought an unexpected touch of graphics to the sky.
When processing the photo, I accentuated the whole, reinforced the colors to have warmer shades in the foreground. I kept the blue of the sky without neglecting my pretty white cloud.
In the end it is this photo that I will keep to illustrate the cabins on Île Madame. It is the one that gives, for me, the best dimension of the subject (the human element gives the scale), places it in its context, on the edge of a path and the water. This is the memory I have kept of this place.
Going around the subject? Your turn!
In conclusion, I would like to encourage you to do more than just take a single photo of your subjects. You should know that photographers who specialize in postcards have done a lot of them before making the right one, why would you do it the first time?
When a subject attracts you, take your time, be patient. Turn around, move around, bend down (the tilt screen on your camera will help), zoom in with your feet. Look for what may be of interest beyond the subject itself.
Contextualize. Feel free to include a human element whenever possible.
Also remember to finish the job by processing your photos to give them the look they deserve.
Making creative photos is all of this at once.
I’m curious to get your opinion, what do you think of this approach? Are you interested in commenting on a series of photos in this way?
To take creative pictures, you don’t always need a new camera or lens. If you already have both, simply identify what you want to photograph and rotate around the subject.
Rather than offering you a long theory on creativity in photography, I have chosen to share a series of images made on Isle Madame, on the Atlantic coast. I present them to you by explaining, as if you were next to me, how I approached the subject, why and how I turned around, and how I arrived at these results.

What is creative photography?
Maybe you think you’re not creative. That you’re making good pictures but not interesting enough. That you’ll never be able to make creative pictures. That’s not true.
A creative, original photo is nothing more than a photo that catches the eye of the viewer. There is something special about it, something that appeals, that expresses an emotion, a desire, that gives pleasure. It can be learned.
To make creative photos is to have these criteria in mind, before shooting, as well as after shooting, since the photographer’s work does not stop with the shot.
Identify a topic you like
To make creative pictures, you need a subject. Not just any subject: a subject you like.
If you don’t like what you photograph, there are few people who don’t like what you photograph either. If you like it and it doesn’t please others, it doesn’t matter, you’re doing the photo for yourself above all (I consider that you don’t respond to a precise order).
I see too many pictures where the subject doesn’t jump out at you. Sometimes there are even several subjects, and my eye doesn’t know which one to focus on. These pictures are not uninteresting, but the whole thing is confusing, the frame is loaded, it’s disturbing. What is disturbing keeps the viewer away.
Filling your frame with a single subject is always a better approach if you don’t master the composition.
Make a first wide shot image

Nikon Z 6 + NIKKOR Z 24-70 mm f/4 – 39 mm -1/1600 sec. – f/8 – ISO 100
In this first picture, I’m quite far from the subject. I do not respect the rule stated above: there are two subjects, two fishermen’s huts, the carrelets of Île Madame.
It is a first approach, I will not retain this photo, but it allowed me to take a stand.
When you talk about your subject, it is important to take such pictures, even if you know you won’t remember them. It’s a warm-up, a way of getting to grips with the subject even when you haven’t yet got around to it.
I didn’t process this photo knowing I wouldn’t keep it, so there’s no point in wasting time.
Turn around the subject, one side…

Nikon Z 6 + NIKKOR Z 24-70 mm f/4 – 70 mm -1/1600 sec. – f/8 – ISO 100
Realizing that two squares was one too many, I shifted. I was then able to frame a single hut, highlighting it in relation to the sky and the horizon, without neglecting the details: the wooden pillars, a few rocks in the water, and wires running from the hut to the ground.
This image is already more interesting, it focuses the gaze on the hut while letting it escape to the horizon in the distance, thanks to a very present light.
…then the other

Nikon Z 6 + NIKKOR Z 24-70 mm f/4 – 34 mm -1/640 sec. – f/8 – ISO 100
A few dozen meters can change everything. For this third view, I went to the other side of the hut. The light is very different, the horizon too, you can see the back of the hut.
The staircase, clearly visible, leads us to the hut that takes us to the horizon. During the post-processing I adjusted the blue tones by working in particular on the darker blue of the hut and the blue of the sky.
I like this picture better than the previous one, its reading direction is more natural. The gaze starts from the left, goes to the center then the right before coming back to the left. This is the usual reading direction in our western culture.
Moving away

Nikon Z 6 + NIKKOR Z 24-70 mm f/4 – 24 mm -1/640 sec. – f/8 – ISO 100
Apart from portrait photography, I’m used to being wary of too tight shots. When I take pictures of nature, landscapes, I like to show the subject in its context.
For this new view, I moved back on the path, even out of it, so as to include the vegetation in the foreground. This allowed me to introduce a touch of green into the image, a color that counterbalances the blue of the hut and the sky, which is very present.
You notice in passing the very peculiar shape of the cloud on the right, it is not a retouch, it is the cloud as I saw it.
I prefer this picture to the previous one, for the context, the treatment of the colors, the light. With hindsight, I should have shifted so that the bottom of the hut is not aligned with the horizon line, so that it stands out from it to create a band of contrast between sky and earth. That would have made a more attractive arrangement.
To rotate around the subject, zoom in with your feet.

Nikon Z 6 + NIKKOR Z 24-70 mm f/4 – 70 mm -1/640 sec. – f/8 – ISO 100
New image and new framing. Here I approached the hut, I “zoomed with my feet”. Having a NIKKOR Z 24-7 mm f/4.0 on my Nikon Z 6, I couldn’t enlarge my subject too much by turning the zoom ring. It’s a bad for a good, zooming with your feet is a better way.

Nikon Z 6 + NIKKOR Z 24-70 mm f/4 – 70 mm -1/500 sec. – f/8 – ISO 100
The following picture highlights the beautiful wooden structure of the staircase and pillars. It is a picture without much interest, documentary at most. It will satisfy the carpenters and sinners but a little less the amateurs of creative photography.
Notice the people under the hut, that’s what I’m going to be interested in for the rest of this series.
Waiting for something to happen
“Photography” should rhyme with “patience.” Turning around is one thing, waiting for something to happen is another.

Nikon Z 6 + NIKKOR Z 24-70 mm f/4 – 43 mm -1/640 sec. – f/8 – ISO 100
Having seen these people nearby on the shore, I waited a few minutes. They then moved to the cabin, but as you can see in the previous picture, they stood behind the pillars.
I changed my position again, went back to the left side of the cabin. I was then able to include these people in my frame without the pillars hiding them.
The composition is more interesting, with this long step from the staircase to the hut and this wooden structure very present in the centre of the frame, reinforced by a slight vignetting in post-treatment. However the size of the figures does not satisfy me. They occupy too little space in the picture, are not visible enough, they lose their interest. Another photo that I will not keep.

Nikon Z 6 + NIKKOR Z 24-70 mm f/4 – 70 mm -1/800 sec. – f/8 – ISO 100 -1/3 Ev
For this last still wide shot, I tightened the frame around the hut and the people at its feet. These are more visible, positioned in the triangular shape created by the supporting pillars of the hut.
However, I would have preferred these people to move to the left side of the shoreline, then they would have been a complementary element to the hut and would have rebalanced this area of the picture.
Why don’t people ever do what you want them to do! I waited a few more minutes in vain, no way I could get my way.
In the end, this other picture of the same subject is interesting but not my favorite, although I appreciate having a human element in each of my pictures.

Nikon Z 6 + NIKKOR Z 24-70 mm f/4 – 68 mm -1/250 sec. – f/22 – ISO 280 -1/3 Ev
Since the characters didn’t want to move, I did it. I moved back, bent down, and then I was able to integrate some plants into the frame, in the very foreground. This touch of colour, sharp, while the hut is plunged into the depth of field blur, gives a very different look to the photo.
I was telling you about the choice of subject in the introduction, you see here that there has been a reversal. My subject, the hut, is evoked while the sharpness is set on the plant mass in the foreground. Your subject does not necessarily have to be sharp to be perceived as such.
In the post-treatment, I increased clarity and accentuation to highlight the colours of the plants in the foreground. This creates a visual contrast with the darker blue of the background.
Step back and contextualize

Nikon Z 6 + NIKKOR Z 24-70 mm f/4 – 32 mm -1/1000 sec. – f/8 – ISO 100
For this last picture of the series, I chose to turn around the subject by taking a step back, integrating in my frame both my subject, the hut, a person nearby, and the path on which I was standing.
The sky occupies an important place, a cloud passing by even brought an unexpected touch of graphics to the sky.
When processing the photo, I accentuated the whole, reinforced the colors to have warmer shades in the foreground. I kept the blue of the sky without neglecting my pretty white cloud.
In the end it is this photo that I will keep to illustrate the cabins on Île Madame. It is the one that gives, for me, the best dimension of the subject (the human element gives the scale), places it in its context, on the edge of a path and the water. This is the memory I have kept of this place.
Going around the subject? Your turn!
In conclusion, I would like to encourage you to do more than just take a single photo of your subjects. You should know that photographers who specialize in postcards have done a lot of them before making the right one, why would you do it the first time?
When a subject attracts you, take your time, be patient. Turn around, move around, bend down (the tilt screen on your camera will help), zoom in with your feet. Look for what may be of interest beyond the subject itself.
Contextualize. Feel free to include a human element whenever possible.
Also remember to finish the job by processing your photos to give them the look they deserve.
Making creative photos is all of this at once.
I’m curious to get your opinion, what do you think of this approach? Are you interested in commenting on a series of photos in this way?
To take creative pictures, you don’t always need a new camera or lens. If you already have both, simply identify what you want to photograph and rotate around the subject.
Rather than offering you a long theory on creativity in photography, I have chosen to share a series of images made on Isle Madame, on the Atlantic coast. I present them to you by explaining, as if you were next to me, how I approached the subject, why and how I turned around, and how I arrived at these results.

What is creative photography?
Maybe you think you’re not creative. That you’re making good pictures but not interesting enough. That you’ll never be able to make creative pictures. That’s not true.
A creative, original photo is nothing more than a photo that catches the eye of the viewer. There is something special about it, something that appeals, that expresses an emotion, a desire, that gives pleasure. It can be learned.
To make creative photos is to have these criteria in mind, before shooting, as well as after shooting, since the photographer’s work does not stop with the shot.
Identify a topic you like
To make creative pictures, you need a subject. Not just any subject: a subject you like.
If you don’t like what you photograph, there are few people who don’t like what you photograph either. If you like it and it doesn’t please others, it doesn’t matter, you’re doing the photo for yourself above all (I consider that you don’t respond to a precise order).
I see too many pictures where the subject doesn’t jump out at you. Sometimes there are even several subjects, and my eye doesn’t know which one to focus on. These pictures are not uninteresting, but the whole thing is confusing, the frame is loaded, it’s disturbing. What is disturbing keeps the viewer away.
Filling your frame with a single subject is always a better approach if you don’t master the composition.
Make a first wide shot image

Nikon Z 6 + NIKKOR Z 24-70 mm f/4 – 39 mm -1/1600 sec. – f/8 – ISO 100
In this first picture, I’m quite far from the subject. I do not respect the rule stated above: there are two subjects, two fishermen’s huts, the carrelets of Île Madame.
It is a first approach, I will not retain this photo, but it allowed me to take a stand.
When you talk about your subject, it is important to take such pictures, even if you know you won’t remember them. It’s a warm-up, a way of getting to grips with the subject even when you haven’t yet got around to it.
I didn’t process this photo knowing I wouldn’t keep it, so there’s no point in wasting time.
Turn around the subject, one side…

Nikon Z 6 + NIKKOR Z 24-70 mm f/4 – 70 mm -1/1600 sec. – f/8 – ISO 100
Realizing that two squares was one too many, I shifted. I was then able to frame a single hut, highlighting it in relation to the sky and the horizon, without neglecting the details: the wooden pillars, a few rocks in the water, and wires running from the hut to the ground.
This image is already more interesting, it focuses the gaze on the hut while letting it escape to the horizon in the distance, thanks to a very present light.
…then the other

Nikon Z 6 + NIKKOR Z 24-70 mm f/4 – 34 mm -1/640 sec. – f/8 – ISO 100
A few dozen meters can change everything. For this third view, I went to the other side of the hut. The light is very different, the horizon too, you can see the back of the hut.
The staircase, clearly visible, leads us to the hut that takes us to the horizon. During the post-processing I adjusted the blue tones by working in particular on the darker blue of the hut and the blue of the sky.
I like this picture better than the previous one, its reading direction is more natural. The gaze starts from the left, goes to the center then the right before coming back to the left. This is the usual reading direction in our western culture.
Moving away

Nikon Z 6 + NIKKOR Z 24-70 mm f/4 – 24 mm -1/640 sec. – f/8 – ISO 100
Apart from portrait photography, I’m used to being wary of too tight shots. When I take pictures of nature, landscapes, I like to show the subject in its context.
For this new view, I moved back on the path, even out of it, so as to include the vegetation in the foreground. This allowed me to introduce a touch of green into the image, a color that counterbalances the blue of the hut and the sky, which is very present.
You notice in passing the very peculiar shape of the cloud on the right, it is not a retouch, it is the cloud as I saw it.
I prefer this picture to the previous one, for the context, the treatment of the colors, the light. With hindsight, I should have shifted so that the bottom of the hut is not aligned with the horizon line, so that it stands out from it to create a band of contrast between sky and earth. That would have made a more attractive arrangement.
To rotate around the subject, zoom in with your feet.

Nikon Z 6 + NIKKOR Z 24-70 mm f/4 – 70 mm -1/640 sec. – f/8 – ISO 100
New image and new framing. Here I approached the hut, I “zoomed with my feet”. Having a NIKKOR Z 24-7 mm f/4.0 on my Nikon Z 6, I couldn’t enlarge my subject too much by turning the zoom ring. It’s a bad for a good, zooming with your feet is a better way.

Nikon Z 6 + NIKKOR Z 24-70 mm f/4 – 70 mm -1/500 sec. – f/8 – ISO 100
The following picture highlights the beautiful wooden structure of the staircase and pillars. It is a picture without much interest, documentary at most. It will satisfy the carpenters and sinners but a little less the amateurs of creative photography.
Notice the people under the hut, that’s what I’m going to be interested in for the rest of this series.
Waiting for something to happen
“Photography” should rhyme with “patience.” Turning around is one thing, waiting for something to happen is another.

Nikon Z 6 + NIKKOR Z 24-70 mm f/4 – 43 mm -1/640 sec. – f/8 – ISO 100
Having seen these people nearby on the shore, I waited a few minutes. They then moved to the cabin, but as you can see in the previous picture, they stood behind the pillars.
I changed my position again, went back to the left side of the cabin. I was then able to include these people in my frame without the pillars hiding them.
The composition is more interesting, with this long step from the staircase to the hut and this wooden structure very present in the centre of the frame, reinforced by a slight vignetting in post-treatment. However the size of the figures does not satisfy me. They occupy too little space in the picture, are not visible enough, they lose their interest. Another photo that I will not keep.

Nikon Z 6 + NIKKOR Z 24-70 mm f/4 – 70 mm -1/800 sec. – f/8 – ISO 100 -1/3 Ev
For this last still wide shot, I tightened the frame around the hut and the people at its feet. These are more visible, positioned in the triangular shape created by the supporting pillars of the hut.
However, I would have preferred these people to move to the left side of the shoreline, then they would have been a complementary element to the hut and would have rebalanced this area of the picture.
Why don’t people ever do what you want them to do! I waited a few more minutes in vain, no way I could get my way.
In the end, this other picture of the same subject is interesting but not my favorite, although I appreciate having a human element in each of my pictures.

Nikon Z 6 + NIKKOR Z 24-70 mm f/4 – 68 mm -1/250 sec. – f/22 – ISO 280 -1/3 Ev
Since the characters didn’t want to move, I did it. I moved back, bent down, and then I was able to integrate some plants into the frame, in the very foreground. This touch of colour, sharp, while the hut is plunged into the depth of field blur, gives a very different look to the photo.
I was telling you about the choice of subject in the introduction, you see here that there has been a reversal. My subject, the hut, is evoked while the sharpness is set on the plant mass in the foreground. Your subject does not necessarily have to be sharp to be perceived as such.
In the post-treatment, I increased clarity and accentuation to highlight the colours of the plants in the foreground. This creates a visual contrast with the darker blue of the background.
Step back and contextualize

Nikon Z 6 + NIKKOR Z 24-70 mm f/4 – 32 mm -1/1000 sec. – f/8 – ISO 100
For this last picture of the series, I chose to turn around the subject by taking a step back, integrating in my frame both my subject, the hut, a person nearby, and the path on which I was standing.
The sky occupies an important place, a cloud passing by even brought an unexpected touch of graphics to the sky.
When processing the photo, I accentuated the whole, reinforced the colors to have warmer shades in the foreground. I kept the blue of the sky without neglecting my pretty white cloud.
In the end it is this photo that I will keep to illustrate the cabins on Île Madame. It is the one that gives, for me, the best dimension of the subject (the human element gives the scale), places it in its context, on the edge of a path and the water. This is the memory I have kept of this place.
Going around the subject? Your turn!
In conclusion, I would like to encourage you to do more than just take a single photo of your subjects. You should know that photographers who specialize in postcards have done a lot of them before making the right one, why would you do it the first time?
When a subject attracts you, take your time, be patient. Turn around, move around, bend down (the tilt screen on your camera will help), zoom in with your feet. Look for what may be of interest beyond the subject itself.
Contextualize. Feel free to include a human element whenever possible.
Also remember to finish the job by processing your photos to give them the look they deserve.
Making creative photos is all of this at once.
I’m curious to get your opinion, what do you think of this approach? Are you interested in commenting on a series of photos in this way?
To take creative pictures, you don’t always need a new camera or lens. If you already have both, simply identify what you want to photograph and rotate around the subject.
Rather than offering you a long theory on creativity in photography, I have chosen to share a series of images made on Isle Madame, on the Atlantic coast. I present them to you by explaining, as if you were next to me, how I approached the subject, why and how I turned around, and how I arrived at these results.

What is creative photography?
Maybe you think you’re not creative. That you’re making good pictures but not interesting enough. That you’ll never be able to make creative pictures. That’s not true.
A creative, original photo is nothing more than a photo that catches the eye of the viewer. There is something special about it, something that appeals, that expresses an emotion, a desire, that gives pleasure. It can be learned.
To make creative photos is to have these criteria in mind, before shooting, as well as after shooting, since the photographer’s work does not stop with the shot.
Identify a topic you like
To make creative pictures, you need a subject. Not just any subject: a subject you like.
If you don’t like what you photograph, there are few people who don’t like what you photograph either. If you like it and it doesn’t please others, it doesn’t matter, you’re doing the photo for yourself above all (I consider that you don’t respond to a precise order).
I see too many pictures where the subject doesn’t jump out at you. Sometimes there are even several subjects, and my eye doesn’t know which one to focus on. These pictures are not uninteresting, but the whole thing is confusing, the frame is loaded, it’s disturbing. What is disturbing keeps the viewer away.
Filling your frame with a single subject is always a better approach if you don’t master the composition.
Make a first wide shot image

Nikon Z 6 + NIKKOR Z 24-70 mm f/4 – 39 mm -1/1600 sec. – f/8 – ISO 100
In this first picture, I’m quite far from the subject. I do not respect the rule stated above: there are two subjects, two fishermen’s huts, the carrelets of Île Madame.
It is a first approach, I will not retain this photo, but it allowed me to take a stand.
When you talk about your subject, it is important to take such pictures, even if you know you won’t remember them. It’s a warm-up, a way of getting to grips with the subject even when you haven’t yet got around to it.
I didn’t process this photo knowing I wouldn’t keep it, so there’s no point in wasting time.
Turn around the subject, one side…

Nikon Z 6 + NIKKOR Z 24-70 mm f/4 – 70 mm -1/1600 sec. – f/8 – ISO 100
Realizing that two squares was one too many, I shifted. I was then able to frame a single hut, highlighting it in relation to the sky and the horizon, without neglecting the details: the wooden pillars, a few rocks in the water, and wires running from the hut to the ground.
This image is already more interesting, it focuses the gaze on the hut while letting it escape to the horizon in the distance, thanks to a very present light.
…then the other

Nikon Z 6 + NIKKOR Z 24-70 mm f/4 – 34 mm -1/640 sec. – f/8 – ISO 100
A few dozen meters can change everything. For this third view, I went to the other side of the hut. The light is very different, the horizon too, you can see the back of the hut.
The staircase, clearly visible, leads us to the hut that takes us to the horizon. During the post-processing I adjusted the blue tones by working in particular on the darker blue of the hut and the blue of the sky.
I like this picture better than the previous one, its reading direction is more natural. The gaze starts from the left, goes to the center then the right before coming back to the left. This is the usual reading direction in our western culture.
Moving away

Nikon Z 6 + NIKKOR Z 24-70 mm f/4 – 24 mm -1/640 sec. – f/8 – ISO 100
Apart from portrait photography, I’m used to being wary of too tight shots. When I take pictures of nature, landscapes, I like to show the subject in its context.
For this new view, I moved back on the path, even out of it, so as to include the vegetation in the foreground. This allowed me to introduce a touch of green into the image, a color that counterbalances the blue of the hut and the sky, which is very present.
You notice in passing the very peculiar shape of the cloud on the right, it is not a retouch, it is the cloud as I saw it.
I prefer this picture to the previous one, for the context, the treatment of the colors, the light. With hindsight, I should have shifted so that the bottom of the hut is not aligned with the horizon line, so that it stands out from it to create a band of contrast between sky and earth. That would have made a more attractive arrangement.
To rotate around the subject, zoom in with your feet.

Nikon Z 6 + NIKKOR Z 24-70 mm f/4 – 70 mm -1/640 sec. – f/8 – ISO 100
New image and new framing. Here I approached the hut, I “zoomed with my feet”. Having a NIKKOR Z 24-7 mm f/4.0 on my Nikon Z 6, I couldn’t enlarge my subject too much by turning the zoom ring. It’s a bad for a good, zooming with your feet is a better way.

Nikon Z 6 + NIKKOR Z 24-70 mm f/4 – 70 mm -1/500 sec. – f/8 – ISO 100
The following picture highlights the beautiful wooden structure of the staircase and pillars. It is a picture without much interest, documentary at most. It will satisfy the carpenters and sinners but a little less the amateurs of creative photography.
Notice the people under the hut, that’s what I’m going to be interested in for the rest of this series.
Waiting for something to happen
“Photography” should rhyme with “patience.” Turning around is one thing, waiting for something to happen is another.

Nikon Z 6 + NIKKOR Z 24-70 mm f/4 – 43 mm -1/640 sec. – f/8 – ISO 100
Having seen these people nearby on the shore, I waited a few minutes. They then moved to the cabin, but as you can see in the previous picture, they stood behind the pillars.
I changed my position again, went back to the left side of the cabin. I was then able to include these people in my frame without the pillars hiding them.
The composition is more interesting, with this long step from the staircase to the hut and this wooden structure very present in the centre of the frame, reinforced by a slight vignetting in post-treatment. However the size of the figures does not satisfy me. They occupy too little space in the picture, are not visible enough, they lose their interest. Another photo that I will not keep.

Nikon Z 6 + NIKKOR Z 24-70 mm f/4 – 70 mm -1/800 sec. – f/8 – ISO 100 -1/3 Ev
For this last still wide shot, I tightened the frame around the hut and the people at its feet. These are more visible, positioned in the triangular shape created by the supporting pillars of the hut.
However, I would have preferred these people to move to the left side of the shoreline, then they would have been a complementary element to the hut and would have rebalanced this area of the picture.
Why don’t people ever do what you want them to do! I waited a few more minutes in vain, no way I could get my way.
In the end, this other picture of the same subject is interesting but not my favorite, although I appreciate having a human element in each of my pictures.

Nikon Z 6 + NIKKOR Z 24-70 mm f/4 – 68 mm -1/250 sec. – f/22 – ISO 280 -1/3 Ev
Since the characters didn’t want to move, I did it. I moved back, bent down, and then I was able to integrate some plants into the frame, in the very foreground. This touch of colour, sharp, while the hut is plunged into the depth of field blur, gives a very different look to the photo.
I was telling you about the choice of subject in the introduction, you see here that there has been a reversal. My subject, the hut, is evoked while the sharpness is set on the plant mass in the foreground. Your subject does not necessarily have to be sharp to be perceived as such.
In the post-treatment, I increased clarity and accentuation to highlight the colours of the plants in the foreground. This creates a visual contrast with the darker blue of the background.
Step back and contextualize

Nikon Z 6 + NIKKOR Z 24-70 mm f/4 – 32 mm -1/1000 sec. – f/8 – ISO 100
For this last picture of the series, I chose to turn around the subject by taking a step back, integrating in my frame both my subject, the hut, a person nearby, and the path on which I was standing.
The sky occupies an important place, a cloud passing by even brought an unexpected touch of graphics to the sky.
When processing the photo, I accentuated the whole, reinforced the colors to have warmer shades in the foreground. I kept the blue of the sky without neglecting my pretty white cloud.
In the end it is this photo that I will keep to illustrate the cabins on Île Madame. It is the one that gives, for me, the best dimension of the subject (the human element gives the scale), places it in its context, on the edge of a path and the water. This is the memory I have kept of this place.
Going around the subject? Your turn!
In conclusion, I would like to encourage you to do more than just take a single photo of your subjects. You should know that photographers who specialize in postcards have done a lot of them before making the right one, why would you do it the first time?
When a subject attracts you, take your time, be patient. Turn around, move around, bend down (the tilt screen on your camera will help), zoom in with your feet. Look for what may be of interest beyond the subject itself.
Contextualize. Feel free to include a human element whenever possible.
Also remember to finish the job by processing your photos to give them the look they deserve.
Making creative photos is all of this at once.
I’m curious to get your opinion, what do you think of this approach? Are you interested in commenting on a series of photos in this way?


![📷 Definitive guide to create photographer logos [2021]](https://big-photography.com/wp-content/uploads/2021/02/logos-de-fotografos-75x75.jpg)
Discussion about this post