Correcting exposure is essential for making original photos. Here’s how to correct exposure on a Nikon SLR and why it’s different from the same setting on a hybrid.

My method to properly display your photos
The principle of exposure metering on a Nikon SLR or hybrid
In photography, correcting the exposure means adjusting the exposure value given by the cell of your camera so that the resulting image suits you better.
To adjust the exposure, your camera offers three settings:
- the opening,
- the exposure time,
- ISO sensitivity.
These three settings combined form what is called the exposure triangle.
Your camera’s light metering module adjusts exposure by automatically adjusting one or more of these three settings, or even all three depending on what you want to achieve. Matrix metering mode covers most situations while spot mode favors a small area in very high contrast situations (learn more about light metering modes).
How to correct exposure on a Nikon SLR or hybrid
To properly adjust the exposure, you may need to modify the exposure value given by your camera. You then apply exposure compensation.
On a Nikon SLR or hybrid, you can correct the exposure using the dedicated button, located on the top of the camera near the shutter release button.

the exposure compensation +/- button of a Nikon SLR or hybrid, and the overexposure indication on the upper screen
Press this button while turning the rear dial, you will then shift the exposure value given by the light measurement module.
You can shift by 1/3, 2/3 or 1 Ev, or even 2 or 3 Ev (learn more about Ev or Stops).
If you correct the exposure in the positive direction, your photo will be brighter (this is the case in the illustration above).
If you correct the exposure in the negative direction, your photo will be darker.
It’s up to you to choose the rendering you like!
Be careful, however, to take into account the limits of your camera’s sensor, and not to saturate the highlights which will be irrecoverable in post-processing. Stick to the limit of the histogram if your intention is to promote them, for example to make the sky blue without it being all white either.
right exposure without saturating whites
Correct exposure with D-Lighting
Your Nikon camera provides an exposure compensation mode for shooting called D-Lighting (Dynamic Lighting). This mode makes it possible to take into account the significant differences in brightness between dark areas and light areas. He can then adjust the exposure setting to adjust it by favoring the foreground and dark areas without saturating the background and light areas (find out more about D-Lighting).

Nikon Z 6 + NIKKOR Z 24-200mm f / 4-6.3 – ISO 320 – 200mm – 1/250 th – f / 6.3
In the photo above the automatic measurement would have given me a brighter sky and birds that were too dark. Correcting the exposure was a way to collect material from the sky without darkening the birds too much. D-Lighting also helped recover material from the sky.
Do some tests to understand how your box reacts and what value of D-Lighting to use, you will have benchmarks.
Correcting exposure: differences between reflex and hybrid
Whether you use an SLR or a hybrid, the principle of light metering, exposure and exposure compensation is the same. The exposure modes are the same. It is the approach to shooting that changes, as well as the implementation of exposure compensation.
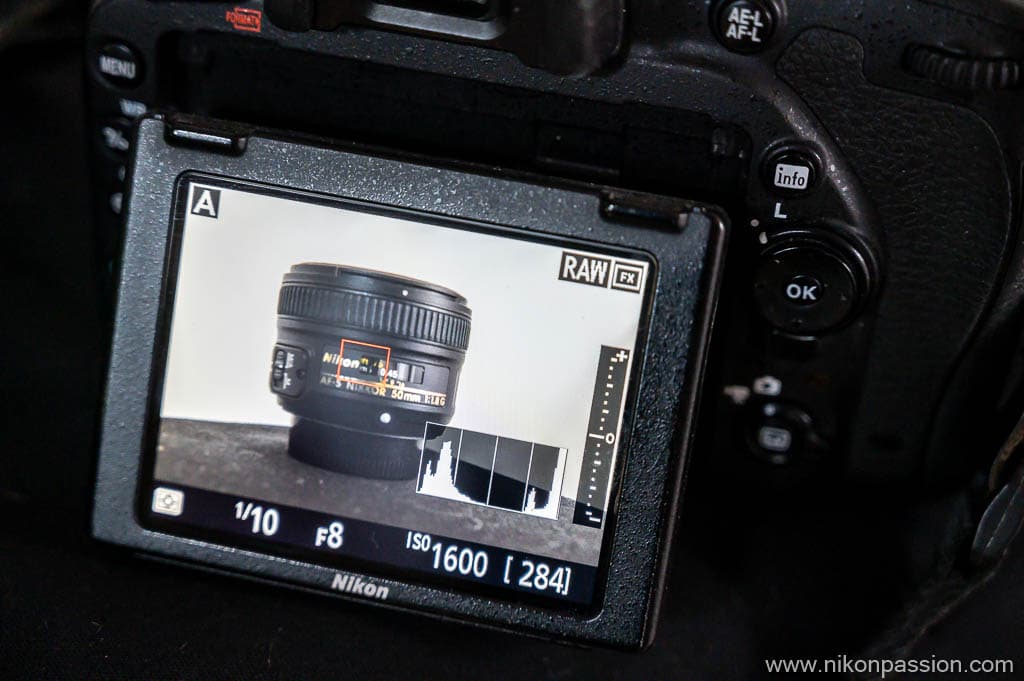
On an SLR, you view the scene through the optical viewfinder, adjust the exposure as described above, then shoot. You can then check the result by viewing the photo on the rear screen, its histogram.
If this result does not suit you, you take the photo again with a different exposure value.

Nikon Z 6II + NIKKOR Z 24-70mm f / 4. S – ISO 110 – 34 mm – 1/250 th – f / 8
exposure compensation -1, 3 Ev
On a hybrid, you always view the scene through the viewfinder, but this being an electronic viewfinder, it displays the final result even before the photo is taken (first activate the “apply settings to live view” function. , d8 or d9 in the personal settings menu). You can also view the histogram in the viewfinder.
All you have to do is correct the exposure and check the result in the viewfinder, then shoot. You know the final photo will be the one you saw before you took it. You don’t have to do it again, or very rarely.
It’s faster and more precise. In addition, some photos cannot be redone (photos taken on the spot), being able to adjust the exposure before shooting is an advantage.
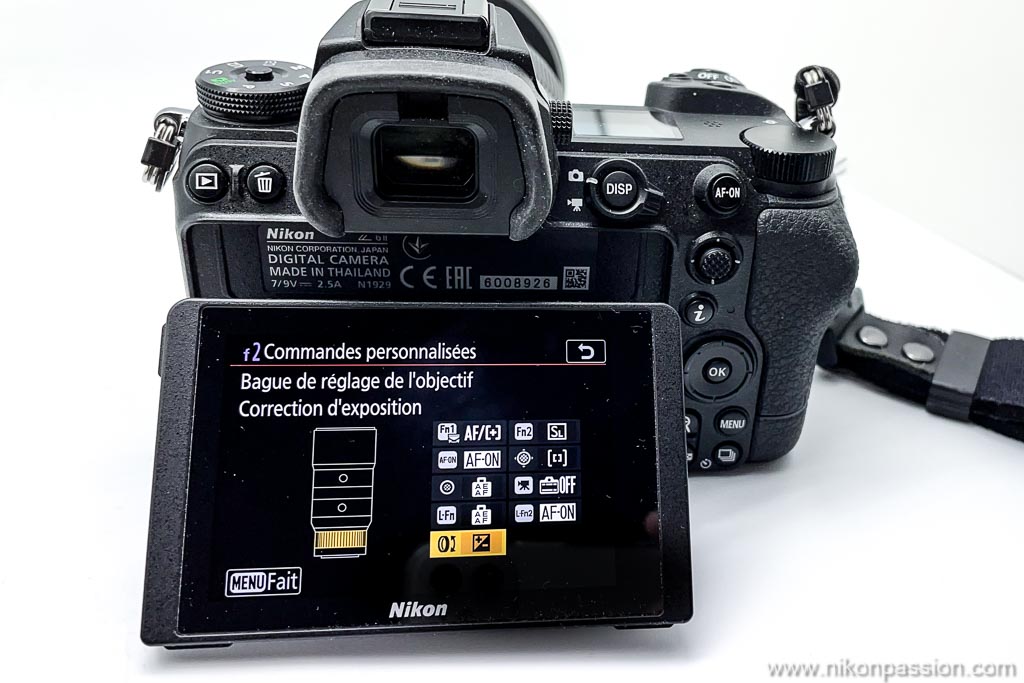
how to correct exposure with the multifunction ring on a Nikon hybrid
On Nikon hybrids, you can use the exposure compensation button and rear dial, just like on an SLR. You can also assign this function to the multifunction ring of your NIKKOR Z lens. You just have to turn it in one direction or the other to underexpose or overexpose very quickly. This is the choice I made and which I find more ergonomic and faster.
Bracketing is not exposure compensation
The bracketing function of your Nikon allows you to take several pictures by shifting, for each frame, the exposure. You then obtain a series of identical images but the rendering of which differs from one image to another. To produce an image with a wide dynamic range, you then need to merge these different exposures using dedicated software. This is the principle of HDR fusion.
This technique, if it gives very good results, is not a real exposure correction but a software treatment to be implemented in specific cases of wide dynamic range.
Correcting exposure, a habit to take
No light measuring system can guarantee you an optimum result in all situations. In addition, you may want to adapt the rendering of your photos, the light metering mode can not guess if you do not tell it.
It is therefore essential to know how to correct the exposure for each of your photos. It has to become a reflex, you have to learn to “feel” the right exposure.
My method to properly display your photos
Correcting exposure is essential for making original photos. Here’s how to correct exposure on a Nikon SLR and why it’s different from the same setting on a hybrid.
My method to properly display your photos
The principle of exposure metering on a Nikon SLR or hybrid
In photography, correcting the exposure means adjusting the exposure value given by the cell of your camera so that the resulting image suits you better.
To adjust the exposure, your camera offers three settings:
- the opening,
- the exposure time,
- ISO sensitivity.
These three settings combined form what is called the exposure triangle.
Your camera’s light metering module adjusts exposure by automatically adjusting one or more of these three settings, or even all three depending on what you want to achieve. Matrix metering mode covers most situations while spot mode favors a small area in very high contrast situations (learn more about light metering modes).
How to correct exposure on a Nikon SLR or hybrid
To properly adjust the exposure, you may need to modify the exposure value given by your camera. You then apply exposure compensation.
On a Nikon SLR or hybrid, you can correct the exposure using the dedicated button, located on the top of the camera near the shutter release button.
the exposure compensation +/- button of a Nikon SLR or hybrid, and the overexposure indication on the upper screen
Press this button while turning the rear dial, you will then shift the exposure value given by the light measurement module.
You can shift by 1/3, 2/3 or 1 Ev, or even 2 or 3 Ev (learn more about Ev or Stops).
If you correct the exposure in the positive direction, your photo will be brighter (this is the case in the illustration above).
If you correct the exposure in the negative direction, your photo will be darker.
It’s up to you to choose the rendering you like!
Be careful, however, to take into account the limits of your camera’s sensor, and not to saturate the highlights which will be irrecoverable in post-processing. Stick to the limit of the histogram if your intention is to promote them, for example to make the sky blue without it being all white either.
right exposure without saturating whites
Correct exposure with D-Lighting
Your Nikon camera provides an exposure compensation mode for shooting called D-Lighting (Dynamic Lighting). This mode makes it possible to take into account the significant differences in brightness between dark areas and light areas. He can then adjust the exposure setting to adjust it by favoring the foreground and dark areas without saturating the background and light areas (find out more about D-Lighting).
Nikon Z 6 + NIKKOR Z 24-200mm f / 4-6.3 – ISO 320 – 200mm – 1/250 th – f / 6.3
In the photo above the automatic measurement would have given me a brighter sky and birds that were too dark. Correcting the exposure was a way to collect material from the sky without darkening the birds too much. D-Lighting also helped recover material from the sky.
Do some tests to understand how your box reacts and what value of D-Lighting to use, you will have benchmarks.
Correcting exposure: differences between reflex and hybrid
Whether you use an SLR or a hybrid, the principle of light metering, exposure and exposure compensation is the same. The exposure modes are the same. It is the approach to shooting that changes, as well as the implementation of exposure compensation.
On an SLR, you view the scene through the optical viewfinder, adjust the exposure as described above, then shoot. You can then check the result by viewing the photo on the rear screen, its histogram.
If this result does not suit you, you take the photo again with a different exposure value.
Nikon Z 6II + NIKKOR Z 24-70mm f / 4. S – ISO 110 – 34 mm – 1/250 th – f / 8
exposure compensation -1, 3 Ev
On a hybrid, you always view the scene through the viewfinder, but this being an electronic viewfinder, it displays the final result even before the photo is taken (first activate the “apply settings to live view” function. , d8 or d9 in the personal settings menu). You can also view the histogram in the viewfinder.
All you have to do is correct the exposure and check the result in the viewfinder, then shoot. You know the final photo will be the one you saw before you took it. You don’t have to do it again, or very rarely.
It’s faster and more precise. In addition, some photos cannot be redone (photos taken on the spot), being able to adjust the exposure before shooting is an advantage.
how to correct exposure with the multifunction ring on a Nikon hybrid
On Nikon hybrids, you can use the exposure compensation button and rear dial, just like on an SLR. You can also assign this function to the multifunction ring of your NIKKOR Z lens. You just have to turn it in one direction or the other to underexpose or overexpose very quickly. This is the choice I made and which I find more ergonomic and faster.
Bracketing is not exposure compensation
The bracketing function of your Nikon allows you to take several pictures by shifting, for each frame, the exposure. You then obtain a series of identical images but the rendering of which differs from one image to another. To produce an image with a wide dynamic range, you then need to merge these different exposures using dedicated software. This is the principle of HDR fusion.
This technique, if it gives very good results, is not a real exposure correction but a software treatment to be implemented in specific cases of wide dynamic range.
Correcting exposure, a habit to take
No light measuring system can guarantee you an optimum result in all situations. In addition, you may want to adapt the rendering of your photos, the light metering mode can not guess if you do not tell it.
It is therefore essential to know how to correct the exposure for each of your photos. It has to become a reflex, you have to learn to “feel” the right exposure.
My method to properly display your photos
![📸 +40 photography phrases [2021]](https://big-photography.com/wp-content/uploads/2021/04/frases-de-fotografia-75x75.png)

Discussion about this post