Your knowledge of the complex mysteries of depth of field is starting to be good: you know what aperture is and you know all the factors that influence depth of field. But in order to use the depth of focus…you were missing one last little explanation.
Pin this article on Pinterest for future reference!
In view of the comments in this last article, I realized that I had not addressed a case enough simple per se, but not necessarily obvious to be understood intuitively, and which requires a renewed emphasis on the clarification.
I had talked about cases where the subject was in the foreground and its environment in the background. But there are cases where your subject will be in the background. backbut where you’ll want to place in the foreground elements in the frame, while losing them in a soft bokeh.
Cleanliness, where does it start and where does it end?
What I think is important to understand is that the sharpness area does not necessarily start in the foreground and end up in the background. It will both ways. Let’s take my example image with the coins:
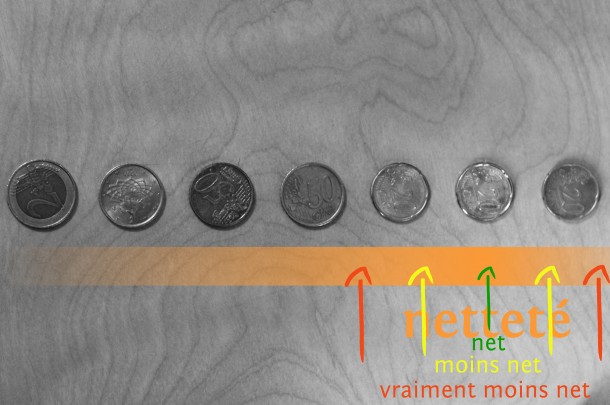
See? Sharpness decreases in both directions, forwards and backwards.
But how do you determine where it starts and where it ends, that sharpness?
Well, it’s dumb to say, but the sharpness is best at thewhere you tuned in and at all places in the image that are exactly the same distance from your camera. Then it gradually decreases depending on your depth of field, which is influenced by all the factors I mentioned in the previous article.
And since the decrease in sharpness will both waysIf you think a little bit about it, you’ll understand how to get a blurred foreground and a sharp background.
Now, think, Darrin…
If you focus on an object in the background, and your depth of field is reduced, then everything in the foreground will be blurred. Example with my friend Jack, who once again graciously lent himself to the game (and with a big smile today!).

IF the same image is taken again but with a smaller aperture (a way ofincrease the depth of field therefore), to f/16 in place of f/2.8you can see Jack better, but he’s still a little blurry.

The double Kisscool effect: when there are more than two shots
Because I like to push you a little bit in your entrenchment and make you think to understand, let’s take a slightly more complicated case: the one where there is a first plan, a second plan and a third plan. So I needed three participants to show you:
- Jack (you will excuse his bad mood on the pictures, he just learned that some of you were not yet subscribed to the newsletter :P)
- Marius the cactus
- Edgar the guitar
All photos were taken at f/1.8.

The focus is on Jack, who is net. Marius is a little fuzzy, and Edgar is very fuzzy. So far, so classic.
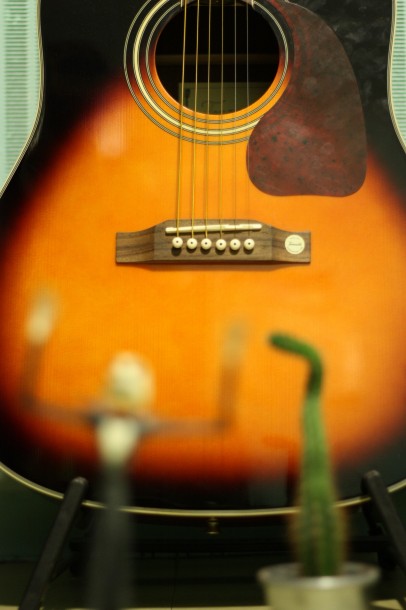
Here the focus is on Edgar. Marius is some fuzzy, and Jack very fuzzy. This corresponds to the previous situation, where the focus was on thebackground with a shallow depth of field, and where the foreground is therefore fuzzy. In the west, nothing new.

And finally, the focus was on Marius. And here we can see that Edgar and Jack are about blurred together. The reason is simple: they’re about equally spaced from the place where I made the focus, namely Marius the cactus. You can see it from above:
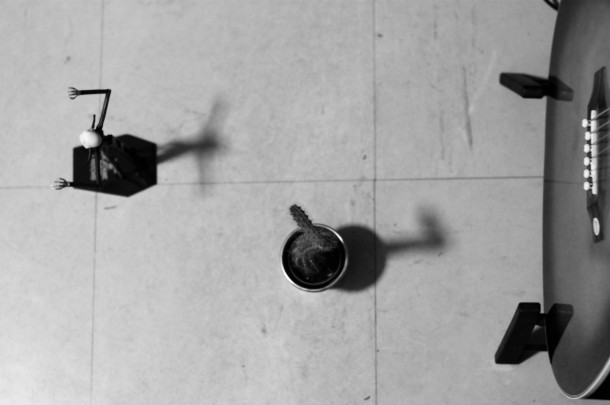
There, you got it? I hope that under this layer of humor, this article will help you understand even better the depth of focuswhich is an essential element in expressing creativity in photography. Especially since there is still one point I talk about in another article: the hyperfocal. But for now, post a comment if you have any questions!
And don’t forget to share the article! 🙂


Discussion about this post