Lightroom Classic uses several types of previews to speed up the display of photos depending on the operation in progress: grid view, full screen magnifier, zoom, development. Do you know which previews to choose according to your uses and your computer? What are 1:1, standard or minimum previews? Smart-previews?
Here are the different Lightroom Classic overviews and how to use them properly.
The different Lightroom Classic overviews: why so many choices?
You may think that implementing different Lightroom previews is making complex what could be simple. A JPG file is displayed everywhere, a RAW file contains a JPG thumbnail, why not make do with these simple displays in Lightroom?
For performance reasons.
Some photo softwares modify the native file when you do a processing operation (Photoshop for example in most cases). Lightroom Classic, on the other hand, does not modify the native file, it applies non-destructive processing, which consists of saving all processing operations one after the other. It shows you the rendering in real time using a preview (see my tutorial Developing a RAW from A to Z).
The native file is never modified, it is not even necessary during development if you have properly managed the Lightroom Classic preferences. It is only at the time of export that Lightroom Classic reads the RAW file, applies the treatments and generates a resulting and exploitable JPG file. The RAW is still not modified. This is the advantage of a catalogue beyond the mere management of photos.
This non-destructive processing requires different Lightroom previews so that the software is as responsive as possible when :
- you display the photos in a grid in the Library module,
- you get a full screen magnifying glass,
- you develop a RAW file,
- you display and/or process the photos in Lightroom Web or on your smartphone/tablet,
- you synchronize photo collections to publish them in your web galleries or on your Adobe Portfolio site (included in the offer).
This display performance can only be achieved by using previews adapted to each operation. Reading the RAW file and displaying the embedded JPG, or worse, converting the RAW on the fly, could not give the same level of performance (this is another one of the problems of Luminar 4 for example).
To use Lightroom in the best conditions, to get the best display performance, you need to manage the right previews. It goes without saying that your computer must be powerful and so must your graphics card. Don’t think about processing 24 or 45 Mp RAW files very quickly with a machine that is several years old and lacks memory and processing capacity.
The Lightroom previews of the Library module
The previews used by the Library module allow you to display photos in different sizes, to zoom, to sort, to index. This module facilitates file management and organization into folders and collections.
When you import your photos into Lightroom Classic, you have to choose which of the 4 options you want to create previews.
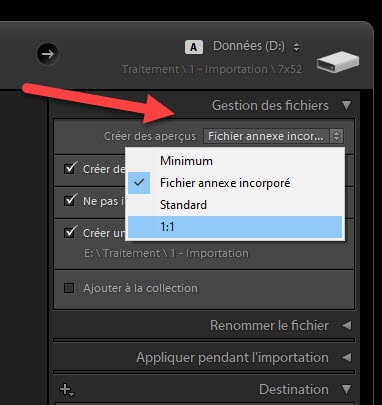
How to choose Lightroom import previews
Minimum overview
This preview takes up little space on the disc, is quick to create but does not give you a quality display when you zoom in on the photo.
Embedded attachment file
This is done by using the JPG file embedded in the RAW file (“appendix”). This preview displays the photo in Lightroom as you see it on your camera screen (with the effect of Picture Control for nikonists).
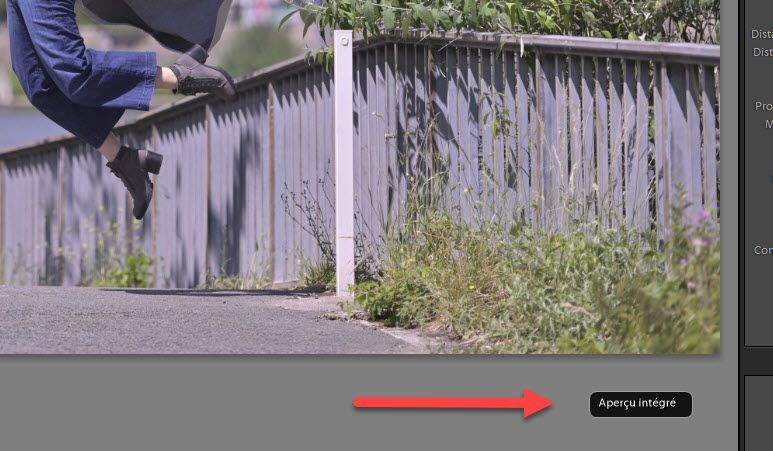
How to view Nikon Picture Control rendering in Lightroom
When you make this choice, Lightroom reminds you of it in the Library module.
Note
These two types of overviews are not enough for Lightroom to do all the processing. They are used temporarily until you switch to the Development module. If you choose either of these previews, Lightroom will generate its own, higher quality previews as soon as it needs them.
I recommend that you use these overviews only if:
- you want to display your photos very quickly after a session,
- you have a low-performance computer.
Standard overview
This preview allows the photo to be displayed in magnifying glass mode, full screen, without the possibility of having a quality display when zooming in.
You can adjust the definition of this preview according to the definition of your computer screen in Lightroom’s preferences.
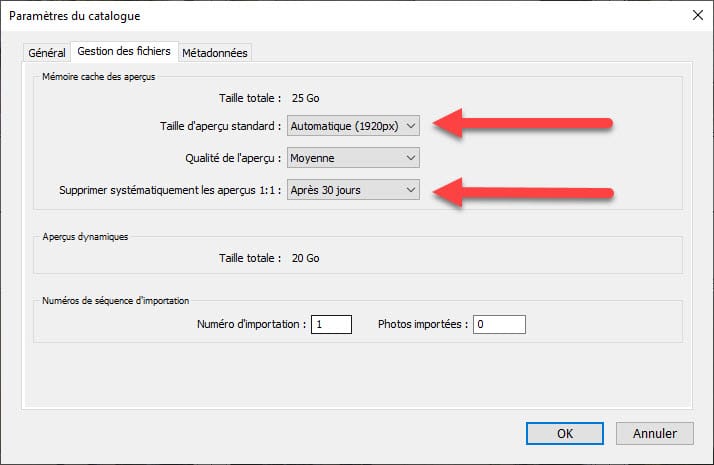
How to choose the size of Lightroom previews
If you don’t know which value to choose, choose “automatic”, the software will calculate the most appropriate value for your configuration.
This preview takes longer to create when importing, but the performance is better once it is available. It is better to lose some time when importing once than to lose time each time you view it later.
Overview 1:1
It is the preview that gives you the best possible display quality and the shortest display time when zooming. This preview displays the photo at 100% without the need for additional computations that are costly in terms of machine resources.
The counterpart is the disk space needed because a 1:1 preview takes up space. To help you manage disk space, Lightroom can do the cleanup for you. Just tell it how long you want to keep these 1:1 previews, choose a time frame that allows you to view your photos and process them. 30 days is a good value.
Dynamic or Smart Preview
This is no longer a simple JPG preview but a new format. A dynamic preview – Smart Preview – is a file with 2540 pixels (for the longest side) that represents the original RAW photo in a highly compressed format. Dynamic Preview is a DNG (Adobe’s RAW standard).
The dynamic preview allows you to process a photo without the need to access the native RAW file, it contains all the information required by Lightroom. This allows you, for example, to process your photos when the drive containing the RAWs is not connected (from a laptop for example). Only the export requires the native format to be read, which is logical.
Dynamic previews are the files used by Lightroom Classic when synchronizing a collection via Adobe Cloud. These are what you see in Lightroom Web just like on your smartphone or tablet. They are also the files that limit the online download limit to 2 MB, as the Adobe Cloud does not store native RAWs with Lightroom Classic.
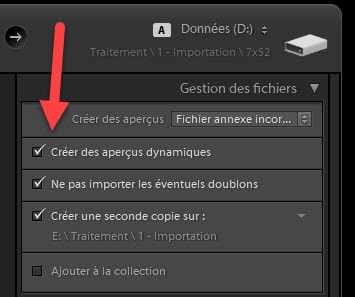
The option to create dynamic previews is available in the import module.
One of the most common uses of dynamic previews is to work remotely from your main computer:
- you select the photos to be processed
- you slip them into a collection
- you sync it to the Adobe cloud
- The photos are then accessible in the Lightroom application on your tablet or laptop.
- the processes performed are synchronized in real time in Adobe Cloud and in your catalog on your desktop computer when you return, you have nothing to update manually.
This saves you from having to carry the hard drive containing your originals, leave it safe at home.
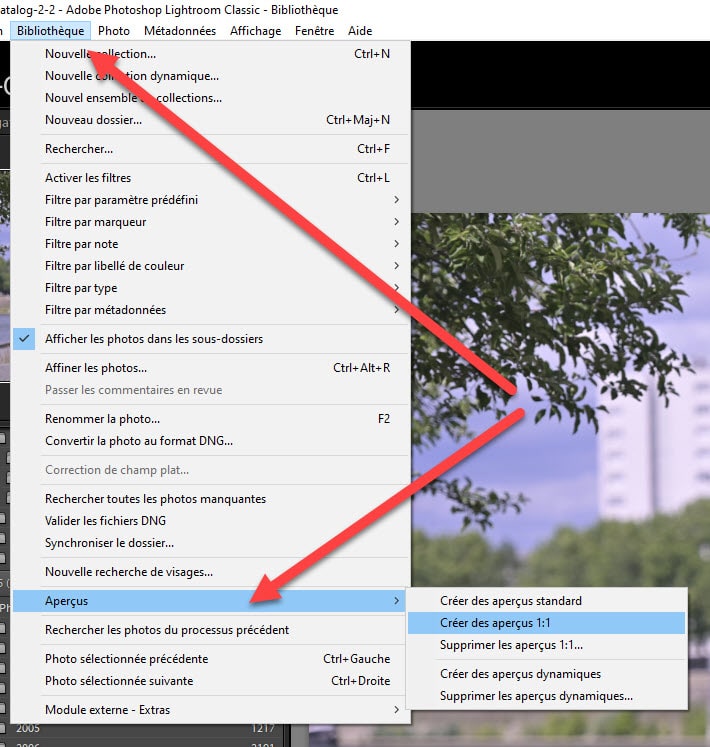
How to recreate Lightroom previews after importing
Note Standard, 1:1 and dynamic previews can be created after import if you change your mind or have forgotten to create them at import. Go to the menu Library > Previews and make your choices.
I recommend you to create dynamic previews by default if you have space on your disk, everything is easier and faster afterwards.
The Lightroom previews of the Development module
You may not know it, but when you switch from the Library module to the Development module, Lightroom Classic changes the preview type to a more qualitative version that allows you to see the impact of your processing operations on your photos.
These development overviews are not stored on your hard disk like the previous ones, they are cached (temporarily) otherwise they would take up too much space on the disk.
The creation of these development previews depends on the type of preview you have chosen in the Library module. If you have created dynamic previews, Lightroom Classic uses them rather than recreating a specific preview for development provided that the disk containing the native RAW file is not connected.
Dynamic previews take up less space than 1:1 previews, allowing Lightroom Classic to run faster in Develop mode, especially if you zoom in on your photos often.
The Lightroom Classic overviews: to finish
You may think that managing Lightroom Classic previews is quite complex and that it escapes you. Remember that you don’t have to choose the type of preview each time you import. Adjust the settings to suit your needs once and for all and let Lightroom Classic handle it on its own afterwards.
If your computer is recent and powerful and you want to have the same rendering on the screen as on your box, use the previews “embedded attachment file” and dynamic previews.
If you do not want to have the same rendering as on the box and you prefer the display speed, choose 1:1 previews and dynamic previews.
If your computer is average, choose the standard import previews and let Lightroom Classic decide the size with the “Automatic” option. Choose dynamic previews to speed up development.
If your computer is low performance and/or lacks memory, an SSD disk and a good graphics card, choose the minimum previews to speed up importing and viewing. You have to accept that you will have to wait when zooming in and out of the image. It may be time to upgrade your computer.
Questions about Lightrom Classic, the previews? That’s what comments are for.
My Lightroom mini-course – 4 video lessons




Discussion about this post